What Steve Eats

  • Recipe Index
  • Spring
  • Drinks
  • Vegetarian
  • Work With Me
  • About
menu icon
go to homepage
  • Recipe Index
  • Spring
  • Drinks
  • Vegetarian
  • Work With Me
  • About
subscribe
search icon
Homepage link
  • Recipe Index
  • Spring
  • Drinks
  • Vegetarian
  • Work With Me
  • About
×
Home

Honey Sriracha Brussels Sprouts

roasted brussels sprouts in a dish

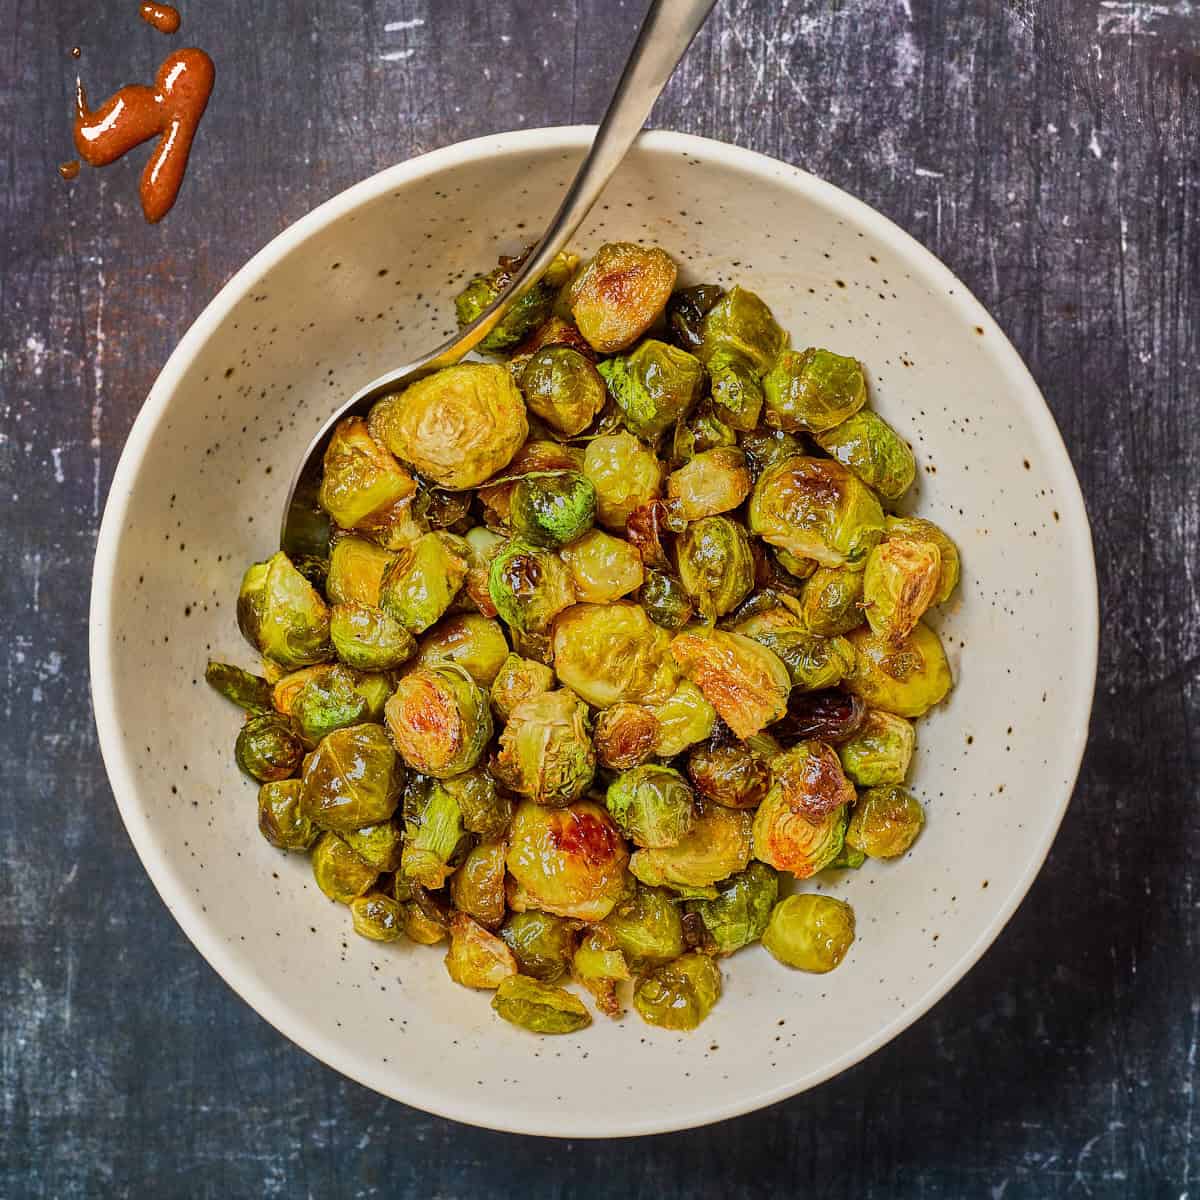
Sweet, spicy and simple, you'll love these honey sriracha brussels sprouts as an easy side dish to share around the table. They're great for everything from weeknights to holidays.

a dish of brussels sprouts with a spoon

I believe Brussels sprouts are truly best when you keep things simple, so that's what I did with these honey sriracha sprouts. Just a few ingredients and no surprises. If you're worried these might be too spicy for you, I think the honey really cuts the heat and they end up well balanced. But you can always reduce the amount of sriracha to your liking.

[feast_advanced_jump_to]

😍 Why You'll Love These Brussels Sprouts

  1. For the tasty balance of spicy and sweet.
  2. Because you only need a few ingredients.
  3. They're easy to make more less spicier to suit your preferences.

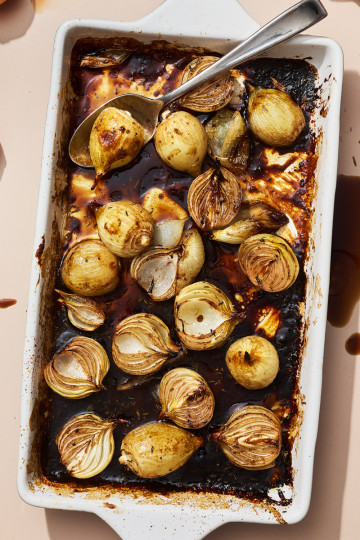
For more tasty vegetable side dishes, try my Roasted Balsamic Onions, Hot Honey Carrots, Mashed Beets, and Pesto Orzo Salad.

🍯 Ingredients

Here's what you need to make this recipe. It's only five ingredients!

ingredients for making brussels sprouts recipe
  • Brussels sprouts: I like to use 1 ½ pounds of Brussels sprouts to serve four people because after trimming them, you do tend to lose a bit of weight. And after cooking, they always shrink down more than I expect. Other recipes may suggest just a pound, and that's fine if that's what you have. You can still make the recipe as is.
  • Honey: For sweetness and caramelization.
  • Sriracha: For a little heat, but not too much.
  • Olive oil: Or your preferred cooking oil.
  • Kosher salt

See the recipe card below for the full list of ingredients and

🥓 Variations & Substitutions

  • More or less spicy: Add another tablespoon of sriracha to make the recipe spicer or cut the the amount of sriracha in half for less spice.
  • Maple sriracha Brussels sprouts: Use an equal amount of maple syrup instead of honey.
  • Garlic: Add a teaspoon of garlic powder when you're mixing the honey and sriracha.
  • Bacon: Toss the cooked sprouts with cooked, crumbled bacon before serving for some extra salty and umami flavor.

🔪 Instructions

How to make these sweet sriracha sprouts.

sprouts being trimmed and cut in half on cutting board
  1. Step 1: Rinse, trim, and halve the Brussels sprouts so that they're all about the same size. Preheat the oven to 400 degrees F.
brussels sprouts being poured onto baking sheet
  1. Step 2: Toss the sprouts with oil and salt in a bowl, then pour them onto a baking sheet lined with parchment paper.
roasted brussels sprouts on a baking sheet
  1. Step 3: Spread the sprouts out across the pan and try not to crowd them. Place the pan in the oven and roast for 15 minutes.
sriracha being poured over sprouts
  1. Step 4: Take the pan out of the oven and pour over the sriracha and honey.
sprouts being tossed on baking sheet
  1. Step 5: Toss well to coat.
roasted sprouts on a baking pan
  1. Step 6: Continue to cook in the oven for another 5 - 10 minutes or until browned and tender. Serve immediately.

🔪 Helpful Tips

  • Make sure your sprouts are all about the same size so that they cook in the same amount of time. You can do this by trimming and halving larger sprouts. Don't forget to slice off the very bottoms of the sprouts as well, as they're a bit tough. Here's a quick video on how to trim sprouts.
  • Don't crowd the pan. When foods are placed too closely together they tend to steam and the heat can't get all around them to create those nice crispy bits.
  • If you do want more cirspy browned sprouts, take the time to arrange them cut side down on the baking tray before cooking.

🥡 Storage and Reheating

Enjoy these Brussels sprouts within 2-3 days. They will become soft after being stored in the fridge, so they really are best the day they're made. For reheating, I suggest gently heating them in the oven or in a pan on top of the stove. The microwave will make them extra mushy.

🙋🏽‍♀️ FAQ

What season is best for Brussels sprouts?

Fall and early winter are the best times of year to enjoy Brussels sprouts because that is when the majority of them are harvested in the northern hemisphere.

What is the trick with Brussels sprouts?

A couple of tricks with Brussels sprouts are to use high heat and avoid crowing your pan, whether you're roasting or sauteeing them. Higher heat leads to crispy sprouts and spacing them out ensures they won't steam as they cook.

What pairs well with Brussels sprouts?

Brussels sprouts can be a little bitter at times. Try pairing them with sweeter foods like roasted sweet potatoes or winter squash, adding dried fruits like cranberries to your dish, or using a sweeteners like honey or maple syrup.

How do you remove bugs from Brussels sprouts?

Give them a brief soak in a bowl of water with a splash of vinegar for about 10 minutes. Then remove from the water and rinse.

🍴 Pairing

  • stuffing in muffin tin
    Cranberry Walnut Stuffing
  • plate of roasted pumpkin wedges
    Maple Roasted Pumpkin
  • a pan of chicken and rice with cardamom and parsley
    Cardamom Chicken and Rice
  • Red Wine Beef Stew

🥬 Related Recipes

  • a bowl of couscous with pumpking and cranberry
    Pumpkin Couscous Salad
  • a plate of sweet potatoes and green beans with pecans and butter
    One Pan Sweet Potatoes and Green Beans
  • roasted jalapenos on a baking sheet
    Oven Roasted Jalapeños
  • a galette of swiss chard and kale leaves baked on a cutting board
    Kale and Swiss Chard Galette

Cranberry White Chocolate Tart

slices of cranberry tart

Fresh cranberry curd is paired with a buttery tart crust and real white chocolate in this easy, yet totally impressive, cranberry white chocolate tart.

cranberry tart cut up and put on plates

Cranberries are fall's take on lemons. Though one is a berry and the other a citrus, I think the two are more alike than not when it comes to desserts. They both have a pleasant sourness that counters well with the sweetness. Many other fruits (excluding citrus, in general) are high in natural sugars, and it's easy to find yourself with an overwhelmingly sweet fruit dessert.

[feast_advanced_jump_to]

I love lemon curd and lemon meringue pie. I also love cranberries. Naturally, cranberries work well in instances where we more commonly use lemons, such as in tarts. So when I saw the idea of using cranberries to make curd, much like you make lemon curd, I was intrigued.

The nice thing about using cranberries for something like a curd is that they're naturally high in pectin, which means they'll set up well. Because of this, you don't need quite so many eggs or thickeners as you do when making lemon curd. It also allows for a cleaner cranberry flavor to come through since you don't have to muddle it up with stabilizing ingredients. On another note, with all of that pectin, cranberries make excellent jams and jellies in case you've never given that a try.

I found myself adding white chocolate to this cranberry tart because it too is an underutilized ingredient, yet a good one for the holiday season. Unlike dark or milk chocolate, I think white chocolate is a flavor that needs a strong compliment. I don't care for it on its own, but in the case of this tart, where you create a white chocolate layer over the bottom crust, and then use some more for decorating the top of the tart, I think it works. The subtle buttery and milky notes of the white chocolate complement the sharpness of the cranberry curd rather well.

When buying white chocolate, keep an eye out for the real deal. Many brands create products that look like white chocolate but lack the essential ingredient - cocoa butter. In the United States, white chocolate must contain at least twenty percent cocoa fat, and that's why many product labels don't explicitly call themselves such.

If cocoa butter isn't on the ingredient list, and the label doesn't clearly say "white chocolate," I won't buy it. Here's a great breakdown of what to look for with white chocolate. As you can see, for this recipe I used Baker's white chocolate which contains cocoa butter, sugar and milk at the top of its short ingredient list.

📋 Ingredients

ingredients for the tart spread out and ready for baking

Key ingredients for this cranberry white chocolate tart include:

  • cranberries (fresh or frozen)
  • white chocolate (the real stuff)
  • flour
  • almond flour
  • butter
  • eggs
  • sugar
  • orange juice
  • corn starch

Note: I like the nuttiness that the almond flour adds to the crust. But if you don't have almond flour handy, you can replace it with additional all-purpose flour.

For the full ingredient list, see the recipe card below.

⏲️ Instructions

baker's white chocolate melted over the tart crust

There are some steps to making this cranberry white chocolate tart, but nothing about it is difficult. There are just some periods of chilling that really take up the bulk of the time. You'll want to plan ahead, perhaps overnight, to make this tart without much hassle.

You start by making the dough. I do this by hand, working in the butter into the dry ingredients with my fingers. If you'd rather use a food processor and have another thing to clean, that works too.

When the dough has come together, you simply press it into your pan. (See my tip below about tart pans.) You want the dough to come up the side of the pan about an inch in order for it to hold the curd. You then put the crust in the freezer to chill out before baking for a total of about 25 minutes.

As soon as the crust is out of the oven, scatter over your white chocolate and let it melt. Use a spatula to spread it across the crust, which will form a thin crunchy candy coating. I think it makes the tart more fun, as you're not expecting that bite of white chocolate when you're eating the tart.

Next up, you cook the cranberries in a small pot, almost as if you were making cranberry sauce. But you then turn it into a puree with a stick blender or food processor. Really, a stick blender makes it so easy because you can do it right in the pot. After adding some eggs and butter and giving it all a chill, you have yourself cranberry curd.

The curd goes in the crust and then you need to let it chill again for it to set for a couple of hours or more. It should have a little wiggle to it, but shouldn't be watery. Finish it off with some white chocolate decoration and you're good to go.

💭 Helpful tips

  • Don't skip chilling the tart dough, as this helps to firm it up and prevent it from spreading during baking. If you're not in a hurry, you can put the dough in the fridge, instead of the freezer, until ready to use.
  • It turns out that not only do I not have a tart pan, I couldn't find a decent one locally. If you don't have one either, don't let that stop you. A springform pan with a bottom that pops out works great. A pie pan will also do the job fine. There is no sense in going to buy a pan if you'll only use it on occassion.
  • For that zig zaggy look with the white chocolate on top, I put my melted white chocolate in a squeeze bottle and squeezed a row of lines across the tart. Then, I used the back of a butter knife to make a slightly indented lines running through the white chocolate in the opposite direction. I alternated the direction I moved my knife from line to line so that the white chocolate was spread from one way to the other.

🥧 Storage

This tart will keep for 3-4 days wrapped and stored in the fridge. Though of course, it's best eaten within a day or two.

🍫 Variations

Cranberry Dark Chocolate Tart - If white chocolate isn't your thing, I think this tart would also be delicious with dark chocolate. If you try that, let me know in the comments below.

🥄 Other cranberry recipes to try

If you like this cranberry white chocolate tart, check out my other cranberry recipes:

  • Homemade Cranberry Sauce with Orange
  • Stuffed Yorkshire Pudding
  • Walnut Cranberry Stuffing
  • Cranberry Orange Mocktail

Cranberry Walnut Stuffing

stuffing in muffin tin

In this cranberry walnut stuffing recipe, nuts and dried fruit add crunch and a bit of sweetness to a simple recipe perfect for Thanksgiving or any meal shared with family and friends.

muffin tin with stuffing and cranberries

Stuffing may be my favorite part of Thanksgiving dinner. You can pair it with any other dish on the table and always have a savory bite of deliciousness on your fork. There are so many different ways to flavor stuffing by mixing in your favorite additions, so it never gets boring. Not to mention - there are so many fun ways to use the leftovers!

😍 Why you'll like this stuffing

  1. The base of the recipe may be a box of stuffing mix, but the added vegetables, walnuts, and cranberries ensure it tastes fresh and homemade.
  2. When you use a muffin tin, the stuffing is preportioned and easy to serve. This is a tip I picked up years ago from Rachael Ray.
  3. Not a fan of walnuts and cranberries? It's easy to swap the nuts and dried fruit with others of your choosing.
[feast_advanced_jump_to]

🥕 Ingredients

Here's everything you need for this walnut cranberry stuffing recipe.

ingredients for making stuffing on a white wood background

Key Ingredients

  • Stuffing mix: To make this stuffing quick and easy, we'll use a store-bought stuffing mix enhanced with fresh vegetables, nuts, and dried cranberries. Any 10-12 ounce package of stuffing will work. To use fresh bread or bread cubes, see the note below under variations.
  • Carrots, celery, and onion: The classic vegetable combo for building great flavor, often referred to as the French term "mirepoix." They're essential to most soups, stews, and, in my opinion, stuffing, too.
  • Walnuts and cranberries: The stars of the dish, adding sweetness, tartness, and crunch. Its a great fall combo and nice way to dress up the stuffing to make it special.
  • Broth: For hydrating the stuffing. Any chicken, turkey, or vegetable broth is fine.

See the recipe card below for the complete list of ingredients and quantities.

📋 Substitutions & Variations

  • Add apples: Walnuts, cranberries, and apples add a great flavor to stuffing. After you saute the vegetables, add one cup of chopped and peeled apples.
  • Experiment with other nuts and dried fruits: Walnuts and cranberries are just one combination of nuts and dried fruits that could work in the stuffing. For other nuts, try pecans, cashews, or almonds. For dried fruits, try figs, apricots, raisins, or plums.
  • Include more fresh herbs:  Many stuffing mixes include added spices, but if you like things with a more herby punch, or if you have herbs from your garden you'd like to include, add a couple of teaspoons of each chopped sage, rosemary, and thyme when you cook the vegetables.
  • To make it extra crispy: add small pieces of butter around the tops of the stuffing before baking. This will melt and crisp up the bread even more during cooking.

🍞 How to make this stuffing using fresh bread

If you'd rather skip the box of stuffing mix and use a loaf of bread, I get it. I often take the approach myself. Here's what to do:

  • Use a hearty loaf of bread with a firm texture. A soft sandwich bread may not be ideal. You'll need about 1 ½ pounds.
  • Slice your bread, then cut each slice into roughly half inch pieces. Toss on a baking sheet with a drizzle of oil, about 1 teaspoon of salt, ½ teaspoon of pepper, and 1-2 teaspoons of a seasoning blend such as poultry spice or a couple tablespoons of chopped fresh herbs like rosemary, sage, and thyme.
  • Bake the bread cubes for about 15 - 20 minutes at 300°F until crispy and dry.
  • Proceed with the stuffing recipe as written, using the toasted cubes in place of the stuffing mix. You will likely need to adjust the amount of broth depending on how much your bread cubes absorb when mixing.

🔪 Instructions

How to make cranberry stuffing with walnuts.

chopped vegetables on a cutting board
  1. Step 1: Chop the celery, carrots, and onion. Preheat the oven to 375 degrees F.
vegetables sauteeing in a pan
  1. Step 2: Saute the vegetables in butter until soft.
parsley being chopped on cutting board
  1. Step 3: While the veg cooks, chop the parsley.
breadcrumbs being stirring in pot
  1. Step 4: Stir the stuffing breadcrumbs into the pot and toss well.
cranberries being added to stuffing pot
  1. Step 5: Add in the cranberries.
walnuts being added to pot of stuffing
  1. Step 6: And then the walnuts.
broth being poured into the pot of stuffing
  1. Step 7: Pour in the broth and the beaten egg.
tossing stuffing ingredients in a pot
  1. Step 8: Finally, add the parsley and toss everything together to coat.
stuffing scooped into muffin tin
  1. Step 9: Scoop the stuffing into a greased muffin tin or casserole dish.
stuffing scooped into muffin tin to bake
  1. Step 10: Bake the stuffing for 20-25 minutes until browned and crispy. Serve warm or at room temp.

✨ Top Stuffing Tips

  • You may need more or less broth to hydrate the stuffing mix. That's why it is a good idea to add a little at a time, stir, and determine if you need more.
  • Tasting the stuffing before mixing in the egg is the best way to determine if your stuffing needs any extra seasoning. The flavor of stuffing mix varies.

🥡 Storage

Fridge: Store leftover stuffing in an airtight container in the refrigerator for up to four days.
Reheating: For the best crispness, reheat stuffing in the oven at 300 degrees F until warm, about 10 minutes. Of course, a microwave may also be used, but it will not be crispy.

🍳 How to Reuse Leftover Stuffing

Leftover stuffing is such a good vehicle for crafting new meals and serving other leftovers. That's why I always make extra. Here are a few of my favorite ideas:

  • Stuffing waffles: Spread leftover stuffing in a waffle maker and cook until crispy.
  • Crispy stuffing cakes: Flatten small portions of stuffing and fry in a pan with a little oil until hot and crisp. Use as a base for serving leftover turkey and gravy.
  • Stuffing dumplings: Shape the leftover stuffing into small balls (add a splash or two of broth if dry) and add them to your turkey soup towards the end of the cooking. Simmer until they're hot.
  • Stuffing egg cups: Good for breakfast the next day. Soften leftover stuffing with broth and press into greased muffin tin cups to form a cup. Crack in an egg, top with cheese, and bake at 350 until the egg is set, about 15 minutes.

Here are even more ideas for leftover stuffing.

🙋🏼‍♂️ FAQ

Why do you make stuffing in a muffin tin?

Stuffing made in a muffin tin is preportioned and easy to serve, plus you get more crispy pieces, which is everyone's favorite part.

Why is my stuffing gummy?

Gummy stuffy is a result of overmixing and using too much broth. YYou only need to toss the stuffing ingredients enough to combine and hydrate the bread with the broth. It shouldn't be the consistency of mashed potatoes.

What do Northerners call stuffing?

I've lived in New England my entire life and I've always referred to stuffing as stuffing regardless of whether it is cooked inside of a turkey.

Why does stuffing taste so good?

Stuffing is so good because it is primarily made up of dried bread that rehydrates and absorbs flavor from butter, broth, and vegetables. When baked, the top gets crispy while the inside remains moist. It's the combination of flavorful bread with these appealing textures.

🥔 Pairing

Try pairing this stuffing with these recipes:

  • plate of roasted pumpkin wedges
    Maple Roasted Pumpkin
  • a plate of colorful roasted leeks and potatoes
    Roasted Potatoes and Leeks
  • plate of roasted asparagus and carrots with breadcrumbs and parsley
    Roasted Carrots and Asparagus
  • a serving dish on a wooden table filled with cabbage, apples, and walnuts
    Instant Pot Red Cabbage with Apples

🫐 Related Recipes

For more cranberry recipes, check out these:

  • cranberry ginger bread sliced on cutting board
    Cranberry Gingerbread Loaf
  • slices of cranberry tart
    Cranberry White Chocolate Tart
  • a tray of sausage stuffed yorkshire puddings
    Stuffed Yorkshire Pudding
  • bowl of cranberry sauce with orange
    Cranberry Sauce with Mandarin Orange

Lentil and Rice Soup

bowls of lentil and rice soup

This healthy lentil and rice soup is the perfect homemade comfort food. All you need are some common pantry staples and a few vegetables for a flavorful soup in no time.

bowls of lentil soup on a table with pita bread

I'll always think of my grandmother when I make lentil soup. She always seemed to have some ready when I stopped by for lunch. Sometimes it was homemade. At other times, it was from a can with some of her own vegetables and spices added. Either way, it was good with me.

[feast_advanced_jump_to]

😍 Why You'll Love This Recipe

  1. It's made with simple ingredients.
  2. It cooks in less than an hour.
  3. It's perfect comfort food.

When making this recipe, I thought back to my grandmother's version. I don't have the recipe for her homemade version, though I wonder if she even had a recipe, anyway. It could very likely have been from the bag of dried lentils. Instead, I thought about how she might include what she already had in the kitchen, and I grabbed tomatoes and greens from my garden, along with ham from the freezer.

I also thought about the spices she would use. She didn't cook with many fresh herbs, and my grandfather wasn't an adventurous eater. Yet I remember a bottle of Mrs. Dash seasoning often being on the table.

I looked up what's in that blend, as I can't say I've ever bought it. It's a combination of a long list of herbs and spices, and I chose a variety from my spice drawer to try to replicate the flavor. It adds a complex earthiness to the soup with just a hint of heat from the cayenne. You may have most of these already in your spice collection. If not, use those you do have. Or if you have a favorite all-purpose seasoning, that will also do the trick.

🥕 Key Ingredients

Here's what you need to make this lentil and rice soup.

a plate of chopped carrots, onions, garlic and tomatoes
  • Onions
  • Carrots
  • Celery
  • Garlic
  • Vegetable broth
  • Brown lentils: Lentils are the oldest pulses (legumes grown for their dried seeds) known to humans. The common lentil variety is tiny and brown, so they're easy to overlook when you're looking for something fun and flavorful. Though tiny, they're filling, and even better, they cook quickly, too. Unlike many other beans, there's no need to soak lentils beforehand. There are also dozens of varieties that range in color from black to yellow. Though if you ask me, you can't go wrong with the standard brown lentil.
  • Short-grain white rice, such as Arborio
  • Tomatoes
  • Ham steak (optional)
  • Greens, such as spinach, Swiss chard, or kale

Refer to the recipe card below for the quantities and a complete list of ingredients. For another tasty lentil recipe, try my Kale and Lentil Salad.

🔪 How to Make Lentil and Rice Soup

If you've ever made a soup before, this will be easy. Start by chopping up the vegetables and then sauteing them in a pot. Add in the spices, and deglaze with some wine. After adding the broth and other ingredients, the mixture simmers until everything is cooked through.

Before serving, adjust the seasonings and add a splash of lemon juice, if desired.

🧂 Substitutions & Variations

chopped ham with lentils and rice

This lentil and rice soup is easy to make your own. You can leave out the ham to keep the soup vegetarian. As for the spices, you could simplify those as well.

  • Lentils - You can try other lentils aside from the typical brown, keeping in mind they may take more or less time to cook. Here's a helpful resource on cooking different kinds of lentils.
  • White Rice - Want to try barley or maybe bulgur instead of rice? Another rice? No problem, just check the typical cooking time of the grain to see how much you should simmer the soup before it's tender. Brown lentils need 20 minutes or more until they're tender, so you'll want to add your grain to the soup accordingly.
  • Ham - Leave out the ham and this lentil soup is vegan. Or if you have already cooked turkey or chicken, you can chop that up and use it instead.

💬 Lentil and Rice Soup FAQs

Should you soak lentils before making soup?

There's no need to soak lentils for cooking soup. Lentils cook fast and will be tender after a short simmer in the soup pot. However, people say that soaking lentils (and legumes, in general) make them easier to digest and produces less gas. If you do soak them, you may find you don't need to simmer the soup as long.

Can you overcook lentil soup?

You can overcook lentils to the point that they become mushy. However, this isn't necessarily a bad thing, especially in a soup.

How long does this lentil soup last?

Lentil soup reheats well, freezes well, and is easy to double if you want to stretch it out to feed more people or have meals to enjoy throughout the week. It will last approximately four days in the fridge when stored in an airtight container.

If you know you'll want to freeze the leftovers of this soup before you start cooking, I suggest cooking and freezing the rice separately and then adding it in when serving. Otherwise, the rice will become mushy. Here are some good soup freezing tips if you want to learn more.

🍞Pairing

Try any of these recipes with this lentil soup:

  • pieces of squash tartlets with apple
    Squash Tartlets
  • a hand serving a cider cocktail
    Apple Cider Whiskey Cocktail
  • a delicata pizza on parchment paper
    Delicata Pizza with Ricotta and Bacon
  • cheese scones on plate with chives
    Easy Cheese and Chive Scones

🍲 Related

Looking for more tasty soup recipes like this one? Try these next:

  • a bowl of soup with celery and leeks, and potatoes
    Creamy Celery Leek Soup with Croutons
  • bowls of borscht with eggs and sour cream
    Easy Vegetarian Borscht (Beet Soup)
  • bowls of seafood soup
    Creamy Seafood Newburg Soup
  • bowl of butternut chicken soup
    Butternut Squash Chicken Soup

Apple Cider Whiskey Cocktail

a hand serving a cider cocktail

This cozy Apple Cider Whiskey Cocktail combines the warmth of bourbon with the crispness of apple cider, balanced by a touch of maple syrup and a splash of lemon juice. Perfect for fall, it's a rich, comforting drink to enjoy throughout the season.

cinnamon sugar sprinkled over apple cider cocktail

Why You'll Love This Cocktail Recipe

  1. You can't beat the combination of bourbon's oaky, vanilla, and warm spice notes with the deep, rich apple flavors of fresh cider. It's like fall in a glass!
  2. The spicy, sweet cinnamon sugar rim makes a fun and festive garnish for your glass.
  3. Whether you're making one cocktail or several, all you have to do is stir the ingredients together in the glass.

For more creative cocktail recipes made with fresh ingredients, check out my Ginger Rhubarb Gin Cocktail, Pomegranate Rosemary Cocktail, and Blackcurrant Mojito. If you like whiskey drinks, you'll also enjoy this Cherry Whiskey Sour.

[feast_advanced_jump_to]

🍏 Ingredients

Here's everything you need to make an apple cider whiskey cocktail:

bottles of ingredients, apple, lemon, cinnamon
  • Bourbon Whiskey - A good bourbon with notes of oak, caramel, and vanilla will pair nicely with the cider's sweet, deep apple flavor. Use whichever bourbon you prefer. The Rebel 100 Kentucky Straight Bourbon Whiskey is one good option.
  • Apple Cider - This beverage's base is freshly pressed apple cider from a local orchard. Make sure to use cider, not juice, which is too sweet and lacks flavor. I don't mean hard cider, either.
  • Maple Syrup - Adds complex sweetness and flavor.
  • Lemon juice - Fresh lemon juice adds a little tartness to help balance the cocktail.
  • Sugar - To make a cinnamon sugar rim on the glass.
  • Cinnamon and cinnamon sticks - Used for making the cinnamon sugar rim and to garnish the cocktail.
  • Apple - For slicing and serving as a cocktail garnish.

See the recipe card below for the full list of ingredients and quantities.

🍯 Substitutions and Variations

  • Garnishes - This drink has a few garnishes - a cinnamon stick, a slice of apple, and a cinnamon sugar rim. You can leave out any or all of these as you like.
  • Sweetness - If you would like a less sweet cocktail, you can leave out the maple syrup or reduce it to ½ ounce. Or if maple syrup isn't handy, try honey instead.
  • Bitters - If you have bitters, a few dashes would be a nice addition to the cocktail.
  • Make a batch of cocktails - Prep the cinnamon sugar glass rim in advance and combine the cocktail ingredients in a pitcher so they're ready to go. To serve, fill the prepped glasses with ice and top with a cinnamon stick and apple slice.

🥄 Instructions

How to make an apple cider whiskey cocktail.

a glass being coated in cinnamon sugar on a plate
  1. Step 1: Combine cinnamon and sugar in a shallow dish. Wet the edge of your glass and roll in the cinnamon sugar to coat.
apple cider being poured into a glass
  1. Step 2: Pour the apple cider and bourbon into the glass.
maple syrup being poured into a glass
  1. Step 3: Add maple syrup and lemon juice.
cider cocktail being stirred
  1. Step 4: Add a few ice cubes and stir to combine.
a cinnamon stick being added to a cocktail
  1. Step 5: Garnish the cocktail with a cinnamon stick and a slice of apple.
a person serving apple cider cocktail
  1. Step 6: Top off with more ice, and serve.

🍋 Top Tip

Don't be afraid to adjust the amounts of lemon juice and maple syrup to meet your preferences.

🤔 FAQ

What liquor goes best with apple cider?

Bourbon is one of the best liquors to add to apple cider because its vanilla and caramel flavors make a perfect pairing with sweet cider. Dark and spiced rums are also good options.

What bourbon pairs well with apple cider?

The best bourbon to pair with apple cider is the one you enjoy the most that also works for your budget. You don't need to use top-shelf liquor when mixing, so aim for something mid-range.

What makes apple cider taste better?

A good, freshly pressed apple cider from a local orchard should taste delicious as is. If not, find a better quality cider. You can add many different ingredients to compliment and enhance cider, from liquors to spices to other fruit juices.

🍗 Pairing

These recipes would go great with this apple cider whiskey cocktail:

  • large plate of arugula spinach salad with chicken and dressing on side
    Arugula and Spinach Salad with Grilled Chicken
  • plate of grilled herb pork chops
    Grilled Pork Chops with Herbs
  • jars of quick pickle beans with garlic and dill
    Quick Green Bean Pickles
  • Air Fryer Eggplant Fries

🍹 Related Recipes

Looking for other recipes like this? Try these:

  • a glass of mint juley mocktail with fresh mint and a straw
    Mint Julep Mocktail
  • glasses of earl grey tea cocktail with a bottle of gin
    Earl Grey Cocktail
  • a tin of maple syrup and a glass of maple milk
    Easy Maple Milk Recipe
  • Easy and refreshing cucumber gin cocktail with fresh lime and thyme, perfect for summer entertaining.
    Cucumber Gin Cocktail

Plum Fool

glasses of plum fool with whipped cream and cookies

This quick and refreshing plum fool dessert is made with layers of lightly cooked, sweetened plums and freshly whipped cream. A fool is one of the easiest desserts to make and is a great way to enjoy in-season fruits.

three glasses of plum fool with spoons and cookies

Fool is an English dessert dating back hundreds of years. Traditionally, it was made by cooking and pureeing fruit and then folding the puree into custard. Today, freshly whipped cream is more commonly used in place of custard, making it quicker and easier to prepare.

Gooseberries were the original fruit of choice for this dessert, but just about any fruit can be used in a fool. While they're delicious any time of year, fools are perfect in the summer as a light and refreshing option that doesn't require heating your oven or spending much time in the kitchen.

[feast_advanced_jump_to]

One of my favorite fruits in this dessert is plums, especially these tiny Italian plums. Also called European or Italian prune plums, these egg-shaped, deep purple-hued fruits are green on the inside and are sweet and delicious.

Italian prune plums on a tree
Italian plums in a bowl

They're ripe towards the end of summer, and I often pick them up at one of my favorite orchards, Champlain Orchards, near Shoreham, Vermont. But when that's not possible, I've also found them at my local Hannafords.

If you like desserts with fruit and whipped cream, you'll want to try my Cherry Tiramisu and Strawberry Cream Soda.

🍇 Ingredients

You only need four ingredients to make this plum fool recipe. Here they are:

heavy cream, maple syrup, plums, and ginger snaps on a counter
  • Heavy cream - Necessary for making fresh whipped cream. I love using local dairy from Monument Farms.
  • Plums - Look for plums that are firm, without bruises, and that have a little give when you give them a bit of a squeeze. Any kind of plum works, though if you can find the Italian prune plums, give them a try!
  • Maple syrup - For adding a little sweetness to the whipped cream and the fruit.
  • Ginger snaps - I like to serve a fool with something crunchy, like a gingersnap or two. If you have a favorite cookie you think would pair well, feel free to use it instead. Or try crumbled pieces of my honeycomb candy for a fun addition.

🍓 Variations

  • Other fruits - Aside from plums, you can use any berry or stone fruit, rhubarb, or apples to make a fool. Use an equal amount and cook your fruit longer, if necessary, to break it down and release its juices. My cranberry sauce with mandarin orange could make a fine alternative to the plums as a filling.
  • Flavor the whipped cream: Try adding vanilla, almond, or mint extract. Or try adding a splash of your favorite liquor.
  • Use the fool as part of another dessert, Such as a filling for the layers of a cake. Or maybe use it to top waffles. I've also seen people use it to fill a pie crust and then freeze the whole thing.
  • Make one big fool - Instead of individual servings, you could also prepare the fool in one large serving dish. This would be good for a picnic or party.
  • Even quicker version - If your fruit is especially soft and ripe, you could skip cooking it. After chopping, try mashing it up a bit instead to release the juices.
  • Gluten-free - The fool is already gluten-free, so simply serve it with a gluten-free cookie of your choosing to keep it that way.

🔪 Instructions

plums being chopped on a cutting board with a knife

Wash the plums. Remove the pits and roughly chop.

chopped plums in a pan

Add the chopped plums to a small pan with a splash of maple syrup.

cooked plums in a pan

Cook the plums over low heat for about 10 minutes until softened and juices are released. Let cool completely.

stand mixer with whipped cream in the bowl

Pour the heavy cream into a bowl with a splash of maple syrup and use the whisk attachment to beat until fully whipped.

whipped cream in a mixing bowl with a spatula

Store the whipped cream in the fridge until the fruit has cooled and you're ready to assemble the fool.

three glasses of plum fool with spoons and cookies

Layer the fruit and whipped cream in serving glasses. Top with a cookie or two and serve.

Another option is to fold the fruit and whipped cream together before dishing it out into glasses and skipping the layering. I think the layers make a nice presentation and make this dessert look much fancier than it is. But if that doesn't matter, fold the fruit into the whipped cream and dish it out into glasses or bowls.

💭 Top tip

Be sure to cool down the fruit completely before assembling. Hot or warm fruit will cause the whipped cream to melt. Pop the fruit in the fridge or freezer to speed up cooling.

🍨 Storage

This plum fool should keep for two or three days in the fridge. I suggest storing the fruit and whipped cream separately and assembling them before serving.

📋FAQ

What is the flavor profile of plums?

Plums are sweet and sour. However, it depends on the variety and how ripe they are when you eat them. Italian plums have a deeper and sweeter flavor.

When are plums in season?

Although you can usually find plums year-round in supermarkets, here in Vermont, you'll usually find them in season from mid-August to October.

Can you eat plum skin?

Absolutely. There's no need to peel a plum before eating it. Just wash the skin first.

What can I do with a lot of plums?

In addition to this recipe, you can freeze sliced plums for future enjoyment or make them into a jam. They would also work well in place of apples in this crisp recipe or in these crepes.

🫖 Pairing

These recipes would pair well with this plum fool:

  • mug of amaretto latte with almonds and whipped cream
    Amaretto Latte
  • a mug of hot buttered rum with a cinnamon stick
    Hot Buttered Rum Recipe
  • a glass mug of citrus tea being poured from a tea pot
    Honey Citrus Mint Tea
  • glasses of mocktail with gingerbread
    Gingerbread Mocktail

🍦Related

Looking for other recipes like this plum fool? Try these:

  • a glass of frozen matcha latte on a countertop with straw
    Frozen Matcha Latte
  • a plate with stuffed apple cremes covered in caramel and powdered sugar
    Baked Apple Crepes with Ricotta
  • fruit granita in bowls
    Sour Cherry Blackcurrant Granita
  • an ice cream cone with two scoops of black currant ice cream
    Blackcurrant Ice Cream

Blackberry Scones

scones on a cooling rack with blackberries

You'll love these soft and cakey blackberry scones flavored with fresh thyme and drizzled with a simple lemon glaze. They make a perfect summer breakfast treat for when fresh, juicy blackberries are in season.

blackberry scones on a cooling rack with icing

I typically bake scones with dried fruit, but when fresh berries are in season, I seize every opportunity to appreciate them.

Sweet yet slightly tart, blackberries take center stage in this recipe. I used to overlook them, but that's difficult to do now with a plant in the garden. So I wanted to give these berries a chance to stand out on their own, with just a little help from some fresh thyme and a touch of sweet lemon glaze.

Why you'll love these scones

  1. If you're typically more of a muffin person, these scones are less sweet and just as easy to make. Their soft and cakey texture is actually closer to a muffin than the traditional British scone.
  2. They're chock full of berries. You get a juicy bite of blackberries in nearly every bite, meaning these scones are moist and full of flavor.
  3. Between the flavors of berries, thyme, and lemon and their tender texture, this baked good exudes freshness. The combination is a great way to wake your taste buds in the morning.
[feast_advanced_jump_to]

For some other not-too-sweet breakfast recipes, try my Rhubarb Oat Breakfast Cake, Orange Parsnip Cake, and Cinnamon Overnight Oats.

📋 Ingredients

Here's everything you need to make these blackberry scones:

all of the ingredients for the recipe on a counter

Key Ingredients

  • Blackberries - Look for blackberries that are plump, firm, deep purple to black in color, and are sweet smelling. Inspect containers carefully for signs of mold. If possible, go for smaller berries for this recipe.
  • Flour - All-purpose flour works great for these scones.
  • Butter - An essential component of scones, butter is worked into the dough to help create a tender pastry.
  • Sugar - A modest amount sweetens these scones. I like to use raw sugar when possible.
  • Milk - Hydrates the dough and adds some creaminess. I typically use whole or 2% milk, as that's what I regularly purchase.
  • Yogurt - Adds additional moisture to the scone dough along with some tanginess and helps achieve a soft texture.
  • Powdered sugar - Used to make the simple lemon glaze.
  • Lemon - The zest goes in the scones while the juice is used to make the glaze.
  • Thyme - Optional, but a little fresh thyme adds a touch of earthiness and herbiness that nicely complements the blackberries.

🌿 Substitutions

Thyme: For fun, I threw in some fresh thyme into this recipe. I like the hint of earthiness it adds with the blackberries, though feel free to leave it out if that doesn't sound appealing to you. Or maybe try rosemary.
Glaze: I also felt like indulging with a super-easy glaze of lemon juice and powdered sugar drizzled over the scones after baking. But again, that's totally optional. Skip it, if you like. Or, you could flavor the glaze with orange or lime juice instead.
Other berries: You can try any other berries in place of the blackberries in these scones. Just be careful of how soft and juicy they are. Extra-juicy berries will further soften an already soft dough.

⏲️ Instructions

How to make blackberry scones.

dry ingredients for mixing the scone dough
  1. Step 1: Whisk together the wet ingredients in a small bowl and the dry ingredients in a large bowl.
mixing butter into the dry ingredients with hands
  1. Step 2: Use your hands to work the butter into the dry ingredients until you have small crumbs.
pouring wet ingredients into the bowl of dry
  1. Step 3: Pour the wet ingredients into the dry.
thyme being stirred into the scone dough
  1. Step 4: Add the thyme, if using, and stir just enough to form a rough, wet dough.
hands shaping the scone dough
  1. Step 5: Dump the dough onto a floured surface and shape it into a large square.
blackberries being added to scone dough
  1. Step 6: Spread the blackberries over the dough.
folding the scone dough
  1. Step 7: Fold the dough into thirds and shape into a rectangle.
scone dough being divided
  1. Step 8: Cut the rectangle into eight triangles. Place them on a parchment-lined baking sheet and brush with the melted butter. Chill in the fridge for 20 minutes, then bake at 375 degrees for 15-18 minutes.
whisking the icing in a bowl
  1. Step 9: Meanwhile, whisk the lemon juice and powdered sugar together in a bowl to make the icing.
icing being drizzled over scones
  1. Step 10: When the scones have finished baking and have cooled slightly, drizzle over the icing and serve.

🧈 Top Tips

  • Scones are best eaten fresh from the oven. Summer heat and humidity make it challenging to keep baked goods tasting fresh, even the next day. But if you don't want to prepare the scones the day of, you could make the dough and shape them the night before, then bake them fresh in the morning.
  • It's important to keep everything as cold as possible as you prepare the scone batter. This creates flakier scones. If things are warm, the scones will be dense and spread during baking. Don't skip chilling the scones in the fridge before baking.

🥄 Equipment

Bench scraper: This helps you get under the dough, lift it, move it around, and scrape up any bits that stick to the counter. It's one of my favorite simple and inexpensive baking tools.

🥧 Storage

As mentioned, these blackberry scones are really best enjoyed the day they are made. If you need to store them for a day or so, do so in a sealed container at room temperature. I recommend warming them before serving.

Freezing - To freeze your baked scones, let them cool completely, individually wrap each scone, and store them in a freezer bag for up to 3 months.

💭 FAQ

How do I prevent the blackberries from making the scone dough too wet?

This scone dough is wetter than traditional British scones. But to prevent the blackberries from contributing to this, make sure they're firm and dry before using. You also want to follow the directions and fold them into the dough rather than mixing them and causing the fruit to burst and release juice.

Which flour is best for scones?

All-purpose flour works great for scones. You don't need any specialty flour.

Should you chill scone dough before baking?

Yes. Ensuring the scone dough is as cold as possible before baking will help the scones keep their shape and have a flakier texture. Warm dough may result in dense scones. Chill the scones after you shape them, but before you bake them, for at least 20 minutes in the fridge.

How do I make my scones rise better?

One common tip is to arrange the scones close together on your baking sheet before baking so that they're barely touching.

🥚 Pairing

These recipes would go great with your blackberry scones:

  • two coupe glasses with cold brew martinis
    Cold Brew Martinis
  • carrot drink in glass with straw
    Carrot Juice Cocktail
  • marmalade with grapefruits and oranges, spread on toast
    Orange and Grapefruit Marmalade
  • the sun dried tomato quiche in a pan with plates and serving utensil
    Broccoli and Stilton Quiche

Related Recipes

Looking for other recipes like this one? Try these:

  • slices of rhubarb quick bread with butter
    Rhubarb Banana Bread
  • plates of sliced blackcurrant cake with fresh berries and whipped cream
    Blackcurrant Cake
  • several cranberry and apple muffins on a countertop with oats
    Apple Cranberry Muffins
  • strawberry homemade pop tarts on tray
    Strawberry Puff Pastry Pop Tarts

Air Fryer Eggplant Fries

You'll turn anyone into an eggplant fan with these simple and healthy air fryer eggplant fries. They're crispy, tender, and perfect for dipping in tomato sauce.

eggplant fries with salt and sauce

A few months ago, we redid our kitchen. We replaced the counters, added a deeper sink, put a butcher block top on our island, installed a subway tile backsplash, built some open shelves, and painted the bottom cabinets a grayish-blue. It was definitely a budget remodel, and there was plenty of DIYing, but I'm happy with the results.

Although we didn't originally plan on it, we also replaced our rusting oven after just a few years. The gas oven we ultimately bought has some cool features, though we bought it because of its reasonable price point and good reviews.

[feast_advanced_jump_to]

One of those added features includes air frying. I admit it wasn't something I cared all that much about. Would I have ever bought a countertop air fryer? No, probably not. But since we have the option built into our oven now, I figure we might as well learn how to use it.

Turns out that air frying isn't all that different than using the convection setting on an oven. Both use a large fan to circulate the hot air. Since we also have that option with our oven, it makes me wonder if there's even a difference between the two settings. At best, it's probably minimal.

At first, I wasn't impressed. Yet each time I attempt to air fry, I feel like I understand it a little better and am happier with the results. From what I've researched, it works much in the same way as a countertop air fryer.

Here are a few helpful tips I've picked up so far:

  1. Food needs good air circulation to get crispy in an air fryer. Makes sense, right? Air frying occurs through the circulation of air, so if air can't reach the food, crispiness won't result. Crowded food or food resting directly on a baking sheet will end up soft. That's why I place my food on a metal cooling rack that I set on a baking sheet. I also make sure my food is in a single layer and that there's a little space between each item. They make special oven baskets you can buy, but I think my method is working well so far.
  2. I first thought that I wouldn't need to use any oil when air frying. Isn't that the point? But that's not accurate. I've learned that a light brushing or drizzle of oil over the food helps it to brown. Luckily, it doesn't require much oil (think a tablespoon or two) and it's still healthier than deep frying.
  3. One of the benefits of an air fryer setting with your oven is that you can fit much more than you can in the small basket of the countertop models. So if you like air frying and it's something you do often, you may want to consider looking for this feature in your next oven and make the process easier and more efficient for yourself.

To date, air fryer eggplant fries are my best creation with the air fryer. These fries come out perfectly crispy and browned on the outside,, while the eggplant is creamy and tender on the inside. I like to think of these as little strips of eggplant parmesan.

🍆 Ingredients

ingredients for eggplant fries laid out in bowls

To make these air fryer eggplant fries, you'll need:

  • Italian eggplant
  • flour
  • eggs
  • breadcrumbs
  • grated Parmesan cheese
  • dried ground rosemary
  • fresh thyme leaves
  • garlic powder
  • kosher salt
  • olive oil

for quantities, check out the recipe card below

🔪 Instructions

an eggplant sliced up

Start by trimming the ends of the eggplant and slicing it into rounds about ¼ inch thick. I didn't bother to peel my eggplant but go ahead if you want. Then slice each round into matchsticks. I do slice off the edge of the skin on the two end pieces.

Preheat your air fryer to 425 degrees. Place an oven-safe cooling rack into a sheet pan. Get three shallow dishes and line them up on the counter with the eggplant strips at the start and the baking sheet at the end.

a bowl of eggplant matchsticks

In the first dish, add the flour. In the second, add the eggs beaten with a splash of water, and in the third, mix the breadcrumbs, parmesan, rosemary, thyme, garlic powder, and salt.

Time to coat your fries! You'll need to use both hands for this and to prevent coating your own hands in a giant mess, keep your left hand as your dry hand and your right as your wet.

three dishes of ingredients for breading eggplant fries

I'll explain. Using your left hand, take a piece of eggplant and coat it in the flour. Now use your right hand to dip the eggplant in the egg. Shake off any excess before moving it to the breadcrumb dish, where you will switch back to your left hand to roll it around and move it to the baking sheet. Now repeat this process with all of the eggplant pieces.

coating eggplant in breadcrumbs for air frying

As you go,  be sure to space the eggplant fries out on the rack and try to leave a little space between each piece. When you're done, lightly brush the fries with some of the olive oil.

unbaked eggplant fries ready for cooking

The fries go in the oven/air fryer for about 25 minutes or until browned and tender. Sprinkle some additional salt over the eggplant fries before serving with your favorite tomato sauce for dipping.

🍽 Equipment

Hopefully, at this point, it won't surprise you to know that you need some kind of ability to air fry for this recipe. It will work in either an oven with an air fryer setting or a countertop air fryer. Just follow the best practices for your particular device. For instance, you may need to shake your fryer basket around and fry the eggplant in small batches for countertop air fryers.

That said, as I mentioned, I think you can get away with using the convection setting of your oven if you have that instead. If you have neither an air fryer or convection oven option, you could attempt to bake these in a regular oven at 400 degrees until tender. I've made enough baked vegetable fries to tell you that it works, but know that they won't come out as nicely.

🧀 Substitutions

cooked eggplant fries with tomato sauce and salt

Seasoning: If you want to flavor your fries differently, that's easy enough to do. Omit the rosemary, thyme, and garlic powder and substitute your own spices. Maybe you like an Italian spice blend, prefer Herbs de Provence or want to try something spicier like chipotle powder and cumin. Go for it.

Dairy-free: Can't do cheese? No problem. Use additional bread crumbs instead of the Parmesan. Just know they'll lack some flavor. You could try adding in some nutritional yeast to make up for that cheesy flavor.

🍟 Storage

These air fryer eggplant fries are at their best immediately after coming out of the air fryer. But if you have to save them for a day or two in the fridge and heat them back up in the air fryer until crispy and warmed through. I don't think I'd save them beyond a couple of days, though.

🥘 Other Ideas

Try serving these fries with Simple Stuffed Zucchini, Chili Rellenos Casserole, or Orange Bourbon Grilled Chicken. And if you love eggplant, you'll want to try my recipes for Eggplant Parm Steaks and Remy's Ratatouille.

Grilled Pork Chops with Herbs

plate of grilled herb pork chops

These Grilled Pork Chops with Herbs are packed with summer flavor thanks to a mix of fresh sage, lavender, and peppery grill seasoning. A quick maple balsamic glaze adds a sweet, tangy finish that brings it all together in under 30 minutes.

grilled pork chops on a plate with herbs

Most often, floral flavors like lavender are limited to desserts and drinks. And that makes sense. It's easy for floral flavors to work well when they're the star of the show, and the only counterpart is sweetness. Take my chocolate lavender coconut cream eggs or blueberry lavender lemonade, for instance.

But did you know not all lavender is the same? Some, like the French variety, tend to have more intense floral notes. On the other hand, English lavender has a hint more pepperiness - and tastes less like soap, in my opinion - which is why it is more common for culinary uses.

[feast_advanced_jump_to]

When used sparingly, lavender can add an appealing aromatic note to savory cooking, especially poultry and pork. If you've ever used the herb blend called Herbes de Provence, there's a good chance lavender was part of the mix. That's because its floral quality blends in well with woody and earthy herbs like rosemary, sage, and oregano, so that it doesn't stand out on its own. There's just a hint, and that's all you need.

To be honest, this recipe was created on a bit of a whim. When I went out to pick some of my fresh English lavender from the garden, I noticed the sage nearby and figured, why not? I chopped up some of both herbs, tossed them with grill seasoning, and really enjoyed the resulting flavor on the pork.

😍 Why You'll Love This Recipe

  1. It's fast. These thin boneless pork chops cook in under 10 minutes.
  2. It has a unique flavor profile. A hint of lavender is delicious and unexpected with pork.
  3. You can cook it outdoors on a grill or inside with a grill pan. Both methods work great.

I like to challenge myself to use homegrown herbs and flowers in unexpected ways. For instance, I've used mint to make a pesto for a pasta dish, lemon balm to make a simple syrup for lemonade, rosemary in a lemon cake, and chamomile to flavor sugar cookies.

Need a tasty vegetable side dish for these pork chops? Try one of these:

  • One Pan Sweet Potatoes and Green Beans
  • Pumpkin Couscous Salad
  • Roasted Balsamic Onions
  • Instant Pot Red Cabbage.

🌿 Ingredients

Here's everything you need to make herb pork chops.

ingredients for making grilled pork chops with herbs
  • Pork chops: I like using boneless pork chops about ½ inch thick because they cook incredibly fast. You can certainly use bone-in pork chops, but they'll take a bit longer to cook. For some reason, I've been seeing only boneless chops in the grocery stores lately, so that's what I tend to buy the most.
  • Sage: A few sprigs of fresh sage is all you need.
  • Lavender: Three or four sprigs of lavender should be all you need. If you don't have a plant of your own or can't easily find fresh, look for dried culinary lavender in specialty food stores that have a bulk spice section.
  • Grill seasoning: Grill seasoning is typically a mix of black pepper, salt, garlic powder, onion powder, maybe some red pepper, and another ingredient or two. There are many blends, but you want something basic since we're adding herbs. You can also use steak seasoning, like this Chicago blend from Penzey's, or you can make your own grill seasoning. I don't recommend anything with a BBQ flavor for this recipe.
  • Maple syrup: You'll need real maple syrup for the glaze. Bonus points if it's from Vermont. I prefer the darker grades of syrup as the flavor is more intense.
  • Broth: The glaze requires a half cup of broth. You can use chicken or vegetable broth.
  • Balsamic vinegar: You'll reduce vinegar with the maple syrup and broth to make a quick glaze while the pork chops cook.

Check out the recipe card below for the complete list of ingredients and quantities.

🐔 Substitutions & Variations

  • Chicken: Try this recipe with bone-in chicken thighs instead of pork chops. Adjust the cooking time as needed.
  • Dried herbs: If you don't have fresh sage and lavender, you can also use dried. I find that they work nearly as well as fresh, and I don't say that about many dried herbs. Use about half as much dried as fresh for both the sage and lavender.
  • Other herbs: Thyme and rosemary would work well instead of or in addition to the sage and lavender.

🔪 Instructions

How to make grilled pork chops with herbs.

sage and lavender chopped on a cutting board
  1. Step 1: Chop the sage and lavender.
balsamic glaze ingredients whisking in a pot
  1. Step 2: Add the balsamic vinegar, maple syrup, and broth to a small pot. Add half of the herbs. Bring to a simmer and reduce by half until slightly thickened.
mixing spices in a bowl
  1. Step 3: Combine the chopped herbs with the grill seasoning.
pork chops being brushed with oil
  1. Step 4: Brush both sides of the chops with the olive oil.
pork chops being sprinkled with herbs and spices
  1. Step 5: Sprinkle the grill seasoning and herb mixture over both sides of the chops.
herb pork chops grilling in a pan
  1. Step 6: Heat a grill or grill pan over medium heat. Add the pork chops when hot and cook for about 3 minutes per side.
pork chops with a thermometer
  1. Step 7: Check the temperature to see if they're done. You want to aim for 145 degrees F.
balsamic glaze being poured over pork chops
  1. Step 8: Serve the grilled pork chops with the balsamic herb sauce poured over top.

✨ Helpful Tips

  • The finer you can chop the herbs, the better they will stick to the pork.
  • The pork chops will cook quickly. Try not to overcook them and check the temperature to make sure you're on track.
  • Grill seasonings can vary in saltiness. If needed, sprinkle the cooked pork chops with a little salt before serving.

🍳 Equipment

Grill or grill pan: I've made this recipe with both a grill and a grill pan, and they both work well.

🥡 Storage

Store leftover pork chops in a tightly sealed container in the fridge for up to three days.

🙋🏻‍♂️ FAQ

What herbs do you use with pork chops?

There are many good herbs for pork chops. Think woody, earthy, and even floral. Sage, thyme, rosemary, lavender, and oregano are all good choices.

How do I cook thin center cut pork chops?

You can pan fry, bake, or grill thin pork chops. In this recipe, they are grilled and take only 3-4 minutes per side.

What is a good condiment to put on cooked pork chops?

I like to make a quick glaze to pour over pork chops, which helps them from drying out. In this recipe, the glaze is made with maple syrup, balsamic vinegar, and broth.

🥕 Pairing

Here are a few ideas for what to serve with these pork chops:

  • dish of roasted onions with balsamic glaze
    Roasted Balsamic Onions
  • a bowl of mashed beets with butter and thyme
    Mashed Beets
  • plate of roasted asparagus and carrots with breadcrumbs and parsley
    Roasted Carrots and Asparagus
  • two napa cabbage halves with sesame seeds
    Roasted Napa Cabbage

🥩 Related Recipes

Looking for more recipes like this one? Try these:

  • large pan of chicken thighs with apricots and barley
    Apricot and Chicken Tagine
  • plate of grilled chicken with bourbon BBQ sauce
    Grilled Bourbon Chicken
  • bowls and a pot of beef hot pot with stout beer
    Beef and Stout Hot Pot
  • a plate with sliced scotch eggs
    Baked Scotch Eggs (Gluten Free and Keto)

Blackcurrant Ice Cream

an ice cream cone with two scoops of black currant ice cream

Creamy and tart with crunchy flecks of dark chocolate, this blackcurrant ice cream is an irresistible homemade frozen treat for warm summer days. It's also easy to customize with other fruit flavors such as raspberry and blackberry.

a hand holding an ice cream cone with two scoops of blackcurrant ice cream

Blackcurrants are an incredibly tart fruit. They're not the kind of berry you want to eat fresh off the plant. But they also have a deep earthy flavor that I find rather unique and worth seeking out. You may find blackcurrants at your local orchards or farmers markets or you could get yourself a plant for the yard. I have one plant that produces several pounds of fruit each summer and requires minimal attention.

[feast_advanced_jump_to]

Blackcurrants lend themselves well to sweet foods like syrups, jams, jellies, and, yes, ice cream, where sugar tames some of the tartness. They work particularly well in this ice cream because of the balance of tart, sweet, cold, and creamy. I think they help create something special you won't get with other naturally sweet fruits.

For another cold and fruity dessert, check out this recipe for plum fool, an easy dish made with whipped cream and plums. Or for a refreshing frozen drink, you might like this frozen matcha latte.

🍨 Ingredients

ingredients for black currant ice cream spread on counter

Here's everything you'll need for this blackcurrant ice cream recipe:

  • Blackcurrants - You can't have blackcurrant ice cream without blackcurrants. You may find them at farmers markets and local orchards in the summer.
  • Whole milk - Whole milk, with its higher fat content, produces a creamier, richer ice cream than lower-fat milk, which I don't recommend.
  • Heavy cream - also necessary for its high fat content. Low fat cream will more likely produce icy rather than creamy ice cream, so while it's entirely possible to use, I think it results in an inferior texture.
  • Honey - Adds sweetness and helps prevent crystallization.
  • Sugar - For more sweetness, which is necessary to balance the tartness.
  • Kosher salt - Just a little to help bring out the flavors.
  • Crème de cassis - For even more blackcurrant flavor and the inclusion of a bit of alcohol also helps to prevent ice crystalization.
  • Egg yolks - Egg yolks add fat, which helps the ice cream freeze at a softer consistency. They also serve as a binder or emulsifier for the other ingredients. In other words, most of the creaminess of ice cream is thanks to eggs. Read more about the importance of eggs in ice cream
  • Dark chocolate - I like my ice cream with add-ins, like some chopped up dark chocolate. If that doesn't sound good to you, leave it out and enjoy the blackcurrant ice cream as it is.

See the recipe card below for the quantities.

a bowl of blackcurrants

As you can tell by reading the ingredient list, this isn't a low-fat ice cream. I've bought those, made them, and tried to convince myself they were satisfying, but they're not, even when homemade. Because lower-fat versions are icy rather than creamy.

I'd rather have tasty, creamy, and satisfying ice cream less frequently than frequent sad, icy ice cream with skim milk, no eggs, and weird emulsifiers.

That said, you can also go the route of an intentionally icy dessert, like a granita. I happen to have a recipe for a Blackcurrant and Sour Cherry Granita that is a completely different, but just as good, frozen treat. For more blackcurrant recipes, try my Blackcurrant Cake and Blackcurrant Smoothie.

🍇 Substitutions

  • Blackcurrants - They're the star of this ice cream, but if you just don't have any, replace them with an equal amount of raspberries, black raspberries, or blackberries.
  • Honey - Try agave nectar or corn syrup in place of honey. These liquid sweeteners all serve the same goal of creating a smooth ice cream texture by reducing ice crystal formation.
  • Crème de Cassis - I like it for flavor and to reduce ice crystal formation, but it's not essential. You could add the same amount of another alcohol, such as vodka. Or leave it out altogether.
  • Dark chocolate - Milk chocolate also works, but if you don't want chocolate at all, you can leave it out or replace it with another ingredient, such as toasted pecans, almonds, or flaky coconut.

📖 Instructions

blackcurrants being held in a hand above a bowl

Pick through your blackcurrants to remove any stems and rinse well.

blackcurrants pureed in a blender

Puree the blackcurrants in a blender with the milk.

blackcurrant puree being strained into a bowl

Strain the currant puree to remove the seeds. Press through a fine sieve.

the base of the blackcurrant ice cream being whisked in a small pot

In a pot, whisk the blackcurrant mixture with the cream, salt, honey, sugar, and Crème de cassis.

blackcurrant ice cream base being cooked and whisked in a pot

Cook the mixture over medium-high heat until nearly boiling or it reaches 175 degrees.

egg yolks being whisked in a small bowl

Whisk the egg yolks until blended.

the ice cream base in the pan with the egg yolks in a small bowl

Add a ladle full of the hot liquid from the pan into the yolks, whisking constantly for 20 seconds. Pour this back into the pan.

the ice cream base cooking in the pan

Continue to cook the mixture over medium-low heat until it reaches 180 degrees. Remove from heat and transfer to the fridge to cool completely for several hours or overnight.

ice cream being churned in a kitchenaid ice cream maker

Pour the cooled custard base into your ice cream maker and run according to the directions - about 20-25 minutes for a basic machine.

spreading ice cream out in a container to freeze

Spread the soft ice cream into a shallow container such as a loaf pan.

a tin of blackcurrant ice cream with chopped chocolate on top

Stir in the chocolate chunks, then cover and freeze until firm, at least 4 hours.

blackcurrant ice cream being scooped out of a container

Scoop out the ice cream and serve immediately. Keep the remaining ice cream covered in the freezer.

🌡️ Top tip

Let the ice cream base mixture cool completely. Don't try and use it before it's reached at least 40 degrees F or your ice cream won't freeze well while churning. My suggestion is to make the ice cream mixture the day or night before you want to eat the ice cream. That way it will have more than enough time to cool down.

🍦 Equipment

Ice cream maker: Essential in this recipe. Don't try to make this recipe without one. I like the ice cream maker attachment from KitchenAid that works with the mixer I already own. But there are plenty of options out there.
Thermometer: While you can probably get away without one in this recipe, you might as well get one anyway; they're always handy for cooking and baking. It will help you ensure the ice cream base reaches the exact temperatures. Here's a good option from Thermapen.
Metal tin: From my research on ice cream making, the metal tin, something like a loaf pan, helps the ice cream to freeze more evenly. Absolutely essential here? No, but I do suggest using something of a similar size and shape that will let the ice cream spread out a bit.
A good ice cream scooper: I don't know why, but there are too many lousy scoopers out there that won't give you a nice round scoop of ice cream. This simple KitchenAid one is my current favorite.

🧊 Storage

Transfer any leftover ice cream from the tin into a freezer-friendly container with a tight seal. Or just tightly wrap the tin to prevent freezer burn. I imagine the ice cream would be good for up to a couple of months, but my homemade ice cream has never lasted more than a week.

If you want to make an extra-special dessert, pair this blackcurrant ice cream with my Triple Ginger Gingersnaps recipe to make your own ice cream sandwiches!

🙋‍♀️ FAQ

Is black currant ice cream good?

Black currant ice cream is delicious. The tangy earthy berries create a flavor that's more balanced and unique compared to other ice creams made with sweet fruits.

Do black currants taste like blueberries?

I think black currants taste closest to black raspberries, which also tend to have a little sourness and earthiness to them. Blueberries are much sweeter than black currants.

What can replace eggs in ice cream?

Cornstarch can replace eggs in ice cream. However, if you've ever made a pudding with cornstarch rather than eggs, you may notice it doesn't have as creamy and full tasting flavor. It's the same with ice cream. If you're going to go through the process of making ice cream, I think it's worth including eggs for their richness and the creaminess they add.

Zucchini Mushroom Pasta

large serving dish of zucchini mushroom pasta

A simple zucchini mushroom pasta recipe that's packed with fresh garden flavors and topped with crispy, lemony breadcrumbs. An easy vegetarian summer dinner that's great for weeknight cooking.

a large serving dish with the mushroom zucchini pasta with breadcrumbs and basil

You can't go wrong when you toss together a bunch of fresh ingredients, especially vegetables, with pasta. And that's why this dish works so well. Earthy mushrooms, tender slices of zucchini, crispy lemon-flavored breadcrumbs, and sweet and spicy basil leaves form a tasty summer combo that you'll love.

[feast_advanced_jump_to]

Zucchini gets a bad rap from the home gardener. Yes, zucchini does grow quickly and profusely. But if you pick them often, and don't plant too many, you won't have a problem. And yes, zucchini on its own, cooked in some boring way like steaming, will not be delicious. But when you season it well and pair it up with interesting flavors, zucchini is a welcome addition to summer cooking.

If you need more zucchini recipe ideas, try my Zucchini Curry or Simple Stuffed Zucchini. Another idea I just tried for the first time is quick zucchini pickles. Instead of cucumbers, you use zucchini. They were much better than expected!

For more mushroom inspiration, you might like my Potato and Mushroom Soup or these Chicken Swedish Meatballs that are coated in a creamy mushroom sauce.

🥘 Ingredients

This simple dish combines sauteed zucchini and mushrooms with onions, garlic, and red pepper in a light white wine sauce. Of course, there's pasta, too. Here's everything you'll need:

zucchini, mushrooms, basil, and other ingredients for making the pasta
  • Pasta - Such as penne, rotini, or another small shape with some texture to it
  • Onion - Just a basic white onion is all you need
  • Mushrooms - I like Baby Bella mushrooms, but whatever you have is fine. You can save a few minutes and buy a presliced package.
  • Garlic - Because you can't have a pasta dish without it
  • Zucchini - Look for small to medium zucchini for the best flavor
  • Red pepper flakes - For just a hint of spice
  • White wine - To create a light sauce to coat the pasta
  • Lemon - We'll need both the zest and juice
  • Grated parmesan - Because you can't have pasta without cheese, right?
  • Bread crumbs - Crunchy breadcrumbs with lots of texture, like panko, are great
  • Basil - Fresh, not dried

🍷 Substitutions and Variations

Yellow squash - If you only have yellow squash, that works fine instead of zucchini.
Wine - A good flavored vegetable (or chicken) broth is a fine substitute for the wine if you don't have it or don't consume alcohol.
Spicy - Use ¼ or ½ teaspoon dried red pepper flakes for more heat.
Creamy - As is, this dish has a simple, very light white wine sauce. If you want to make more of a creamy zucchini pasta dish, add a splash or two of heavy cream in the last minutes of cooking.
Sun-dried tomatoes - Would make a great addition. Roughly chop and toss them in when you add the zucchini to the pan.

🔪 Instructions

Here's how to make zucchini mushroom pasta:

chopped onions, sliced zucchini, zested lemon and other ingredients prepped for cooking

Slice the zucchini and mushrooms. Chop the onion. Mince the garlic. Zest and juice the lemon. Meanwhile, cook the pasta in boiling water until al dente. Save 1 cup of pasta water, drain, and set aside.

panko breadcrumbs toasting in a pan

Heat 2 tablespoons olive oil in a large pan over low heat. Add the breadcrumbs and toast until golden brown, about 5 minutes. Remove and add lemon zest and ½ teaspoon salt.

sliced mushrooms in a pan with onions

Add 2 tablespoons oil to the pan. Over medium-high heat, saute the onion and red pepper for 8 minutes. Add the mushrooms, garlic, and ½ teaspoon salt. Cook until mushrooms have softened, about 5 minutes.

mushrooms and onion cooking in white wine

Carefully pour in the white wine (or broth). Simmer until reduced in half.

zucchini cooking in a pan with mushrooms and onions

Toss in the zucchini and cook until tender, about 5-8 more minutes.

pasta being tossed in a pan with zucchini and vegetables

Remove from the heat and stir in the pasta and lemon juice to coat. Then top with torn basil leaves and the lemon breadcrumbs before serving.

💭 Top tips

  • Save 1 cup of the pasta water before draining. You may want to add a bit to the pan if you find the pasta too dry and want things a little saucier. It's also good to add if/when reheating leftovers.
  • Try not to overcook the zucchini! If you've ever had mushy zucchini, you know how terrible it can be. It's why so many people hate the poor vegetable. If you slice it thin and aren't using giant pieces, it won't take long to cook and it's why it's the last thing you add into the pan.

📋FAQ

What protein would go well with this?

I would try adding chicken to make this a chicken zucchini mushroom pasta dish. Add cubed, lightly salted chicken pieces after sauteeing the onions and before adding the mushrooms. Cook for a few minutes to lightly brown, then continue with the recipe as written. The dish may turn out drier, so definitely use that extra pasta water if needed. Ground sausage is another idea.

How do you keep zucchini from getting soggy when sauteed?

Simple. Don't overcook it! Since it won't all fit in one single layer in the pan, make sure to toss it around every once in a while as it cooks.

Do you remove the seeds from zucchini before sauteing?

I only remove the seeds from zucchini when they are very large and have large seeds. I don't bother with small-to medium-sized zucchini.

More Pasta Recipes

  • pan with pasta and parmesan, garlic, and basil
    Creamy Garlic Parmesan Chicken Pasta
  • two plates of pasta with peas and mint pesto with a side of peas and drink glasses
    Pasta and Peas with Mint Pistachio Pesto
  • dish of pumpkin pasta with sage
    Roasted Pumpkin Pasta with Sage
  • Creamy Bacon Corn Pasta
  • a bowl or risotto with pumpkin and parmesan
    Pumpkin and Sage Risotto

Apple Cherry Crisp

small dishes of cherry crisp topped with whipped cream

This apple cherry crisp is the crunchiest crisp you'll ever make. Flavored with almonds, coconut, oranges, and spices, it'll soon be your favorite rendition of the classic dessert.

five small dishes of cherry crisp with whipped cream and apples

Raise your hand if you ever had an apple crisp that wasn't crispy. It defeats the point, right? If I wanted mushy apples with oats, I'd eat oatmeal.

That's why there's nothing mushy about this crisp recipe. Thanks to a technique I picked up from a recipe in The America's Test Kitchen Cooking School Cookbook, where you start off baking the topping on its own pan, you get the crispiest oat topping possible.

Other reasons why you'll love this recipe:

  • There's a balance of sweet and tart thanks to a mix of cherries and apples.
  • Orange juice and almonds create a unique and complimentary flavor combo.
  • It's easy to make as individual servings or as one large dish.
[feast_advanced_jump_to]

If you're also a fan of cherries, you'll want to go check out my Cherry and Blackcurrant Granita, Cherry Rhubarb Pie, Brownies with Cherry Pie Filling, and Cherry Tiramisu recipes.

🍒 Ingredients

I use cherries and apples for the fruit in this crisp because I think it keeps things interesting. You get a mix of textures by using two fruits, especially if you leave the apples unpeeled. I think the combo would also be great as a pie filling.

all of the ingredients for the cherry crisp laid out on a wood background

Ingredient Notes

  • Cherries - Sweet cherries, the ones you most commonly find in the produce department of grocery stores during the summer, work great here if you don't mind removing the pits and stems first. Sour cherries are also fine if you happen to find those and don't mind the crisp being on the tart side. But if you're short on time, or it's not peak cherry season, there's no problem using frozen cherries. Just add them to the recipe frozen.
  • Apples - I suggest using crisp, firm apples that will hold their shape during baking. Some good options include Granny Smith, Northern Spy, Braeburn, Pink Lady, and Honeycrisp. You can certainly use a mix of apple varieties for a blend of flavors and textures. If you don't care whether the apples still have some crunch after baking, and don't mind softness, feel free to use whatever apples you have on hand.
  • Shredded coconut - Look for unsweetened coconut flakes instead of the more common sweetened coconut shreds. The sweetened shreds are honestly more like candy with a predominant flavor of sugar. The shreds, like these ones, do a better job of toasting and adding a simple, pure coconut flavor. In this recipe, they also add more crunch to the crunchy topping.
  • Oats - You want the regular old-fashioned rolled oats for this recipe. Instant oats or steel-cut oats are not good options here.
  • Almond extract - I enjoy the pairing of almond and cherry flavors. That's why I use almond extract in this crisp rather than the typical dessert flavor of vanilla. However, if vanilla is all you have, that will work just fine.

See the recipe card below for the complete quantities and measurements.

📖  Substitutions & Variations

  • Almond extract - Vanilla extract also works, of course. But almond and cherry is a terrific flavor combo. Have neither extract? Try a splash of bourbon.
  • Gluten-free cherry apple crisp - Use a gluten-free flour blend instead of the all-purpose wheat flour. You may also want to verify that your oats are gluten-free.
  • Individual crumbles - Who doesn't like their own personal dessert? Instead of a large baking dish, use small oven-safe dishes and serve everyone their own.
  • Other fruits - This recipe would be just as good with different fruits. Try pears in place of apples and raspberries, and blackberries or blueberries in place of cherries.

⏲️ Instructions

Time to bake some apple cherry crisp.

dry ingredients for the crisp in a bowl with the butter in a small bowl to the side

Combine flour, oats, coconut, salt, and extract in a bowl. Stir or whisk together.

cubed butter pieces being added to the bowl of dry ingredients

Add the butter and use your hands to work into the dry ingredients until you have a rough-looking dough.

crumble topping in hands over the bowl of mixed ingredients

It should look something like this-no need to be exact or perfect.

the cherry crumble topping spread out on a baking sheet lined with parchment paper

Then, dump this out on a baking sheet lined with parchment paper. Preheat the oven to 350 degrees F.

granny smith apple being chopped on a cutting board

Core and chop the apples. You don't need to peel them first unless you prefer to do so.

cherries and apples in a bowl with remaining ingredients to the side

Combine the fruits in a large bowl, then toss with the sugar, salt, and spices.

orange juice and cornstarch being whisked in a small bowl

Whisk the orange juice with the cornstarch. Then toss this with the fruit.

cherry apple crisp in small dishes on a baking sheet

Pour the fruit into a square baking dish, or into individual oven-safe dishes like these. Bake the topping in the middle of the oven and the fruit on the bottom for 20 minutes.

the crisp topping being spooned over the filling

Take both the topping and filling out of the oven. Break the crumble into pieces and spread over the crisp filling.

dishes of the cherry apple crisp with whipped cream ready to eat

Return the crisp to the oven and continue baking for another 15-20 minutes.

🍏 Storage

You can store this apple and cherry crumble for about three days in the fridge. Keep loosely covered, not tightly covered, to prevent moisture from building up on top of the crisp and making the topping soft. I suggest reheating before serving, but that's up to you.

🥛 Top tips

  • Keep an eye on the topping in the last few minutes of baking. When I baked mine, it started to quickly brown only in the last few minutes. If this happens to you, throw a piece of aluminum foil over the top of the baking sheet or dish.
  • You can enjoy this for more than just dessert. It makes a great breakfast when heated up and served with a splash of milk instead of whipped cream.

💭FAQ

What is crisp topping made of?

What makes a crisp a crisp is the inclusion of oats in the topping. That's the big difference between a crisp and a crumble, which does not contain oats.

Should you cover apple crisp after baking?

Not right away. This will make your crisp soggy. Let the crisp cool completely at room temperature if not serving right away. Then loosely cover the crisp, that way moisture is not trapped and condensing on the topping.

How can you tell when apple crisp is done?

You'll know this cherry apple crisp is done baking when the topping is lightly browned and the fruit is soft and bubbling. You can always do a quick taste test and make sure the fruit is cooked to your liking. Just don't burn your mouth!

🍹 Pairing

Try this crisp with any of these beverages:

  • cranberry mocktail in a coupe glass
    Cranberry Orange Mocktail
  • glasses of mocktail with gingerbread
    Gingerbread Mocktail
  • a glass mug of citrus tea being poured from a tea pot
    Honey Citrus Mint Tea
  • a hand serving a cider cocktail
    Apple Cider Whiskey Cocktail

📋Related

Looking for similar recipes? Try these:

  • two pieces of cherry pie on plates with coffee cups
    Cherry Rhubarb Pie
  • peach cobbler in a cast iron pan with two plates and sliced peaches
    Cast Iron Peach Cobbler
  • a plate with stuffed apple cremes covered in caramel and powdered sugar
    Baked Apple Crepes with Ricotta
  • Apple Strudel

How to Use Garlic Scapes

What's a garlic scape, and what do you do with it? From how to harvest to how to eat, learn all you need to know about how to use fresh garlic scapes.

roasted garlic scapes on top of an omelet with eggs and cheese

There are many foods I didn't know about until I moved to Vermont, expanded my vegetable garden, and started paying attention to local foods. Garlic scapes were one of them. You probably won't find them at your typical grocery store, but garlic lovers won't want to miss these tasty bonus vegetables, as their season and availability don't last for long.

What are garlic scapes?

A garlic scape is a shoot that emerges from the center of a hard-neck garlic plant as the bulb forms. (More on hard-neck vs. soft neck garlic.) This happens in late spring and early summer. The end of a scape is where the flower forms. Except, you want to harvest the garlic scape before that flower blooms. Doing so allows the plant to put its energy back into forming the garlic bulb that you'll soon harvest. In other words, by picking scapes, you're basically getting an extra part of the plant that will give you better garlic in the long run. It's a total win.

Interestingly, scallions and chives also produce scapes, though garlic's are the most popular.

garlic scape growing from garli plant
A garlic scape growing in the garden

How to Harvest

If you're unsure what you're looking for, the scape is thin, round, and has a pointy-looking end. It also forms a curl as it grows. This is unlike the leaves of the plant that grow straight upward. The scape starts to grow as the garlic bulb nears the end of its growing season. This will depend on where you live and your growing season.

If you're not growing garlic, no problem. You'll find scapes at farmers' markets in early summer. They tend to go quickly because they're only available for such a limited time.

garlic scapes on counter
getting ready to roast garlic scapes

How to store garlic scapes

You can store garlic scapes in the fridge for up to two weeks, wrapped in a damp paper towel, and placed inside a bag. If you don't plan to use them within that time, chop them up, spread them out on a baking sheet, and freeze them. Then, transfer the chopped scapes to a freezer container for long-term storage.

garlic scapes frozen on baking sheet
trimmed garlic scapes ready for roasting

How to use garlic scapes in your cooking

Start by giving the scapes a rinse, then cut off any tough parts. Sometimes, the ends can get a little woody or rough, and you don't want to eat them. Next, cut off the blossom end where the flower would have formed. This part is stringy and also not ideal for eating.

Now that they're prepared, there are many ways you could use scapes for cooking.

One of the most common methods is to make a garlic scape pesto. All you need to do is replace the basil or other green with scapes in your favorite pesto recipe. I also leave out garlic cloves, as the scapes provide more than enough of that flavor. Toss the pesto with pasta or vegetables, add it to a potato salad or salad dressing, or put it on top of a white pizza. Basically, anywhere you want a burst of fresh garlic flavor.

I prefer to use scapes as a whole ingredient and add them, chopped into stir-fries, cooked with scrambled eggs, or raw in salads.

This week, I tried something different. Instead of chopping them up, I kept the scapes whole and drizzled them with olive oil and a sprinkle of salt. I roasted them on a baking sheet at 400 degrees for about 20 minutes until they were browned and crunchy. I honestly could have eaten them all right out of the oven. Instead, I put them on top of a cheddar and bacon omelet and cut them up as I ate. I felt a bit lazy just throwing them whole into the oven. Yet, they were amazing just like that.

garlic scapes on a baking sheet

I love how versatile this bonus vegetable can be. It doesn't matter how you use them, as long as you enjoy them and don't let the brief scape season pass you by.

Here are a few more ideas on how to add them to some of my recipes.

  • Saute chopped scapes in butter and toss them into this mint pesto pasta dish
  • Cook them alongside asparagus and enjoy them with orange tempeh
  • Slice them into large pieces and try them raw in spring rolls

Have you tried garlic scapes? What's your favorite way to use them? Leave me a comment below!

Tofu Spring Rolls

Vietnamese spring rolls on a cutting board

A recipe for fresh tofu spring rolls that packs crunchy vegetables with strips of flavored tofu and a side of easy peanut dipping sauce.

spring rolls with herbs and peanut sauce

Spring rolls, often called Vietnamese spring rolls, typically consist of raw vegetables, a protein, some noodles, and herbs, all rolled up in a thin rice paper wrapper.

This recipe's protein is tofu, although shrimp and pork are also common. We'll quickly cook the tofu under the broiler; however, the roll itself is served raw. Because of that, the fresh vegetables provide a wonderful crunch, while the peanut dipping sauce elevates and ties it all together. It's a good way to enjoy fresh, in-season vegetables.

😍 Why you'll love these spring rolls

  1. They're completely customizable. You can use your favorite vegetables and herbs and vary each roll with your choice of fillings.
  2. They're fun to make. If you're serving them at a get-together, why not let everyone make their own just how they like? After the ingredients are all prepped, they take just a few minutes to assemble and roll up.
  3. They're healthy and fresh tasting. You can't beat the crunch of fresh vegetables paired with the flavors of the herbs. They're perfect for summer when both ingredients are at their peak.

If you're looking for more delicious vegetarian recipes, check out these:

  • Cauliflower Potato Leek Soup
  • Eggplant Florentine
  • Mushroom and Pumpkin Risotto
  • Remy's Ratatouille
  • Orange Pan Fried Tempeh
[feast_advanced_jump_to]

🥕 Ingredients

Here's everything you need to make these spring rolls with tofu.

ingredients for making spring rolls

Key Ingredients

  • Tofu - This recipe calls for one package of extra firm tofu. Softer tofu will not hold up.
  • Spring roll wrappers - You want to use rice paper spring roll wrappers that you can rehydrate with water. Package quantities may vary, but you want at least 16 wrappers.
  • Vegetables - I use carrots, cucumbers, and cabbage in the recipe as it's written, though you can use any crunchy fresh vegetable.
  • Fresh herbs - Such as basil and mint.
  • Soy sauce - A key component of the peanut sauce. If desired, use low sodium soy sauce or tamari if you want to make this recipe gluten-free.
  • Peanut butter - Any peanut putter you like is fine here.

See the recipe card below for the full list of ingredients and quantities.

🫛 Substitutions & Variations

  • Vegetables - Several other raw vegetables, such as snow peas, radishes, bell peppers, and bean sprouts, would go well in these rolls. Because the tofu has a soft texture, you may want your vegetables to provide some crunch to balance things out. Use whatever combination of vegetables you prefer.
  • Herbs - Basil, mint, cilantro, parsley, and even dill could be used.
  • Lower sodium-The peanut dipping sauce is salty. If you'd like it less so, use a lower-sodium soy sauce. However, keep in mind that the rolls themselves are a bit bland on their own, and the sauce intentionally packs some punch.
  • Add rice noodles - Rice noodles are a common addition to spring rolls. Try adding a small amount of cooked noodles to your rolls. Just be careful not to overstuff them.

🔪 Instructions

How to make the spring rolls.

slices of tofu being covered with a towel
  1. Step 1: Slice the block of tofu in half and then each half into ¼-inch slices. Place on a tray, cover with a towel, and place something heavy, like a pan, on top of the towel. Let sit for 15 minutes to press out some of the liquid.
whisking marinade ingredients in a bowl
  1. Step 2: In a bowl, whisk together the soy sauce, ginger, garlic, olive oil, honey, and rice vinegar.
sliced tofu coated in marinade
  1. Step 3: Coat both sides of the tofu with a couple of tablespoons of the sauce. Pop the pan under the broiler, adjust your oven rack as needed, and cook for 5 minutes on each side until lightly browned.
vegetables sliced on a cutting board
  1. Step 4: Slice your carrots, cucumber, and cabbage into matchstick-sized pieces. Separate the herbs into individual leaves and remove the stems. Slice the tofu into strips.
dipping spring roll wrappers in water
  1. Step 5: Set all of the ingredients out to assemble the rolls. Add some water to a shallow dish, then briefly dip one of the wrappers for 10-15 seconds to soften.
herbs on a spring roll wrapper
  1. Step 6: Lay the wet wrapper on the counter. Place a few herb leaves in the middle, followed by a few pieces of vegetables and then tofu.
tofu strips added to spring roll
  1. Step 7: Fold the sides of the wrapper inward on top of the filling.
rolling up a spring roll
  1. Step 8: Roll the wrapper up gently but firmly, squeezing to tighten the wrapper around the filling and have it stay closed.
holding an assembled spring roll
  1. Step 9: Repeat with the remaining wrappers and filling ingredients, varying the ingredients in each roll as you like. Place the rolls in the fridge until ready to serve.
whisking peanut butter into small pot
  1. Step 10: Add the remaining sauce to a small pot with the peanut butter and sriracha. Heat over low to soften the peanut butter until it is easy to whisk until smooth. Serve the spring rolls with the peanut sauce.

✨Top Tips

  • Don't overfill the wrappers! They hold less than you think. Go easy at first until you get a sense of how much filling will fit.
  • Just dip the rice paper wrappers in water briefly to hydrate. There's no need to let them sit in the water. They'll fall apart if you do.
  • Remember that what you put on the bottom of the wrappers when you fill them will be the top after you roll them.
  • Don't stress. Have fun, be creative, and don't worry if you're first few are a mess. Just eat the mess and keep going!
  • Serve within a couple of hours of serving for the freshest taste and most crunch.

🥡 Storage

These spring rolls are best enjoyed the day they're prepared. When stored in the fridge for too long, they turn soft and mushy, which is not what you want. You want that fresh vegetable crunch.

That said, you can prepare the sauce in advance, prep the ingredients for the rolls, store them in the fridge, and assemble everything just before you're ready to serve.

🙋🏼‍♀️ FAQ

What is a tofu spring roll?

A spring roll is an Asian snack or appetizer in which thin, translucent wrappers made of rice paper are filled with various fresh ingredients, often vegetables. A tofu spring roll contains vegetables and tofu.

Are spring rolls healthy?

Fresh spring rolls, when filled with fresh vegetables and not fried, are a healthy appetizer option.

Which is healthier, spring roll or egg roll?

Spring rolls are the healthier choice because, unlike egg rolls, they're not fried.

Are spring rolls gluten-free?

If you use a rice-based gluten-free wrapper (such as these from Blue Dragon) and tamari in place of the soy sauce in this recipe, then yes, these rolls will be gluten free.

🍹 Pairing

These recipes would pair nicely with spring rolls:

  • bowls of chicken curry with noodles and peanuts
    Chicken and Squash Curry
  • a dish of beet broccoli salad with yogurt dressing
    Beet Broccoli Salad
  • glasses of lemon balm lemonade drink
    Lemon Balm Lemonade Recipe
  • jars of quick pickle beans with garlic and dill
    Quick Green Bean Pickles

🥗 Related

Looking for other recipes like this one? Try these:

  • a large plate of bok choy, tofu, and radishes with dressing
    Bok Choy with Tofu Salad
  • large dish of pesto orzo salad
    Orzo Pesto Pasta Salad
  • a plate of artichoke pasta
    Artichoke Pesto Pasta
  • a large bowl of pasta salad with basil leaves
    Pesto Pasta Salad with Sundried Tomatoes

Lilac Tea

glasses of lilac tea with ice, pitcher, and flowers

In this recipe, learn how to use lilac flowers to make an easy, refreshing glass of lilac tea. Because lilac flowers aren't just pretty spring flowers, they're also edible!

glasses of lilac iced tea with a pitcher and flowers

Here in Vermont, lilacs are in full bloom, and it's a sure sign that summer is just about here. Lilacs have a rich, sweet aroma that's hard to miss. They smell so good you can't help but wonder how they might taste. And since they're completely edible, there's no need to wonder.

[feast_advanced_jump_to]

There are many ways to use lilac flowers in the kitchen. Like other edible flowers, I enjoy infusing their flavor into something rather than directly eating the flowers themselves - though you totally could!

Making lilac sugar is one of the easiest ways to impart its flavor. All you have to do is add some flowers to a container of sugar, shake it up, and let it sit for a few days. Then sift out the flowers, and you'll find that the sweet lilac flavor has infused into your sugar.

In this lilac recipe, we'll use the flowers to infuse a simple syrup that we'll then use to flavor and sweeten a pitcher of homemade iced tea.

If you're interested in using other flowers from your garden in your cooking and baking, check out my chamomile cookie recipe. And if you also have rhubarb in your garden, give this rhubarb crumble cake a try. Or if it's more tea ideas you're after, how about this recipe for honey citrus tea or an Earl Grey Cocktail?

🌼 Ingredients

Do you have lilacs in your yard? If not, I'm sure you know someone who does. If you've wondered what it takes to grow them (hint: they're easy!), here's some info from Iowa State University.

sugar, flowers, lemon, tea leaves for making tea
  • Freshly picked lilac flowers will flavor the tea. Pick your flowers the day or the day before you make this tea, preferably in the morning when they're at their best. Look for branches that aren't too close to the ground (cause you never know who may have peed on them 😉) and pick only from plants you know haven't been sprayed with chemicals.
  • Loose-leaf tea or tea bags of your favorite variety. A green or a not-too-strong black tea works well. Use a tea that won't overpower the lilacs' subtle flavor.
  • Sugar to make the simple syrup. White granulated sugar or natural cane sugar are good choices.
  • A lemon, for serving.

🔪 Instructions

a measuring cup filled with picked lilac flowers

Remove the lilac flowers from their branches, then rinse them well with water.

lilac flowers in a small pot with a spoon

Add the clean lilac flowers to a small pan.

lilacflowers in a pan with sugar

Add the sugar and water to the pan. Bring to a simmer. Simmer for 5 minutes. Turn off the heat and let it sit for 1 hour.

glass pitcher filled with water and tea leaves and a spoon being stirred in the pitcher

Meanwhile, make the tea. Add tea leaves or bags to boiling water and let steep for the recommended time for your tea variety. Chill while the syrup cools.

lilac simple syrup being strained from a pan into a glass

Pour the lilac simple syrup into a jar with a tight-fitting lid. You won't need all of it at once, so store whatever you don't need in the fridge.

glasses of lilac tea with a pitcher of tea and the lilac simple syrup

To serve, fill glasses with ice. Pour over the tea and some of the lilac simple syrup. Garnish with some lilac flowers and a slice of lemon.

Tip: This infused simple syrup makes a mild-tasting lilac tea. So if you're worried about it being overwhelmingly floral, there's no need. I actually suggest brewing your tea on the weaker side so the lilac flavor comes through better. If your tea is too strong, you likely won't even taste the lilac flavor.

🍋 Variations and Substitutions

  • Cold brew your tea for a milder flavor that will let the lilac syrup stand out better. I do this by adding tea leaves to a pitcher of water and putting it in the fridge overnight.
  • Lilac lemonade could be made in the same way. Just prep a pitcher of lemonade instead of iced tea and flavor it with the lilac syrup to your liking.

🍵 Storage

You likely won't use the entire cup of lilac simple syrup all at once. So keep it stored in the fridge with a tight lid and use it within a month.

And it's not just good for making lilac tea. Try it in your lemonade, to flavor your seltzer, and in summer cocktails in place of regular simple syrup.

💭 FAQ

What does lilac tea taste like?

A bit like it smells, to be honest. It's a mix of sweet and floral but it's a very subtle flavor. No need to worry about it being like an overwhelming perfume in this recipe.

Don't I need to dry the lilac flowers to make tea?

Not in this recipe. Here, we're using fresh lilac flowers to make a simple syrup that flavors your iced tea. I'm sure the flowers could be dried and part of a homemade dried tea blend, but I haven't tried this myself.

Which lilacs are edible?

All kinds of lilacs are edible. You don't need to worry about using only a specific variety. However, do make sure the flowers you use are clean and haven't been sprayed with pesticides or other chemicals.

🍪 Pairing

Try pairing this tea with one of these recipes:

  • a plate of chamomile cookies with flowers on side
    Chamomile Cookies
  • several cranberry and apple muffins on a countertop with oats
    Apple Cranberry Muffins
  • bowl of rhubarb chutney with apple slices
    Easy Rhubarb and Apple Chutney
  • marmalade with grapefruits and oranges, spread on toast
    Orange and Grapefruit Marmalade

🍹 Related Recipes

Looking for more recipes like this one? Try these:

  • glasses of earl grey tea cocktail with a bottle of gin
    Earl Grey Cocktail
  • glass of elderflower gin tonic with gin bottle and flowers
    Elderflower Gin and Tonic
  • glasses of lavender lemonade with blueberries and lemon slices
    Blueberry Lavender Lemonade
  • glasses of lemon balm lemonade drink
    Lemon Balm Lemonade Recipe

Thai Coffee

a large glass of thai coffee with ice

Inspired by traditional Thai iced coffee, this indulgent drink is made with sweetened condensed milk, cream, and cardamom. Enjoy it as a refreshing beverage served over ice in the summer, although it is also delicious hot.

glass of iced coffee with a straw

Cardamom is one of my favorite spices, and when I enjoyed a cardamom-flavored Thai coffee at my local farmers market, I was excited to make my own at home.

[feast_advanced_jump_to]

Thai iced coffee, known as Oliang, is made with coffee grounds combined with grains or seeds like corn, soybeans, rice, or sesame seeds to create a unique flavored blend. You can buy a traditional blend of Oliang coffee powder, such as this variety, or your favorite strongly brewed coffee roast instead. The cardamom and sweetened condensed milk create a perfectly balanced coffee that's worth trying.

☕ Why you'll love this coffee

  1. This Thai coffee is a quick way to liven up your typical coffee and make it more interesting and flavorful.
  2. You don't need any special equipment or brewing methods. You can use your preferred coffee roast and brewing method. (Here's a good resource if you want to use the traditional Thai method and ingredients.)
  3. It only takes an additional minute to prepare than your typical cup of coffee.

Are you looking for more coffee or tea drinks? Try these:

  • Amaretto Latte
  • Lilac Tea
  • Cold Brew Martinis
  • Honey Citrus Mint Tea

🥛 Ingredients

Here's what you need to make this Thai iced coffee recipe.

bowls of ingredients for preparing the thai coffee
  • Coffee - To prepare the two large iced coffees in the recipe, you'll need 32 ounces of freshly brewed coffee. Use whatever coffee and brewing method you prefer. My everyday coffee is Vermont Coffee Company's medium roast Dos Carribean. Thai coffee is made with strong coffee, so consider brewing your coffee with more coffee grounds than usual.
  • Ground Cardamom - Sweet and spicy with hints of citrus, ground cardamom is easy to find in stores with other spices. A little goes a long way, so you don't need much. Adding cardamom is not necessarily traditional, but I enjoy the added spice.
  • Sweetened condensed milk - Rich, sweet, and creamy with a caramel-like flavor, this kind of milk is shelf-stable and found in cans with baking supplies in the grocery store. Sweetened condensed milk is a common part of Thai coffee, and since you don't need much for the recipe, refrigerate any leftovers in an airtight container.
  • Cream - A bit of cream or half-and-half lightens the coffee and allows the condensed milk to be incorporated into the coffee. Use your preferred cream or half-and-half. Traditional recipes often use evaporated milk, but I prefer fresh cream.

🥥 Variations and Substitutions

  • Make it sweeter by using more sweetened condensed milk, or adding a splash of maple syrup to your coffee.
  • Make a coconut variation by using sweetened condensed coconut milk.
  • Try other flavors in place or in addition to the cardamom. Add a bit of ground cinnamon, ginger, vanilla, or almond extract.
  • Use espresso instead of coffee. Brew your espresso normally and add water until you have an equivalent amount. The stronger flavor of espresso is a good substitute for coffee here.

🥄 Instructions

coffee being brewed in a french press
  1. Step 1: Brew your coffee using your preferred method.
cream in bowl with whisk and coffee
  1. Step 2: Whisk the cream, cardamom, and sweetened condensed milk in a bowl.
a glass of black iced coffee
  1. Step 3: Fill a glass with ice and add your coffee.
cream being poured into iced coffee
  1. Step 4: Pour the sweetened cardamom cream mixture into the coffee and stir to combine.

🌟 Top Tip

Don't skip whisking the cream and sweetened condensed milk together before adding them to the coffee. This allows the sweetened condensed milk to easily incorporate into the coffee and not just sit at the bottom of the glass.

🙋🏼 FAQ

What is Thai coffee made of?

You make Thai coffee with strongly brewed coffee, sweetened condensed milk, and evaporated milk or fresh cream. Some people, such as myself, like to add cardamom for extra flavor.

Does Thai coffee have a lot of caffeine?

Thai coffee has a similar amount of caffeine to a typical strong coffee. However, the specific amount depends on the roast, bean, and brewing process. If you're looking for less caffeine, you can use a decaf dark roast.

Is Thai coffee bitter?

No. It's a nice balance of bitter, sweet, and spice. Without the sweetened condensed milk, cream, and cardamom, yes, this recipe would be as bitter as a strong black coffee.

🍰 Pairing

These recipes would go great with this Thai coffee:

  • cranberry ginger bread sliced on cutting board
    Cranberry Gingerbread Loaf
  • a plate with stuffed apple cremes covered in caramel and powdered sugar
    Baked Apple Crepes with Ricotta
  • cookies on a blue and green background
    Ginger Cookies With Fresh Ginger
  • peach cobbler in a cast iron pan with two plates and sliced peaches
    Cast Iron Peach Cobbler

🍹 Related Recipes

  • a glass with a foamy pink cocktail topped with cherries and limes
    Cherry Whiskey Sour
  • a glass of negroni with smoke
    Smoked Negroni
  • peppermint mocha martini with lights
    Peppermint Mocha Martini
  • glasses of elderberry cordial
    Elderberry Cordial Recipe

Rhubarb Crumble Breakfast Cake

four plates with slices of cake and rhubarb on side

This rhubarb crumble breakfast cake is part tart, part sweet, and entirely delicious. With oats, yogurt, whole wheat flour, and maple syrup, it's practically a healthy breakfast. However, it also makes a good snack any time of day and is a quick bake when you've got rhubarb to use up.

slices of rhubarb cake stacked on a plate with more plates in background

A few years ago, a generous friend divided up her rhubarb plant and shared some with me to plant in my own garden. Now, each spring, I look forward to seeing it sprout back up when warmer weather arrives.

Rhubarb is an interesting fruit (I mean vegetable), but browse just a few recipes, and you'll notice that people tend to smother it in sugar. Yeah, it has a tart flavor - and yeah, I absolutely hated it as a kid - but with too much sweetness, you lose its charm and flavor. So when I cook with rhubarb, and in this rhubarb crumble cake recipe in particular, you'll find that I go easy with the sugar. It may be cake, but it doesn't taste overwhelmingly sweet.

[feast_advanced_jump_to]

For some more of my rhubarb recipes, check out my Rhubarb Banana Bread for a less sweet option. This Cherry Rhubarb Pie is great for dessert, while my Rhubarb Apple Chutney makes a fantastic, not-too-sweet condiment for grilled meat. Of course, there's never a bad time for making a Ginger Rhubarb Gin Cocktail.

I have several other cake recipes you may like as well, including this Carrot Cake sweetened with dates, a Pear and Cardamom Cake coated in caramel, or this more unique Parsnip Cake with orange.

🧾Ingredients

ingredients for rhubarb crumble cake on a tray with labels

Key Ingredients

  • Rhubarb: The star of the cake, and when it bakes, it creates pockets of tart jamminess. You can use fresh or frozen rhubarb. If using frozen, thaw and squeeze out some of the water first.
  • Rolled oats: Add texture and fiber to this cake, and they are one of the reasons why this cake works well as a breakfast and not just a dessert
  • Whole-wheat flour: Offers more nutritional value and a deeper, nuttier flavor. If you only have all-purpose flour, that works too.
  • Ginger: Makes a great pairing with rhubarb
  • Greek yogurt: Helps keep the cake super moist. Don't substitute regular yogurt; it's too runny. But you could use sour cream if you prefer.
  • Maple syrup: I use real maple syrup as the main sweetener for this cake. Not only is it a better choice, but it also helps to keep the sweetness dialed in.
  • Brown sugar: For the sweet and crumbly topping.

See the recipe card below for the complete list of ingredients and quantities.

🍓Substitutions and Variations

Wheat flour: Instead of whole wheat flour, you can use all-purpose flour or a combination of the two.
Brown sugar:
Strawberry rhubarb: You can substitute half of the rhubarb for sliced strawberries if you're a fan of the classic strawberry rhubarb combo.
Dessert: If serving for dessert instead of breakfast, you can sweeten things up with a scoop of vanilla ice cream served over a warm slice of the cake.

🔪 Instructions

dry ingredients in a bowl for making cake
  1. Step 1: Preheat the oven to 350 degrees F. In a large bowl, whisk together the dry ingredients.
wet ingredients mixed in a bowl for making rhubarb cake
  1. Step 2: In a second bowl, whisk together the wet ingredients.
mixing wet ingredients into the dry
  1. Step 3: Pour the wet into the dry and use a spatula to gently combine until completely blended.
rhubarb being added to the cake batter
  1. Step 4: Add the chopped rhubarb and fold it into the batter.
cake batter spread into baking dish
  1. Step 5: Spread the batter into a greased baking dish.
rhubarb crumble in a hand over a bowl
  1. Step 6: In a bowl, combine the crumble ingredients until you have crumbs.
rhubarb crumble being sprinkled over a pan of cake batter
  1. Step 7: Sprinkle the crumble over the cake batter.
up close photo of crumbles on the cake batter
  1. Step 8: Don't skimp on those crumbles. Make sure the cake is well covered.
baked cake in a pan
  1. Step 9: Bake the rhubarb crumb cake in the preheated oven for 30-35 minutes until cooked through.
pieces of cake on plates with rhubarb
  1. Step 10: Serve the cake warm with extra brown sugar, cinnamon, and pecans.

✨ Top Tips

  • Make sure to use cold butter when making the crumble topping so that it retains some of its texture when baking.
  • This is a very wet cake batter. Because of that, the crumb topping may dissolve into the batter and not be quite as crumbly. That's why I set aside some brown sugar, cinnamon, and chopped pecans to sprinkle over the cake after baking, to ensure there is still some crunch.

🍰Storage

Since it's such a moist cake, I suggest storing it in the fridge rather than at room temperature. In the fridge, it should keep for up to four days.

📋FAQ

Can I use frozen rhubarb?

Frozen rhubarb would work fine here. Just proceed with the recipe as written.

What does rhubarb taste like in a cake?

Rhubarb has a refreshingly tart or sour taste. On its own, it's probably not that tasty, but in a cake with a bit of sugar, it's well-balanced. It tends to melt down during cooking, and in this cake it creates pockets of gooeyness that I think you'll enjoy.

Do you peel rhubarb for cake?

No, there's no need to peel your rhubarb. Just chop it into bite-sized chunks, and it'll cook down in the oven.

🍵 Pairing

  • glasses of lavender lemonade with blueberries and lemon slices
    Blueberry Lavender Lemonade
  • glasses of lilac tea with ice, pitcher, and flowers
    Lilac Tea
  • a glass mug of citrus tea being poured from a tea pot
    Honey Citrus Mint Tea
  • a large glass of thai coffee with ice
    Thai Coffee

🍰 Related Recipes

  • slices of rhubarb quick bread with butter
    Rhubarb Banana Bread
  • a serving plate full of muffins with apples
    Apple Rhubarb Muffins
  • plates of sliced blackcurrant cake with fresh berries and whipped cream
    Blackcurrant Cake
  • parsnip cake with oranges and pistachios
    Orange Parsnip Cake with Cream Cheese Frosting

Chamomile Cookies

a plate of chamomile cookies with flowers on side

These simple chamomile cookies offer the sweet and soothing flavor of chamomile flowers in the form of tender, buttery cookies. They're the perfect treat for your afternoon cup of tea or coffee.

a plate of chamomile cookies with coffee and sugar on side

When it comes to plants that can take over your garden, everyone warns you about mint. But no one ever mentions chamomile. I planted a small bunch of flowers in my garden once or twice. Now, they pop up just about anywhere and everywhere each summer. This year, it's even growing from a crack in the driveway pavement.

These small, attractive flowers have tiny white petals and vibrant yellow centers. They tend to drop their seeds and regrow annually from year to year. They certainly add some interest, no matter where they appear, and I don't mind too much, as chamomile flowers are much easier to remove and manage than mint.

[feast_advanced_jump_to]

Like mint, chamomile makes a great tea. But that's not the only use for the edible flowers. Their sweet apple flavor is a good addition to cocktails, cakes, honey ice cream, and cookies.

These are essentially easy sugar cookies topped with fresh chamomile flowers. When they're still soft, you press the flowers into the cookies right after taking them out of the oven. The residual heat softens the flowers and sets them in place as the cookies cool.

For more garden-inspired treats, try my Lemon Rosemary Olive Oil Cake, Blackberry Thyme Scones, and Rhubarb Crumble Breakfast Cake. Even these Strawberry Puff Pastry Pop Tarts have some herbs in them.

But if it's another tasty cookie recipe you're looking for, try my Salted Maple Oatmeal Chocolate Chip Cookies next.

🌼Ingredients

These cookies only take a handful of ingredients.

ingredients lined up for making the cookies

You'll need:

  • Unsalted butter
  • Powdered sugar
  • All purpose flour
  • Fresh chamomile flowers
  • An egg yolk
  • Salt
  • Vanilla
  • Coarse sugar

See the recipe card below for quanities.

📋Substitutions & Variations

  • If you don't have chamomile flowers in your garden and can only get dried chamomile, that's ok! You can find dried chamomile in the bulk section of health food stores or co-ops. Though you can also open up chamomile tea bags and use the tea leaves. Add 2 tablespoons dried and crushed chamomile flowers to the cookie batter and skip adding the flowers to the cookies after baking. Although your cookies won't look the same, they will taste similar.
  • No powdered sugar? Just run an equal amount of granulated sugar in your food processor until you have a white powder - aka powdered sugar.
  • Try replacing the vanilla with lemon zest for a slight change in flavor that would also complement the chamomile.

🍪Instructions

stand mixer with cookie ingredients being added to make the dough

Blend butter and sugar in a mixer with the paddle attachment. Then add flour, vanilla, salt, and egg yolk and continue to mix until a dough is formed.

cookie dough rolled and cut out on the counter with a rolling pin

Roll out the dough on a lightly floured counter. Cut it into rounds using a cookie cutter or glass. Place them on a baking sheet lined with parchment.

two pieces of dough and a plastic bag with bench scrapper

Divide the dough into two equal pieces. Put them in bags or wrap and refrigerate for at least 30 minutes to firm up.

cookes on a tray fresh from oven with chamomile flowers pressed into the tops

Bake the cookies for about 10 minutes in a 325 degree oven. Remove and press the flowers into the cookies, sprinkle with sugar and let cool completely.

Note: Are you wondering why I wouldn't have you add the flowers before baking rather than after? When I tried doing so, I found that the flowers turned an unappealing color. I think the heat was just too much. Instead, pressing the flowers into the hot cookies right out of the oven provided enough heat to wilt them and have them adhere to the cookies.

⭐Top Tip

Don't skip chilling the dough! This is important for several reasons. Primarily, in this case, it helps the butter firm back up so that the cookies don't spread out too much when baking. It also makes the dough easier to roll and cut. This is a soft cookie dough and if it gets too warm, it will stick to your surface and be difficult to roll out.

🥄Equipment

  • A mixer, either a stand or hand mixer will work.
  • A rolling pin to roll out the cookie dough.
  • You can use a cookie cutter (or even a water glass) to cut out the cookies. I used a 2 ½-inch-wide glass.

⏲️Storage

  • Store these cookies in an air-tight container at room temperature for up to a week.
  • You can also freeze the cookies after baking and store them in a freezer bag. Just let it sit at room temperature for a few minutes before enjoying

💭FAQ

What does chamomile taste like?

Chamomile has a subtle and pleasant sweet apple flavor. Its taste is not overpoweringly floral. If you've ever had chamomile tea, you'll quickly recognize the taste in these cookies.

What goes well with chamomile?

Chamomile pairs well with citrus flavors, especially lemon, and other edible flowers, like lavender. It adds a nice flavor to foods that don't have much flavor of their own (like these simple cookies) and can be used to flavor drinks, honey, rice, and desserts.

What are common uses for chamomile?

As an edible plant and flower, chamomile has a long history of medicinal use, chief among them being as a sedative. However, I have no knowledge or experience in medicinals, so please do your research from a reliable source if you'd like to know more.

🫖 Pairing

These cookies with chamomile would go great with these recipes:

  • glasses of elderberry cordial
    Elderberry Cordial Recipe
  • large glass full of strawberry cream soda with straw
    Strawberry Cream Soda
  • glasses of lavender lemonade with blueberries and lemon slices
    Blueberry Lavender Lemonade
  • glasses of lilac tea with ice, pitcher, and flowers
    Lilac Tea

🍪 Related Recipes

For more cookie recipes, try these:

  • raspberry jam with rugelach cookies
    Raspberry Rugelach
  • cookies on a blue and green background
    Ginger Cookies With Fresh Ginger
  • three fig bars with crumbs and figs
    Homemade Fig Bars Recipe
  • biscotti on a plate with lemons and icing
    Limoncello Biscotti

Frozen Matcha Latte

a glass of frozen matcha latte on a countertop with straw

A quick, refreshing, and energizing frozen matcha latte perfect for the warm weather season. Skip the coffee shop and whip this tasty drink up in just five minutes.

large glass filled with frozen matcha with matcha powder in background

I'm a sucker for buying frozen drinks in the summer months. I was surprised by how much I liked Dunkin Donuts' frozen coffee when I tried one for the first time recently. Until I later checked out the nutritional details. 😲

That's the problem. They're usually too sweet and made from concentrates with a long list of ingredients. Not to mention, it's a pricey habit when half the drink is made of ice anyway.

[feast_advanced_jump_to]

This matcha latte recipe solves all the problems.

  • It's sweetened with maple syrup instead of highly processed sugar and you can control the level of sweetness by using more or less to your liking.
  • You don't need any extra (and expensive) emulsifiers or additives. We're making a simple frozen drink, not a science project. I know some recipes suggest otherwise, but I haven't found it necessary.
  • It's just four ingredients, plus water and ice. It doesn't get much easier.

If you're a fan of tea, you may like my recipes for Lilac Tea or Honey Citrus Mint Tea. And for another refreshing beverage idea, try my Lemon Balm Lemonade.

🌿Key Ingredients

Matcha green tea powder - Matcha powder makes a smooth and rich tea with an earthy, sort of herbal taste. On its own, it can be bitter. But incorporated into milk with some sweetener, it's quite satisfying and unique. You can find matcha in most grocery stores with the other teas. It comes in both a loose container form as well as tea bags. If you can only find it in a teabag, simply cut it open. One bag typically contains 1 teaspoon of tea.

Milk - This recipe will work with whichever milk beverage you prefer, such as cow's milk, almond milk, oat milk, or soy milk.

Maple syrup - Sweetens the frozen matcha latte. Use more or less as you like.

🥣Instructions

matcha being whisked with water in small bowl

Whisk the matcha with the hot water in a small bowl until combined.

milk being poured into a blender cup with matcha

Add the ice to your blender, along with the matcha liquid, milk, vanilla extract, and maple syrup.

blending the matcha latte in blender

Blend for about 30 seconds to combine.

frozen matcha being poured into a glass

Pour the drink into your glass. Top with some whipped cream, if you like. Enjoy your frozen matcha latte!

💭Helpful tips

  • Matcha powder clumps easily. Because of this, you may find it helpful to first sift the matcha powder into your cup or bowl. Then whisk it into hot water to dissolve the powder.
  • While there are special bamboo matcha whisks that the professionals use to prepare the tea, a small traditional whisk is fine at home for the occasional matcha drinker.
  • If you're wondering about the caffeine level in this matcha latte, it's around 70mg. That's more than a cup of green tea, but less than the standard cup of coffee.

📖Variations and Substitutions

Hot matcha latte - After dissolving the powder into hot water, you can add steamed milk and sweetener for a simple cup of matcha tea.
Honey - If you'd rather use honey instead of maple syrup, that will work fine.
Flavored frozen matcha lattes - If you want to take this drink one step further, you could add various flavors to this frozen latte. For fruit flavors, substitute ½ cup of ice for an equal amount of frozen fruit, such as strawberries or blueberries. For other flavors, such as mint or lavender, you could either blend in a small amount of those ingredients or use them to flavor a simple syrup that you would then use in place of the maple syrup.

💬FAQ

What is matcha?

Matcha is a green tea powder. It's made with a special shade-grown green tea plant high in chlorophyll that is ground into a fine powder. When you make matcha, the powder is incorporated into the liquid. This is different than when you make a cup of tea and steep the leaves and then discard them. With matcha, you're consuming the plant.

Is a matcha latte still healthy?

It depends on your definition of healthy. A homemade frozen latte, like this recipe, uses fewer ingredients and no additives compared to coffee shops. However, there is still sugar in the form of maple syrup. I'd argue that it is a healthier alternative to buying something similar and that's why I wanted to share this recipe.

In general, there are many matcha benefits, and you'd still get them from a latte. Most of these are the same as regular green tea, but the benefits are even greater because you directly consume the plant. They include increased energy and reduced stress. The energy you get from matcha is said to be less jittery and more focused energy than coffee. Here's some more info on the health benefits.

What's the difference between matcha and matcha latte?

Think of it as you would espresso. You make espresso with water, right? But when you add milk, it becomes something else - such as a latte or cappuccino depending on how you make it. The same with matcha. If you make it purely with water, that's matcha tea. If you combine it with milk, it becomes more of a latte beverage. David's Tea has more info on the traditional preparation of matcha.

🍹Related Recipes

Looking for other recipes like this? Try these:

  • glasses of lavender lemonade with blueberries and lemon slices
    Blueberry Lavender Lemonade
  • glass of elderflower gin tonic with gin bottle and flowers
    Elderflower Gin and Tonic
  • glasses of lemon balm lemonade drink
    Lemon Balm Lemonade Recipe
  • fruit granita in bowls
    Sour Cherry Blackcurrant Granita

📋Recipe

Carrot Juice Cocktail

carrot drink in glass with straw

The flavors of carrot cake inspire this refreshing carrot juice cocktail. With maple, ginger, and coconut, it's a refreshing beverage to enjoy in the spring sun.

tall glass with an orange drink on pink background

As a fan of carrot cake, I started thinking about how that might work in the form of a cocktail. I love the ginger and maple flavors I include in my carrot cake, but I also wanted to add the creaminess you get from the cream cheese frosting. Rather than adding a scoop of cream cheese, I opted for coconut cream, which lends creaminess and a hint of complimentary coconut.

The result is not too sweet or heavy. It has some earthiness from the fresh carrot juice and brightness thanks to a garnish of orange and ginger. If you like a little bite, a piece of candied ginger makes a great addition to the top of the glass.

[feast_advanced_jump_to]

This cocktail would fit right in at a spring or summer brunch. Why not plan a brunch menu with a few of my other recipes:

  • Banana Buckwheat Pancakes with Blueberries
  • Rhubarb Crumble Breakfast Cake
  • Beet and Feta Tartlets
  • Cheese and Chive Scones

🥕Ingredients

ingredients for making carrot cocktail

Carrot juice - Fresh carrot juice will give you the freshest-tasting cocktail possible. If you want to make your own juice, you'll need 3-4 carrots for two cocktails. But if you don't have a juicer or the time to bother, look for fresh bottled juice in the produce area of your grocery store. There may also be options in the bottled juice section. If you can only find a carrot juice blend, that'll do.

Coconut cream - Not to be confused with cream of coconut, which, even though it is for cocktails, is too sweet, in my opinion. Also, not to be confused with coconut milk, which isn't thick or creamy enough. Rather, coconut cream is thick and unsweetened. You should be able to find it in stores with cans of coconut milk. If you can only find coconut milk, it is still possible to use that to make coconut cream. Here's some more info on how to do that.

Maple syrup - I like a touch of sweetness in this cocktail, and maple syrup is a great choice. It pairs perfectly with carrots and coconut.

Ginger - Fresh minced ginger adds a touch of spice. You can either grate a piece of fresh ginger root, or do as I do, and use Ginger People's minced ginger. I always keep a jar in the fridge and the quality is always excellent.

Vodka - Use what you have and whatever variety you prefer. I chose vodka for its neutral, clean flavor.

Triple sec - Adds a bit of orange flavor, which also goes well with carrots.

An orange - For garnish. You can make a fancy orange garnish or just use slices.

Candied ginger - Offers a nice punch of extra ginger flavor as a garnish, though it's not essential if you don't have it or can't easily find some.

🍋Substitutions and Variations

Non-alcoholic version - To make this cocktail alcohol-free, replace the vodka with water and add a splash of orange juice instead of triple sec. Alternatively, try a non-alcoholic spirit.
Lemon instead of orange - A slice of lemon would be a fine substitute for the orange if you don't have one on hand.
Dairy cream - You can substitute heavy cream or half and half for the coconut cream, however, you'll miss out on the coconut flavor.
Gin cocktail - I haven't tried it, but I think the botanical notes of gin would work well with the carrot juice in this cocktail if you wanted to try that out in place of the vodka.
Vanilla - A touch of vanilla would make this cocktail taste even more like carrot cake. Add a teaspoon of vanilla extract to the recipe below or ½ teaspoon per cocktail.

📋Instructions

ice being added to a cocktail shaker

Fill a cocktail shaker halfway with ice.

carrot juice being poured into a cocktail shaker

Pour in the carrot juice.

coconut cream being poured into a cocktail shaker

Add the coconut cream.

maple syrup pouring into a cocktail shaker

Then add the maple syrup, grated ginger, vodka, and trip sec.

cocktail shaker being shook

Shake your cocktail for 15 seconds.

carrot cocktail being strained into a glass with ice

Strain into a glass filled halfway with ice.

candied ginger being placed on the cocktail glass

Add a piece of candied ginger, a slice of orange, and a straw to the glass.

carrot cocktail being held with green plants in background

Top off with extra ice and enjoy.

🧊Top Tip

This carrot juice cocktail is best when served ice cold. Be sure to use plenty of ice in your cocktail shaker and glass. After straining the cocktail, top it off with more ice if you have room in the glass and serve immediately.

💭FAQ

Do I need fresh carrot juice for this cocktail?

If you can juice your own carrots to make this cocktail, that's great. If not, check out the fresh juice options in your grocery store. Small bottles of carrot juice can often be found in produce departments. If you can't find fresh juice, check the jarred juice section.

How many carrots does it take to make 8 oz of carrot juice?

It takes about three carrots to make about 8 ounces of carrot juice, which is enough for at least two cocktails. Of course, the size of your carrots will affect the amount of juice they produce.

Is carrot juice full of sugar?

There is some sugar in carrot juice. However, it is much less than fruit juices like orange, cranberry, and apple juice. If you're buying carrot juice in the store, look for an option without added sugar.

🍸More Cocktail Recipes

A few other refreshing cocktails to try after this one.

  • glasses of rhubarb gin cocktail with a bottle of rhubarb juice
    Ginger Rhubarb Gin Cocktail
  • glass of elderflower gin tonic with gin bottle and flowers
    Elderflower Gin and Tonic
  • watermelon basil vodka cocktail in a martini glass with basil and watermelon garnish
    Watermelon Basil Cocktail
  • a hand serving a cider cocktail
    Apple Cider Whiskey Cocktail

Chocolate Lavender Coconut Cream Eggs

These tasty coconut cream eggs combine dark chocolate and lavender for a uniquely flavored treat you can make at home without special molds or fancy tools.

chocolate lavender eggs floating off plate

I grow lavender in the garden, but I have to be honest that I never really have many ideas for what to do with it. I enjoy the smell when I occasionally brush up against the plant, it looks attractive, and it brings plenty of bees to the yard. Good enough, right? Sure. But in the back of my mind, I wanted to find a few uses for cooking.

I tried using lavender in shortbread cookie dough once and didn't like the taste. In hindsight, I think I just used too much. It was exactly as anticipated, and the cookies tasted like soap. Needless to say, I never felt too compelled to find additional uses. Nevertheless, I dried some of the buds last summer and stashed a small jar of them with my spices.

While working on our kitchen upgrade project the past few months, we did some cleaning out. And I consolidated my spice collection to just two drawers and a ridiculous, though kind of cool, pull-out spice board-more on the kitchen in a future post. I told myself I was either getting rid of the lavender or using it up before we have more growing.

Side note: if you're thinking of planting lavender in your own garden, I've learned that some varieties are better for culinary use than others. If you don't want that soapy/perfumey taste, look for English varieties rather than French. That's not a hard and fast rule, but I read that once, and it stuck with me. Here are more specifics.

chocolate lavender eggs on plate

Why chocolate and lavender?

So here we are. It's finally spring, people like flowery things in spring, and I happened to have a little more time on my hands. Being the week of Easter, my mind went to a lavender-flavored candy. Because what else are holidays all about but eating candy and other foods?

I wanted to find a way to combine lavender and chocolate. It's not a combination you see too often, and maybe that was a sign. If it was, I didn't listen. I'm glad I didn't.

After brainstorming options, I realized that the flavor of lavender directly infused in chocolate would probably end up too muddled to really taste. So how about a lavender filling that's covered in chocolate? And since it's Easter, what better option than eggs?

I ended up with lavender coconut cream eggs. They're not the gooey kind of cream eggs like Cadbury. They're more like the coconut cream texture of a mounds bar. But a little less sweet (I think), a little creamier thanks to cream cheese, and flavored with lavender - definitely not something you'll find in the Easter candy aisle.

Candy making isn't hard, it's just takes a little time

As is the case when you make any candy, there is some work involved. This isn't a 15-minute project. That said, it is not difficult, and I don't see how you can mess this up.

You start by pulsing the filling together in a food processor. The filling sets in the fridge until firm while you melt some chocolate. The filling is shaped into eggs then dipped in the melted chocolate. It then sets for a bit in the fridge until hardened. If you want to be fancy and drizzle over some melted white chocolate (or those not so tasty, though convenient candy melts), go for it!

chocolate lavender candy in hand

Potential questions:

Do I need a candy mold?
No. The filling essentially becomes a dough and it's easy to shape by hand into eggs, balls or whatever you prefer.

Do I need a candy thermometer?
No. The only thing you cook here is melt some chocolate and coconut oil. I do this by bringing some water in small saucepan to a simmer with a glass bowl set over the top. The chocolate and coconut oil will melt as you stir. Alternatively, you could do this in a bowl in the microwave using 50% power and heating in short 30 second increments. No temperature check is needed, just use your eyes.

Don't I need a candy factory to make candy?
No. But a counter, stove, and fridge are helpful. In other words, you need a kitchen.

Will these taste like soap?
Nope. I only use a ½ teaspoon of dried lavender buds here, so it's just a hint of flavor and not an overwhelming taste. If you're still worried though, and hey, I don't blame you, start out with just a ¼ teaspoon. Taste the filling and add more to your liking.

But I don't like lavender! And chocolate lavender sounds gross!
Then why have you read this far in a recipe post that specifically includes lavender? Fine. You can skip the lavender and try using some citrus zest or an extract such as vanilla, peppermint, or almond.

I don't grow plants. Where can I find dried lavender?
Try checking the herbs and teas at your local food cooperative or grocery store. But you should also try growing plants, it's fun!

Do you have any other sweet recipes that use flowers or herbs?
Why yes. Thanks for asking. Try this lemon rosemary olive oil cake. I bet lavender would work well in place of the rosemary there, too.

Will my chocolate lavender coconut cream eggs float like yours?
Sorry, Georgie. Pennywise says your eggs will not float too.

Creamy Celery Leek Soup with Croutons

a bowl of soup with celery and leeks, and potatoes

This simple and creamy celery leek soup is a twist on the classic potato leek combo. Blended until smooth and finished with quick homemade Parmesan croutons, it's cozy, satisfying, and simple enough for a weeknight dinner.

a bowl of soup with croutons and celery

Often overlooked and hardly ever a main ingredient, you may wonder why I'd include celery as a key component in this soup.

I wanted a lighter take on the potato leek combo and celery helps to balance the heavy nature of potatoes and dairy. Celery also adds freshness and enhances the flavors of the other ingredients. That's why it's a key component of a mirepoix, the base of many soups and stews that adds a layor of depth and flavor.

I was also inspired by Julia Child, who mentions in Mastering the Art of French Cooking that you should use the potato and leek soup combo as a starting point and try adding other ingredients to create your own interesting combinations. I already did just that with my Cauliflower Potato Leek Soup, so why not celery?

😍 Why You'll Love This Soup Recipe

  1. It's made with everyday ingredients like celery, potatoes, bread, and milk. You may find you only need to buy some leeks.
  2. It's a cozy and comforting soup from fall to spring. Enjoy it on any cool day when you need a bowl of something warm.
  3. The croutons are incredibly easy and tasty. You'll want to eat them all on their own.

Other places where these croutons would be a welcome addition are Arugula and Spinach Salad, Blackened Shrimp Salad, Potato and Mushroom Soup, and Seafood Newburg Soup.

[feast_advanced_jump_to]

🥔 Ingredients

Here's everything you need to make this tasty potato leek celery soup.

ingredients for making the celery soup

Key Ingredients

  • Leeks: Look for medium to large leeks with a good portion of light green and white, which are the parts you will use to cook.
  • Celery: Celery adds a subtle, fresh earthiness that lightens the whole soup. It doesn't overpower but rounds out the flavor with delicate herbal notes.
  • Potatoes: You can use any basic potato for this soup, such as a russet or white potato. However, I find Yukon Gold potatoes have the best flavor and texture.
  • Bread: I often use sourdough bread for the croutons, but you can use whatever bread you enjoy best. This is also a good way to use up those last few slices of bread hanging around.

Check out the recipe card below for the complete list of ingredients and quantities.

🐄 Substitutions & Variations

  • Extra creamy: Replace 1 cup of the milk with 1 cup of Greek yogurt for extra creaminess and a protein boost.
  • Chunky version: Skip pureeing the soup.
  • Dairy free: Use all olive oil instead of butter and your favorite non-dairy milk alternative.
  • Gluten-free: Try a gluten-free bread to make the croutons.
  • Other crouton seasonings: Instead of Parmesan and smoked paprika, try other spices, herbs, or a favorite blend to season the croutons.

🔪 Instructions

Here's how to make celery and leek soup. The recipe card below provides the complete instructions.

leeks being sliced on a cutting board
  1. Step 1: Slice the white and light green parts of the leeks, discard the tough, dark green tops, then rinse the sliced leeks well in a colander to remove dirt or sand.
celery being chopped on cutting board with potatoes
  1. Step 2: Chop the celery. Peel and cut the potatoes into cubes. Mince the garlic and finely chop some parsley.
sauteed leeks in a pot with spices being added
  1. Step 3: Saute the leeks and celery in butter over medium heat until softened, about 10 minutes. Add the salt, garlic, and thyme and cook for another couple of minutes.
broth being poured into the soup with potatoes
  1. Step 4: Pour in the broth and add the potatoes.
celery leek potato soup cooking in pot
  1. Step 5: Simmer for 20 minutes or until the potatoes are very tender.
pieces of bread being cut into cubes for croutons
  1. Step 6: While the soup simmers, cut the bread into cubes.
bread cubes on baking sheet with spices
  1. Step 7: Toss the bread with olive oil, Parmesan, and paprika.
baked parmesan croutons
  1. Step 8: Bake in a 350-degree F oven for 15 minutes until browned and crisp.
soup being pureed with immersion blender
  1. Step 9: Blend the soup with an immersion blender.
cream being stirred into the celery leek soup
  1. Step 10: Stir in the milk. Heat until warmed through, then add the lemon juice, if using. Serve topped with the croutons and chopped parsley.

✨ Helpful Tips

  • The saltiness of broths varies greatly, so taste and adjust as needed. I always try to use a reduced-sodium broth to better control the salt level myself.
  • If you don' have smoked paprika, try using sweet paprika instead.

🥡 How to store leek and celery soup

Store the soup in an airtight container in the fridge for up to four days. I don't recommend freezing it, as the dairy may separate when heating. However, you could try freezing it and adding the milk upon reheating. In that case, the soup may be frozen for up to three months.

🙋🏻‍♂️ FAQ

How do you clean and cut leeks?

Start by trimming off the root end and the part of the leek where it starts to turn dark green. Compost these or save them to make broth. Then, slice the remaining leek down the middle, lengthwise, as this helps expose the layers. Next, slice each half of the leek into small, bite-sized pieces. Put the pieces of leek in a calendar and rinse well to remove any dirt or sand.

What herbs go well in leek and celery soup?

I like to include thyme while sauteeing the vegetables in the soup, because it adds earthy notes and depth, then include parsley as a garnish because it adds a bit of freshness.

What potatoes can you use in leek and potato soup?

Honestly, you can use just about any potato in a leek and potato soup. This soup is very forgiving and when you add ingredients like milk or cream, it will still turn out creamy. That said, Yukon Gold potatoes have a naturally creamy texture and buttery flavor.

🥖 Pairing

What can you serve with leek and potato soup? Try pairing it with any of these recipes:

  • Beetroot and Feta Tartlets
  • cheese scones on plate with chives
    Easy Cheese and Chive Scones
  • pieces of squash tartlets with apple
    Squash Tartlets
  • a delicata pizza on parchment paper
    Delicata Pizza with Ricotta and Bacon

🍲 Related Recipes

Looking for other recipes like this one? Try these next:

  • bowls of potato and mushroom soup
    Potato and Mushroom Soup
  • leek potato cauliflower soup in bowl
    Cauliflower Potato Leek Soup
  • bowls of borscht with eggs and sour cream
    Easy Vegetarian Borscht (Beet Soup)
  • bowls of lentil and rice soup
    Lentil and Rice Soup

Lemon Rosemary Olive Oil Cake

plates of cake with lemon and rosemary

A lemon rosemary olive oil cake that's bright, earthy, and memorable. It takes just minutes to get in the oven and will stay fresh for days thanks to the olive oil.

plates of rosemary olive oil cake with icing and lemons

Chances are that you use olive oil in your everyday cooking. But have you tried it in your baking? It may sound unusual, but olive oil adds a satisfying depth of flavor while also helping to keep baked goods tasting fresh and moist. In this cake, I kept things interesteing by adding lemons for brightness, and rosemary for a hint of earthiness.

[feast_advanced_jump_to]

You'll want to make this cake because:

  • You can quickly mix it by hand. There's no need to drag out the mixer and beat sugar and butter to a perfect consistency.
  • The flavor profile is unique and refreshing. This is not your boring old white cake.
  • It's a good cake no matter the time of year. It's great in winter when you can use fresh citrus, but it's just as refreshing on a warm summer day.

Make this lemon rosemary olive oil cake when you want something fresh and unexpected. There's no wrong time to eat it, either. It works well as a snack, dessert, or for brunch.

If you're a fan of lemon, you'll want to check out these recipes:

  • Blueberry Lavender Lemonade
  • Cherry Limoncello Biscotti
  • Lemon Balm Lemonade

And for more cake inspiration, check out these:

  • Caramel Pear and Cardamom Cake
  • Date Carrot Cake
  • Mulled Wine Cake

🍋Ingredients

ingredients for making rosemary olive oil cake with lemons

Key ingredients:

  • Fresh lemons - Look for bright yellow lemons with smooth skin that are firm but have a little give when squeezed. Do not cheap out and use bottled lemon juice in this cake, as lemon is one of the primary flavors, and it'll make a noticeable difference. You also need the zest of the lemon, which contributes extra tang and a pleasant lemon scent.
  • Rosemary - A little chopped fresh rosemary leaves add a hint of unexpected and welcomed flavor. It's not enough to overpower. But it's enough to add some interest. Unfortunately, dried rosemary is not a good substitute.
  • Olive oil - If you have olive oil in your kitchen, hopefully, you already have a good-tasting, quality variety. This is key because the oil's flavor is prominent, and you want it to be one you enjoy. Since olive oil flavors can vary widely from one to another, you'll want to taste your oil on its own before using it in this recipe. If you like what you taste, great. If not, I recommend waiting until you have one whose flavor you like when tasted on its own. Here are some tips for finding a good bottle.

See the recipe card below for a full list of ingredients and measurements.

🍊Substitutions & Variations

  • Make it orange-flavored instead of lemon. Substitute an equal amount of orange juice and zest instead of the lemon. Blood oranges or Meyer lemons would also be nice if you want to try out some more winter citrus flavors.
  • Like it herby? Double the amount of fresh rosemary and use two teaspoons.
  • Try fresh thyme in place of rosemary for an equally tasty cake. Even better would be lemon thyme if you can find it.

🥣Instructions

bowl of eggs and sugar with oil, lemons and rosemary

Preheat the oven to 350 degrees F. Whisk together the eggs, sugar, and yogurt until smooth.

lemons being juiced and zested into cake batter

Zest and juice the lemons, then stir them into the bowl with the chopped rosemary.

olive oil pouring into cake batter

Slowly pour the olive oil into the batter and stir to incorporate.

dry cake ingredients being whisked in a bowl

In a second bowl, whisk the flour, baking powder, baking soda, and salt.

cake batter being stirred in a bowl

Add the dry ingredients to the wet and stir until smooth. Pour the batter into a 9-inch cake pan that's greased and lined with parchment. Bake for 30-35 minutes or until golden, and a knife inserted into the center comes out clean. Then cool the cake in the pan before removing.

lemon juice and confectioners' sugar being whisked in a bowl

Meanwhile, make the icing by whisking the lemon juice and zest with the confectioners' sugar. Add a little water if it's too thick. Pour the icing over the cake and serve.

🫒Top Tip

Olive oil helps to make baked goods, especially cakes, moister and more tender. It also adds some interesting flavor notes. But it's important that you use an olive oil whose flavor you like. I don't recommend using a cheap oil or one with a strong, peppery flavor. Either could overwhelm your baking, and not in a good way.

🍰Storage

This cake will keep well for about four days when covered well and stored at room temperature.

🤔FAQ

Why is my olive oil cake so dense?

Olive oil cakes tend to be a bit denser than those made with butter. There is no creaming process, which helps to give other cakes a lighter consistency. That said, olive oil cakes tend to be moist and tender, which is enjoyable in a different way.

Which olive oil is best for cakes?

Considering the taste of olive oil can vary greatly, and everyone's tastes are different, I don't believe there is one that's best for cakes. Rather, it's a matter of personal preference. But look for quality olive oil and taste it before baking with it to ensure you like the flavor. Don't use an oil you don't find tasty.

Does olive oil cake need to be refrigerated?

No, this cake does not need to be refrigerated. Store it in an air-tight container, or well-wrapped, and it will keep for about 4 days at room temperature.

🍹PAiring

Try this rosemary cake with one of these beverages:

  • glasses of earl grey tea cocktail with a bottle of gin
    Earl Grey Cocktail
  • glasses of elderberry cordial
    Elderberry Cordial Recipe
  • a glass of frozen matcha latte on a countertop with straw
    Frozen Matcha Latte
  • glasses of lemon balm lemonade drink
    Lemon Balm Lemonade Recipe

🍪Related Recipes

  • parsnip cake with oranges and pistachios
    Orange Parsnip Cake with Cream Cheese Frosting
  • pear cake on a cake stand with caramel
    Caramel Pear and Cardamom Cake
  • plate of cupcakes with orange zest, cinnamon, and bottle of wine
    Spiced Red Wine Cupcakes
  • four plates with slices of cake and rhubarb on side
    Rhubarb Crumble Breakfast Cake

Polish Golumpki Recipe (Stuffed Cabbage Rolls)

a plate of cabbage rolls sliced open with sauce

This Polish golumpki recipe yields tender stuffed cabbage rolls filled with beef and rice, baked in a tangy tomato sauce. It's a hearty, traditional dish made easy with a helpful shortcut and a flavor-boosting ingredient.

Polish stuffed cabbage rolls served with tomato sauce on a green plate

🥬 What are Golumpki?

Cabbage has many uses, and one of the best is for making stuffed cabbage. Stuffed cabbage is a simple yet comforting food found in cultures worldwide, although it's believed to have originated in Poland, where it's known as golumpki.

The general idea is that softened cabbage leaves are wrapped around a ground meat filling that includes rice or another grain. The seasonings vary based on the recipe's origin, and the sauce, typically tomato-based, may be sweet, savory, or, as in my recipe here, a combination of sweet and sour.

[feast_advanced_jump_to]

Although a simple dish, variations on Golumpki seem endless. You'll find the dish not only in Polish cooking, but also in Jewish, Italian, Bulgarian, Greek, Croatian, Czech, and Hungarian cuisines. It's not all that different from dishes like these Stuffed Peppers with Tomato Sauce.

😍 Why You'll Love these cabbage rolls

  1. This method cooks the cabbage in much less time. Thanks to a quick, partial cook in the microwave.
  2. Pomegranate molasses adds an extra layer of flavor, creating a balance of sweet and sour notes.
  3. Raisins help keep the meat moist. Unexpected, but effective.

Cabbage is often underrated, but it has a lot to offer. Crisp Napa cabbage is coated in an Asian-inspired sauce in my Roasted Napa Cabbage. Combined with apples, it makes a simple side for fall and winter in my Instant Pot Red Cabbage and Apples. It adds texture and substance to this Beet Soup.

🥬 Ingredients

Here's everything you need to make these easy stuffed cabbage rolls.

ingredients for making cabbage rolles including ground beef and tomatoes

Key Ingredients

  • Green cabbage: A large head of standard green cabbage features larger leaves that are ideal for filling and rolling. Savoy or Napa cabbage can be used, although they'll cook slightly differently and may require more cooking time.
  • Basmati rice: This long-grain, quick-cooking rice makes a hearty component to the filling. Other types of rice may be used, however, and you can save a little time by using leftover rice from take-out or another meal.
  • Ground beef: A main component for filling the cabbage leaves. You'll need a pound of ground meat.
  • Garlic, paprika, cinnamon, nutmeg: For flavoring the filling and sauce.
  • Crushed tomatoes: A large can of crushed tomatoes, or about four cups, makes an easy sauce for the base and topping of the cabbage rolls. Plain, fire-roasted, or even one with added herbs may be used. If you have fresh tomatoes, you can chop and blend them.
  • Raisins: Traditionally used in Eastern European cooking, raisins help keep the ground beef filling moist and flavorful. Other dried fruits, such as currants, may be used as an alternative.
  • Pomegranate molasses: Pomegranate molasses creates a tangy yet slightly sweetened tomato sauce that complements the savory nature of the cabbage nicely. If you're not familiar with pomegranate molasses, it's one of my favorite ingredients for adding vibrant flavor. It's great in salad dressings, sauces, and marinades. Despite being called molasses, it's actually not very sweet; instead, it has a deep richness. The best way I can describe it is like a more intense, syrupy, fruity balsamic vinegar.

Check out the recipe card below for the complete list of ingredients and quantities.

🍚 Substitutions and Variations

  • Red cabbage: If you have red cabbage instead of green, that works just as well.
  • Pomegranate molasses: Can be substituted with balsamic vinegar if unavailable.
  • Ground turkey: Try making these cabbage rolls with ground turkey instead of beef.
  • Rice: You can use any rice (or grain) you like. I like basmati because it cooks quickly.
  • Vegetarian: Substitute roughly 2 cups of cooked lentils for the ground beef.

🔪 How to Make Polish Golumpki

Here's a step-by-step guide on how to prepare this recipe.

hands holding a cabbage and using a knife to cut out the core
  1. Step 1: Cut the core out of the bottom of the cabbage using a sharp knife.
cabbage in a bowl with water being poured in
  1. Step 2: Place the cabbage in a large bowl, add a cup of water to the bottom, and microwave on high for 15-20 minutes. It should be easily pierced with a knife when done. Let cool briefly.
water being poured into a small pot of rice
  1. Step 3: While the cabbage cooks, add rice to simmering water and cook for 7-8 minutes until tender, but not overcooked. Preheat the oven to 375°F.
cooked rice being stirred into ground beef filling
  1. Step 4: Combine the ground beef with the rice, egg, the minced garlic, raisins, pepper, cinnamon, nutmeg, paprika, and one teaspoon of salt. Stir well to combine.
tomato sauce being spread across a pan
  1. Step 5: Stir the pomegranate molasses and the remaining teaspoon of salt into the crushed tomatoes. Spread half of the mixture over the bottom of a baking dish. Add the two whole cloves of garlic.
leaves from a head of steamed cabbage being pulled apart
  1. Step 6: Gently pull the cabbage leaves one by one from the head of cabbage. Try not to tear them.
Rolling cabbage leaf around beef and rice filling for golumpki
  1. Step 7: Spoon some filling onto the center of a cabbage leaf. Use approximately 1-2 tablespoons per leaf, adjusting the amount depending on the leaf's size.
a stuffed cabbage leaf being rolled up on a cutting board
  1. Step 8: Fold the sides of the leaf inward, then roll the cabbage leaf from the bottom up, similar to rolling a burrito. Repeat this process with additional cabbage leaves until all the filling is used up.
Baking dish of Polish golumpki stuffed cabbage rolls with tomato sauce
  1. Step 9: Place the stuffed cabbage leaves into the baking dish with the sauce.
parsley being sprinkled over a pan of baked stuffed cabbage rolls
  1. Step 10: Top the stuffed cabbage with the remaining tomato sauce. Bake for 30 minutes. Place under the broiler for 4-5 minutes after baking for a little extra browning.

✨ Helpful Tips

  • Don't overfill your cabbage leaves or they may tear. Which isn't a deal breaker, just cover them in sauce and no one will really know.
  • You can save yourself a little time by steaming the cabbage and cooking the rice up to 3 days in advance of assembling the golumpki.
  • Not sure how to cut that core out of the cabbage? Check out this video for a quick demonstration. What you don't want to do is cut the cabbage in half, which is what they will tell you in other videos when it comes to taking out the core. But we need the leaves intact in order to fill and roll them.

🍳 Equipment

Microwave: Used to steam the head of cabbage and save some time in the cooking process. I know not everyone loves the microwave; however, you can steam or boil the cabbage in a pot on the stove. Here's a tutorial for how to steam cabbage for cabbage rolls.

🥡 Storage

Fridge: Leftover golumpki can be stored covered in the refrigerator for 3 to 4 days. Uncooked cabbage rolls may also be prepared in advance and stored in the refrigerator for up to two days before cooking.
Freezer: Freeze cooked or uncooked cabbage rolls in the baking dish or other freezer and oven-safe dish, tightly covered, for up to three months. Defrost in the fridge and bake as described, or if already cooked, until hot.

🙋🏻‍♂️ FAQ

Can uncooked cabbage rolls be frozen?

Yes, they can. Prepare the recipe up until the point of baking. Then cover the pan well with layers of plastic wrap and foil. Defrost in the fridge and bake as instructed. Or bake directly from the freezer, adding up to 15 minutes (or more) to the cooking time.

What is the best type of cabbage for cabbage rolls?

I've made cabbage rolls with several types of cabbage - green, red, savoy - and I think they all work. So it's more a matter of personal preference. However, make sure to use cabbage with large leaves so there's plenty of room for stuffing and rolling. Small cabbages aren't great for this recipe.

What does Golumpki mean?

It's the Polish word for "little pigeon," which is what people liked to say the stuffed cabbages resemble. But they're a little less appetizing when you put it that way.

What to do if my cabbage leaves tear?

It's ok if some of the cabbage leaves tear. Just do your best to stuff and roll them, and turn them around in the dish so they stay intact. Then, cover them with sauce and no one will even know.

Can I prepare golumpki ahead of time?

Sure. These golumpki can be prepared up to a day in advance. Make the cabbage rolls as described in the recipe, but cover and refrigerate before baking. When ready to bake, take the dish out of the fridge, let come to room temperature for a few minutes, and cook as usual.

🥔 Pairing

Try any of these recipes alongside this dish:

  • a glass of negroni with smoke
    Smoked Negroni
  • a plate of colorful roasted leeks and potatoes
    Roasted Potatoes and Leeks
  • rosemary parmesan bread sliced on a cutting board
    Rosemary Parmesan Bread
  • cheese scones on plate with chives
    Easy Cheese and Chive Scones

🫑 Related Recipes

Looking for more vegetable-forward recipes like this one? Try these next:

  • three stuffed peppers with cheese
    Stuffed Peppers with Tomato Sauce
  • two napa cabbage halves with sesame seeds
    Roasted Napa Cabbage
  • three stuffed zucchini halves on a cutting board
    Rice Stuffed Zucchini
  • baked sweet potatoes with quinoa and black beans
    Quinoa Sweet Potatoes

Creamy Seafood Newburg Soup

bowls of seafood soup

This Creamy Seafood Newburg Soup recipe turns the classic seafood dish into a rich and satisfying soup. Made with shrimp, cod, vegetables, cream, and Old Bay seasoning.

bowls of seafood newburg with toast

In the late 19th century, a wealthy sea captain named Ben Wenberg brought the idea for a creamy lobster dish to the famous Delmonico restaurant in New York City. They loved it and added it to the menu, where it was eventually named Lobster Newberg. Made with lobster, cream, butter, sherry, eggs, and cayenne pepper, the dish was a hit.

Over time, however, other more affordable and accessible types of seafood replaced the lobster, and the indulgent dish became known as Seafood Newburg (the spelling apparently changed along the way, too). To make the dish, pieces of seafood are cooked in a velvety cream sauce and served over rice, puff pastry, or toast.

My version, seafood newburg soup, adapted from a recipe in Rachel Ray 365: No Repeats, retains all of the flavors of the original dishes. I just add more vegetables and mushrooms, and enough broth and half-and-half that's so rich and buttery that you'll want to slurp it right from the bowl.

[feast_advanced_jump_to]

For more soup inspiration, check out these recipes:

  • Cauliflower Potato Leek Soup
  • Lentil and Rice Soup
  • Celery Leek Soup
  • Potato and Mushroom Soup

🦐 Ingredients

ingredients for making the seafood soup recipe

Key Ingredients

  • Shrimp and Cod are an affordable seafood pairing that balances each other well. The shrimp maintains a bit of bite while the cod flakes into the soup.
  • Potatoes - Add body and substance to the soup. Whatever variety you have handy is fine.
  • Mushrooms add an umami earthiness that boosts the soup's flavor and complements the seafood. I often use crimini, but white mushrooms are good, too.
  • Celery, scallions, and onions bring savory vegetable flavors.
  • Half and half offers a combination of milk and heavy cream that adds a nice, creamy texture without too much heaviness. Use a fresh, high-quality half-and-half from your local dairy farmer. In Vermont, I most often use Monument Farms.
  • Old Bay seasoning is a perfect complement to seafood and it comes from Maryland, where they know something about seafood. It includes a unique combination of paprika, black pepper, celery salt, cayenne, cinnamon, and ginger.
  • Sherry contributes a little acidity and sweetness. I consider it the soup's secret ingredient.

🥛Substitutions & Variations

  • Make it richer - use heavy cream instead of half-and-half
  • Try other seafood - use an equal amount of lobster, clams, scallops, and/or haddock
  • Make it gluten-free - replace the flour with 2 teaspoons cornstarch mixed with ¼ cup water
  • Add more seafood flavor - try seafood stock in place of the vegetable broth
  • For some heat - add ¼ teaspoon ground cayenne pepper with the Old Bay

🥘Instructions

How to make Seafood Newburg Soup:

vegetables chopped in bowls

Prep the vegetables. Peel the potatoes and cut them into ½-inch cubes. Roughly chop the onions, mushrooms, celery, and scallions.

vegetables sautéing in a pan

Saute the vegetables in the olive oil and butter until soft with the bay leaf, salt, and Old Bay.

chopped seafood on a cutting board

While the vegetables cook, chut the seafood into bite-sized pieces.

flour being sprinkled over the vegetables in a pan

Coat the vegetables with flour. Cook for a minute, then deglaze the pan with the wine until absorbed.

adding seafood and potatoes to the pan

Add the broth, potatoes, and seafood to the pot. Bring to a simmer and cook for about 12 minutes or until the potatoes are tender.

cream being poured into seafood soup

Stir in the cream. Cook another couple of minutes until heated through. Remove the bay leaf and serve with toast.

🥣Top Tip

The most critical part of the recipe is towards the end. You want to keep the heat at a steady but gentle boil to avoid overcooking the seafood. Then, you want to ensure the heat is even lower once the half-and-half is added to avoid the chance of curdling.

💭FAQ

What is Seafood Newburg made of?

Seafood Newburg consists of seafood such as lobster, shrimp, or crab cooked in a creamy sauce made with butter, cream, and egg yolks flavored with sherry or cognac.

Why is it called Seafood Newburg?

The original dish was named Seafood Wenberg after the sea captain who brought the recipe to Delmonico's restaurant in NYC. But the Delmonico brothers and Captain Ben Wenberg had a falling out, and the dish was changed to Lobster Newburg. When other types of seafood replaced the lobster, it became Seafood Newburg.

What is an alternative to Sherry in Newburg?

You can use vermouth instead of sherry or even a splash of brandy.

🍞 Pairing

These recipes would go great with this seafood newburg:

  • cheese scones on plate with chives
    Easy Cheese and Chive Scones
  • pieces of squash tartlets with apple
    Squash Tartlets
  • Vietnamese spring rolls on a cutting board
    Tofu Spring Rolls
  • large dish of pesto orzo salad
    Orzo Pesto Pasta Salad

🍲 Related Recipes

Other recipes you may like:

  • salad with serving utensils and dressing
    Blackened Shrimp Salad
  • bowls of potato and mushroom soup
    Potato and Mushroom Soup
  • a bowl of soup with celery and leeks, and potatoes
    Creamy Celery Leek Soup with Croutons
  • Zucchini Curry

Orange and Grapefruit Marmalade

marmalade with grapefruits and oranges, spread on toast

A bright, lightly bitter, easy-to-make, orange and grapefruit marmalade that's sweetened with honey for depth and balance. The result is great for everything from topping cakes to stirring into your bowl of morning oats.

a jar of marmalade with oranges, grapefruit, and toast

Marmalade is the citrusy winter equivalent of jam. Partly because it's essentially jam made with the peels, juice, and flesh of citrus. Yet marmalade is refreshingly tart, a little bitter, and a welcome pop of brightness for the dead of winter.

[feast_advanced_jump_to]

Marmalade originated as a quince paste in Portugal but took its modern form after its introduction and commercial production in Scotland in the late 1700s. Although we don't equate citrus with Great Britain, marmalade has an interesting history and popularity in the United Kingdom.

😍 Why You'll Love This Marmalade

  1. A great way to enjoy and preserve fresh winter citrus. The taste of fresh citrus will last you for weeks as marmalade.
  2. It's a small batch recipe that doesn't require canning. It makes about three cups that you can store in the fridge.
  3. It's made partly with honey for a better flavor and a more balanced sweetness.

There are plenty of ways to use marmalade besides topping your morning toast. You can stir some into a muffin, pancake, or cake batter. You can also use it as a cake topping. Try stirring a spoonful into your oats or using it on my Goat Cheese Grilled Cheese.

🍊 Ingredients

Here's everything you need to make this homemade marmalade recipe.

a bowl of sugar, cup of honey, and oranges and grapefruit
  • Oranges: You can choose any variety of orange you want. Standard navel oranges are fine, though it's fun to try varieties such as blood oranges or Cara Cara oranges if you're making this in winter, when more kinds of citrus are in season and available in stores. Both varieties are slightly sweeter and less acidic, which helps balance the grapefruit.
  • Grapefruit: One pink or red grapefruit is all you need.
  • Lemon: Adds brightness and helps the marmalade set.
  • Sugar: Sweetens and sets the marmalade. I prefer unrefined cane sugar.
  • Honey: Offers flavor, depth, and a more subtle level of sweetness than you would get from using sugar alone. I like to use local honey when possible. Since I can't get citrus locally, it's nice to have at least one component of the recipe produced close to home.

Check out the recipe card below for the complete ingredient list and quantities. ⬇️

🍋 Variations

  • Thyme: For a hint of earthy herbal flavor that complements the citrus and balances the sweetness. Add the leaves of 5-6 fresh thyme sprigs towards the end of cooking. Or you can throw a few sprigs into the pectin bundle.
  • Change up the citrus: Try different varieties of oranges and grapefruits, or Meyer lemons instead of regular lemons. Why not try adding a lime while you're at it?
  • All honey: If you want to replace the sugar with honey, use 1 cup of honey in place of the 1 ½ cups of sugar. Just know that you'll have a softer marmalade.

🔪 How to make orange and grapefruit marmalade

an orange being peeled over a cutting board
  1. Step 1: Peel the zest off the oranges, grapefruit, and lemon. Try to limit the amount of white pith you include.
citrus peel chopped on a cutting board
  1. Step 2: Roughly chop the zest into small pieces.
chopped citrus peel in a pot with water being poured in
  1. Step 3: Put the zest in a pot and cover with water. Simmer for 20 minutes
grapefruit being chopped on a cutting board
  1. Step 4: Meanwhile, remove the pith and any remaining peel, as well as any seeds and membranes, and set them aside. Roughly chop the citrus.
grapefruit and orange being mashed in a pot
  1. Step 5: Add the citrus fruit to a heavy-bottomed pot and roughly mash.
citus peels wrapped up in cheesecloth
  1. Step 6: Wrap the pith, seeds, and membranes in cheesecloth. Tie it up to make it a bundle.
sugar being poured into pot with fruit and ctirus peel
  1. Step 7: Add the cooked peel and liquid to the pot of mashed citrus. Then pour in the sugar.
honey being poured into pot of citrus marmalade
  1. Step 8: Add the honey. Stir to combine, then set the cheesecloth bundle into the pot.
pectin bundle being removed from the pot with tongs
  1. Step 9: Cook at a steady simmer for 20 minutes. Then remove the bundle with tongs and discard.
marmalade cooking in a pot with some in a spoon
  1. Step 10: Continue simmering the marmalade for another 10 to 15 minutes, stirring often, until it has reduced, darkened in color, and become less watery and more syrupy. Let cool, then store in clean jars in the fridge for up to a month.

✨ Top Tips

  • When removing the peels from the citrus, be gentle with your peeler and remove only the peel and not the white pith.
  • The pectin bundle may seem like extra effort, but wrapping up all those pieces of pith and seeds in a bundle will really help the marmalade to set. So it is worth the effort.
  • If you want to test the set of the marmalade before you finish cooking it, use the freezer plate method. I didn't include it here because this is a small batch fridge marmalade and I don't think it matters too much.

🍳 Equipment

  • Cheesecloth: Used to bundle up the pith and seeds and heat them in the marmalade, which helps increase the level of pectin. You can find a package of cheesecloth for a few bucks at most grocery stores.
  • Heavy-bottomed pot: Such as a Dutch oven. The thicker bottom helps keep the marmalade heated more evenly and prevents burning.

🥡 Storage

This homemade marmalade will keep in the fridge for up to four weeks, perhaps longer, depending on how often the jar is taken out and how clean your utensils are.

If you would like to store the marmalade for longer, you could freeze the jars for up to six months. Just be sure to leave some space in the jar in case of expansion.

This recipe isn't tested for long-term, shelf-stable storage. Though it could be adapted to be so. Please consult a marmalade recipe designed for water bath processing, such as this small-batch marmalade from Food in Jars, to ensure you use the correct ingredient ratios and follow best practices.

🍰 How to use orange marmalade

There are so many ways to use marmalade. Here are a few ideas:

  • Pour it over this orange cake with cream cheese frosting
  • As part of the sauce of this orange tempeh and asparagus
  • On halloumi toast
  • Spread on apple rhubarb muffins
  • As a filling for these pancake balls

🙋🏻‍♂️ FAQ

Can you use less sugar in orange marmalade?

You can use less sugar in marmalade, especially if the recipe is not being canned. However, less sugar will change the texure and final quantity of the marmalade. You can expect to get less and it will have a thinner consistency.

Why does marmalade have orange peel in it?

The peel is part of what makes marmalade marmalade. It impacts both the flavor and texture of marmalade and is one of its defining characteristics.

What's the difference between marmalade and jam?

Marmalade is made with citrus, citrus peel, and sweetener. Jam, on the other hand, is made from whole fruits (such as berries, plums, or peaches) and sweetener.

Do you need to add pectin to marmalade?

It depends on your recipe. This recipe does not require additional pectin and instead uses the pith and peels, which are high in pectin, to thicken the marmalade.

🍞 Pairing

Try pairing this citrus marmalade with these recipes:

  • scones on a cooling rack with blackberries
    Blackberry Scones
  • several cranberry and apple muffins on a countertop with oats
    Apple Cranberry Muffins
  • a plate of pancake balls topped with powdered sugar
    Danish Aebleskiver Pancake Balls
  • parsnip cake with oranges and pistachios
    Orange Parsnip Cake with Cream Cheese Frosting

🫖 Related Recipes

Looking for more recipes like this one? Try these next:

  • a glass mug of citrus tea being poured from a tea pot
    Honey Citrus Mint Tea
  • plates of cake with lemon and rosemary
    Lemon Rosemary Olive Oil Cake
  • glasses of lavender lemonade with blueberries and lemon slices
    Blueberry Lavender Lemonade
  • glass of elderflower gin tonic with gin bottle and flowers
    Elderflower Gin and Tonic

Danish Aebleskiver Pancake Balls

a plate of pancake balls topped with powdered sugar

These Danish Aebleskiver Pancakes are soft, round, and golden on the outside with a fluffy center. They're often filled with sweet or savory surprises like jam, chocolate, or cheese. Enjoy them as a cozy breakfast, a festive treat, or a fun snack.

round pancake balls on a plate with jam and powdered sugar

When your usual pancake routine starts to feel a little dull, it's the perfect time to try Aebleskiver. These round Danish pancakes (also known as ebleskiver) are cooked in a special pan with small molds that give them their signature shape. Imagine a cross between pancakes and donut holes but with the airy lightness of a popover.

[feast_advanced_jump_to]

Danish Aebleskiver pancakes are about the size of golf balls and are as versatile as they are fun to make. You can fill them with almost anything, starting with classic options like jam, jelly, or marmalade. Or try chopped apples with cinnamon or mashed bananas with toasted pecans. If you're in the mood for something richer, dark chocolate and nut butter would be amazing.

In Denmark, Aebleskiver is more of a snack or dessert than a breakfast staple. They're especially popular around Christmas and New Year's, enjoyed at family gatherings or from street vendors on chilly winter days. Traditionally, they're dusted with powdered sugar and served with a warm mug of glogg, a fragrant Scandinavian mulled wine that makes the experience feel extra festive.

🥰 Why You'll Love this Recipe

  1. You can use a variety of fillings. Since they're individually cooked, each little pancake can be filled with something different, making them perfect for sharing with a crowd and offering multiple flavors to meet varying preferences.
  2. They're a fun alternative to the typical pancake. Round, bite-sized, and filled with something tasty. What's not to love?
  3. They're like homemade donut holes but without having to deep fry anything. I'm not saying they're healthier donuts, but that's one way of looking at things.

For more tasty filled snacks, try these:

  • Homemade Fig Bars
  • Raspberry Rugelach
  • Honey Coconut Chocolates

🌾 Ingredients

Here's everything you need to make this aebleskiver recipe.

ingredients for making this aebleskiver recipe on a  counter
  • Flour
  • Buttermilk
  • Sugar
  • Eggs
  • Vegetable oil
  • Jam or other fillings
  • Baking soda and baking powder
  • Salt

See the recipe card below for the complete list of ingredients and quantities.

💡 Substitutions & Variations

  • Buttermilk: Instead of buttermilk, use your preferred milk and add a tablespoon of lemon juice or vinegar. Let the milk sit for 5 minutes before using.
  • Crisper and lighter pancakes: Separate the egg yolks and whites. Beat the whites until fluffy. Add the yolks with the buttermilk and oil. Gently fold in the whites after combining the wet and dry ingredients to incorporate.
  • Without filling: Skip the filling and use more batter in the pan to fill the mold. Serve with various condiments for dipping.
  • More perfectly round aebleskiver: Instead of rotating the pancake balls just once, rotate them about 90 degrees four times throughout cooking.
  • Creative aebleskiver fillings: Try your favorite jam, marmalade, cranberry sauce, or something more savory, such as cream cheese. Chocolate sauce, chopped fruit, or a piece of cheese could all work, too.

🥣 Instructions

How to make Danish aebleskiver pancakes.

whisking pancake dry ingredients in bowl
  1. Step 1: Whisk the dry ingredients together in a large bowl.
whisking wet ingredients for pancakes
  1. Step 2: In a small bowl, whisk together the buttermilk, eggs, and oil.
combining wet and dry pancake ingredients
  1. Step 3: Pour the wet ingredients into the bowl of dry and stir only enough to combine.
aebleskiver batter in a bowl
  1. Step 4: Let the batter rest for 15 minutes.
brushing the aebleskiver pan with oil
  1. Step 5: Coat the aebleskiver pan well with butter, oil, or cooking spray.
pancake batter being scooped into the molds
  1. Step 6: Fill the aebleskiver molds about halfway with the pancake batter.
filling being spooned into the molds
  1. Step 7: Add about ½ teaspoon of your filling of choice.
spooning more batter into the pancake mold
  1. Step 8: Top off each of the molds with more pancake batter.
flipping aebleskiver with chopsticks
  1. Step 9: Cook over medium heat for 2-3 minutes until the edges are set. Then, use chopsticks to gently flip over each aebleskiver.
cooked aebleskiver in pan
  1. Step 10: Cook for another couple of minutes, then remove them from the pan. Add more butter or oil to each mold, then repeat the filling and cooking process with the rest of the batter.

🔥 Helpful Tips

  • Be sure to adjust the heat as needed while cooking the abelskiver.
  • Add more butter, oil, or cooking spray in between each batch of pancakes to prevent sticking.
  • Turn off the heat as needed while you flip and remove the pancakes from the pan. The pan can get hot very quickly and your pancakes may burn.
  • You can keep aebleskiver warm in a 200 ° F oven as you cook more.

🍳 Equipment

Aebleskiver cast iron pan: An essential piece of equipment for making these pancakes. These pans have several round molds for filling and creating the shape that makes them extra special. I've seen some that are non-stick, but I generally prefer cast iron. And they're good for more than just making aebleskiver. Here are a few ideas.
Wooden chopsticks: Help to rotate the pancakes around the round molds of the aebleskiver pan.

🫙 Storage

These pancakes are best enjoyed as soon after cooking as possible. While you can store them in an airtight container in the fridge for a few days, they quickly soften and lose their shape, so I don't recommend it. I don't recommend freezing them, either.

🙋🏻‍♀️ FAQ

What are aebleskivers?

The legend is that aebleskiver were created by Vikings while out at sea. They wanted pancakes, yet lacked a pan to make them in. So they used their dented armor instead. When they flipped the pancakes in the rounded dents, they created the spherical pancake shapes now known as aebleskiver. Whether this is accurate remains debatable.

What does aebleskiver mean?

The name aebleskiver, when translated from Dutch, means "apple slices" and refers to the traditional apple filling. From what I can tell, apple filling doesn't seem to be as common today. In fact, they're not always filled. Instead, jam or a sauce is served on the side for dipping.

Can I use a pancake mix to make aebleskiver?

You can try using a mix to make aebleskiver, however, since mixes vary so much from one to another, it is hard to say how well your particular mix will work to make these pancake balls.

How do you flip aebleskiver?

Flip aebleskiver using chopsticks. After you let the pancake cook for a couple of minutes and you've added your filling, you can use the skewer or needle to sneak around the sides. It might take you a few tries before you get it right, and that's fine. Just eat your mistakes and no one will ever know.

🥚 Pairing

  • the sun dried tomato quiche in a pan with plates and serving utensil
    Broccoli and Stilton Quiche
  • mug of amaretto latte with almonds and whipped cream
    Amaretto Latte
  • a plate with sliced scotch eggs
    Baked Scotch Eggs (Gluten Free and Keto)
  • smoothie in glass topped with mint and blackcurrants
    Blackcurrant Smoothie

🥞 Related Recipes

Looking for other recipes like this one? Try these:

  • a stack of banana buckwheat pancakes topped with blueberries
    Banana Buckwheat Pancakes with Blueberries
  • scones on a cooling rack with blackberries
    Blackberry Scones
  • cake with icing on a cutting board
    Date Carrot Cake
  • four plates with slices of cake and rhubarb on side
    Rhubarb Crumble Breakfast Cake

Chili sin Carne

bowls and a pot of chili with vegetables

Hearty and flavorful, this chili sin carne recipe is packed with beans and butternut squash, making it a perfect dish to warm you up and fill you up. With only a few minutes of prep, it's easy enough for weeknight cooking but tasty enough to serve guests.

bowls and a pot of vegetable chili

I don't mean to brag, but this vegetarian chili recipe once won second place in a local Vermont chili competition. But I don't take chili too seriously. It's such a subjective dish. Everyone has their take on it and a set of secret ingredients they swear by. And I love that.

So I'm not about to tell you this is the best chili recipe you'll ever find. But, if nothing else, this is a decent chili sin carne. It's hearty and satisfying, and it tastes great, too. But here area a few more reasons I think you'll like it.

😍 Why You'll Love This Chili

  1. It has a good balance of spice, sweetness, acidity, and saltiness. I include a range of ingredients that add a nice variety of those flavors without any one of them overwhelming the dish. And you can always add more of something to adjust the flavor to your liking.
  2. It has depth. I know the phrase "depth of flavor" is used too much-heck, I use it all the time. But what does it mean? It means the flavors are complex. They're not one note-like just spicy or just sweet. Instead, the molasses, coffee, and chipotle peppers add smokiness, richness, and a little intensity to this chili.
  3. It doesn't take a lot of time. While many chili recipes require simmering for hours to achieve deep flavors, this recipe only takes about an hour from start to finish. Instead of a long and slow cooking time, the various ingredients add the flavor.

Looking for more vegetarian dinner recipes? Check out my Chile Rellenos Casserole, Eggplant Florentine, Zucchini Mushroom Pasta, and Broccoli and Stilton Quiche. For another bean-centered recipe, try my Beans and Chorizo with Spinach.

[feast_advanced_jump_to]

🍅 Ingredients

Here's everything you need to make chili sin carne.

ingredients for making meatless chili

Key Ingredients

  • Butternut squash: You'll need about a pound of butternut squash. That's either a small squash or about half of a large one. Butternut is easy to find throughout the fall and winter, and it works well in the chili because it maintains its shape yet still manages to be creamy and tender when you bite into it.
  • Beans: To keep this recipe relatively quick, I suggest using canned beans. Of course, you can use dried and cook them prior to adding to the chili. Use your favorite varieties or what you have on hand. I usually use black and pinto beans.
  • Celery, carrots, garlic, and onions: Sauted together at the start, they form the base of flavor for the chili.
  • Chipotle pepper in adobo: You can find these canned peppers in any grocery store, and they're a good way to add a little smoky spice to a dish. I always have some on hand. Since I don't usually use an entire can at once, I freeze the remainder and pull a pepper or two out when needed. They add a more interesting flavor than a fresh hot pepper. Start using just one pepper with a little sauce for a mild chili. Use more if you like things spicier.
  • Crushed tomatoes: A large 28 ounce can of crushed tomatoes works great here, but if you wanted to use diced or chop up fresh tomatoes, that works, too.
  • Broth: Use your favorite broth here, but keep in mind that the salt level of broth can vary quite a bit from one brand to another. A good way to determine how salty your broth is is to give it a taste. Add or reduce the salt in the recipe, as needed.
  • Coffee: Adds bitterness and coffee flavor. I used to use coffee liqueur instead, but found it made the chili too sweet.

See the recipe card below for the complete list of ingredients and quantities.

🌶️ Substitutions & Variations

  • Alcohol-free: Instead of liqueur, you can use an equal amount of strongly brewed coffee.
  • Spicy chili sin carne: To make this chili spicier, (it's pretty mild as is) use two or more chipotle peppers and include some of the sauce from the can.
  • Vegan-friendly chili: Surprisingly, Kahlua is not considered vegan, as explained on their website, so use a coffee liqueur that is, or skip the liqueur and use an equal amount of strong black coffee instead. Otherwise, this recipe is vegan.
  • With dried beans: Use 4 cups of cooked dried beans instead of the two cans. Do not add dried beans directly without cooking, as they require more time and liquid to become tender.
  • Other winter squash: You can use any other variety you prefer (aside from spaghetti squash). Just be sure to peel and chop the squash into small cubes. Keep in mind that some varieties may take a little longer to cook than butternut, so you may need to add a few minutes to the overall cooking time.
  • Slow cooker variation: I don't use a slow cooker (the results are too inconsistent for me), so I can't say for sure how this would turn out. But I know how much people enjoy slow-cooker chili. My suggestion would be to follow the instructions as written up until you add the broth to the pot. From there, everything can be added to the slow cooker. My best guess is to try cooking the chili for 4 hours on high or 6 on low to start.

🔪 Instructions

How to make this vegetarian chili sin carne.

chopped onions, carrots, and celery on a cutting board
  1. Step 1: Chop the onion, carrot, celery, garlic, and pepper.
vegetables sauteeing in a pot
  1. Step 2: Saute the vegetables in olive oil over medium-low heat for about 10 minutes, stirring occassionally.
butternut squash being peeled and chopped
  1. Step 3: While the vegetables cook, peel and chop the butternut squash into small cubes.
coffee liqueur being poured into a pot with vegetables
  1. Step 4: Add the chili powder, cinnamon and cumin. Stir to coat. Pour in the coffee and let cook for about a minute as you stir.
vegetable broth being poured into a pot
  1. Step 5: Pour in the broth, soy sauce and molasses.
butternut squash being added to the pot of chili
  1. Step 6: Then add the squash.
tomatoes being poured into the chili pot
  1. Step 7: Then the tomatoes.
beans being stirred into the chili pot
  1. Step 8: And finally, stir in the beans.
chili simmering in a pot
  1. Step 9: Bring the pot to a boil, then reduce heat to a steady simmer for 35-45 minutes until thickened and the squash is tender. Stir occasionally.
a pot of cooked chili sin carne
  1. Step 10: Serve the chili hot topped with your choice of items, such as shredded cheese, sour cream, lime juice, cilantro, and chopped green or red onion.

✨ Helpful Tips

  • Try to cut the vegetables, including the squash, into similarly sized pieces.
  • Instead of prepping all of the ingredients upfront, save time by peeling and chopping the squash while the first ingredients start cooking.
  • Chili often tastes even better the day after cooking, when the flavors have had time to meld. So consider preparing this the day before you plan to serve it.

🫙 How to Store Leftover Chili sin Carne

Store leftovers in an airtight container in the fridge for up to four days. Reheat in the microwave or on top of the stove until hot. Leftovers may also be stored in the freezer for up to three months.

🤔 FAQ

What is the meaning of chili sin carne?

It means a chili without meat. Chili con carne, on the other hand, is chili with meat.

How to season chili sin carne?

There are many ways to season chili sin carne. In this recipe, I use chili powder, cumin, cinnamon, garlic, molasses, soy sauce, coffee, and vinegar.

What to serve with chili sin carne?

Try serving your chili with tortilla chips, bread, cornbread, or salad. Chili sin carne is great as the main component of a meal or as part of a spread for a party, where you can serve it with a few different side dishes. Check out my variety of side dishes for inspiration.

🍞 Pairing

Any of these recipes would go great with this vegetarian chili recipe:

  • rosemary parmesan bread sliced on a cutting board
    Rosemary Parmesan Bread
  • Beetroot and Feta Tartlets
  • plate of poblano casserole with salsa
    Easy Chile Relleno Casserole
  • cheese scones on plate with chives
    Easy Cheese and Chive Scones

🍲 Related Recipes

Looking for other recipes like this one? Try these next:

  • bowls of potato and mushroom soup
    Potato and Mushroom Soup
  • bowls of lentil and rice soup
    Lentil and Rice Soup
  • bowls of seafood soup
    Creamy Seafood Newburg Soup
  • bowls of borscht with eggs and sour cream
    Easy Vegetarian Borscht (Beet Soup)

Hot Buttered Rum Recipe

a mug of hot buttered rum with a cinnamon stick

This creamy hot buttered rum recipe creates a cozy winter cocktail that retains the classic mix of butter, brown sugar, and warm spices, but uses a small-batch, make-ahead batter. I like to make it extra special by using quality local butter, ice cream, and fresh apple cider.

mugs of hot buttered rum with whipped cream and cinnamon sticks

Hot Buttered Rum has its origins in America's Colonial days, when rum was a major industry in New England. During that time, recipes for Hot Buttered Rum varied, but the main ingredients usually included rum, sugar, butter, and spices.

The drink experienced a revival in the 1940s at tiki bars, where it was served alongside other rum-based beverages in ceramic skull mugs.

However, you don't need to live in colonial times or visit a tiki bar. Today, Hot Buttered Rum remains the perfect drink to indulge in at home on a winter evening when the snow is falling and you're craving something warm and comforting to sip.

[feast_advanced_jump_to]

The old tiki bar chain, Trader Vic, included a Hot Buttered Rum batter recipe in their 1948 book Bartender's Guide. The idea is to cream together the butter, sugar, and spices in a batch.

Then, to make an individual serving, you scoop some batter into a mug and dissolve it in your hot water and rum. You can keep the batter in the fridge for a few days or in the freezer for a few months and use it as needed.

😍Why You'll Love This Cocktail

  1. Warm and cozy for cold winter nights.
  2. Made with a make-ahead batter.
  3. Works with dark, spiced, or black rum.

For more winter beverage ideas, try my recipes for Smoked Negroni, Gingerbread Mocktail, Baileys Eggnog, and a Pomegranate Rosemary Cocktail.

🧈 Ingredients

Here's everything you need to make this drink at home.

ingredients for making hot buttered rum drink
  • Dark rum: I've made several Hot Buttered Rums using Mad River Distillers' First Run Rum, and I think that's an excellent choice for this drink-the rich caramel flavors of their rum blend in perfectly here. However, any dark or spiced rum you prefer will work.
  • Butter: Use an unsalted butter in this drink and make sure you let it sit at room temperature for a while so that it will easily blend into the other ingredients of the batter.
  • Vanilla ice cream: The ice cream blends with the butter and sugar, adding extra creaminess to the drink. It also helps to make sure the butter doesn't just float on top of your mug.
  • Brown sugar: This is a sweet drink, and brown sugar adds a deeper, richer sweetness than white sugar, which complements the warming spices.
  • Spices: Cinnamon, nutmeg, clove, and cardamom add a range of warm, baking spices. If you like pumpkin spice-flavored beverages, you'll enjoy the flavor of these spices in the drink. You'll want ground spices to mix into the batter, but if you have some cinnamon sticks handy, they make a great garnish.
  • Apple cider: Personally, I think hot buttered rum is way better made with apple cider instead of water. If you like a hot, spiced cider that's just a little creamy, you'll want to opt for cider. Use a cider from a local orchard in your area for the best quality.

Check out the recipe card below for the complete list of ingredients and quantities.

Substitutions & Variations

  • Water: Keep it simple and use water instead of apple cider. It won't be as flavorful, but it will still be warm and rich.
  • Alcohol-free: Omit the rum and use additional apple cider in its place. If leaving out the rum, you'll want to be sure to make the drink with cider; otherwise, it will lack flavor.
  • Maple syrup: Try maple syrup in place of the brown sugar.

🔪 Instructions

hot buttered rum batter being combined in a bowl
  1. Step 1: Stir the softened butter, brown sugar, and spices together in a bowl.
ice cream being whisked into the batter in a bowl
  1. Step 2: Whisk in softened ice cream.
hot buttered rum batter being scooped into a mufifn tin
  1. Step 3: Divide the batter into individual portions (about 2 tablespoons each). You can freeze these in greased muffin tins or silicone ice cube trays.
frozen hot buttered rum batter being added to a mug
  1. Step 4: To make a drink, add the frozen batter to your mug.
rum being poured into a mug
  1. Step 5: Pour in the rum.
cider being poured into a mug
  1. Step 6: Then add hot cider (or water).
hot buttered rum being stirred in a mug
  1. Step 7: Still to combine.
whipped cream being sprayed onto a drink in a mug
  1. Step 8: If desired, top off with whipped cream.
nutmeg being grated over a mug of whipped cream
  1. Step 9: Garnish with freshly grated nutmeg.
mugs of hot buttered rum with whipped cream and cinnamon sticks
  1. Step 10: Serve immediately and enjoy.

✨ Top Tip

Make sure to soften the butter and ice cream so that they're easy to mix. To do this, just leave them out on the counter - the butter for about 30 minutes and the ice cream for 5-10 minutes.

🥡 Storage

Store the individual portions of hot buttered rum batter in an airtight container or bag in the freezer for up to three months.

To serve, add the hot buttered rum mix to a mug with hot water or cider and 1 ½ ounces of rum. Top with whipped cream, if desired, and a grating of fresh nutmeg.

🙋🏻‍♂️ FAQ

Can you make hot buttered rum ahead of time?

Yes, you can make the base of hot buttered rum - butter, sugar, spices, and ice cream - then freeze in individual portions. To serve, add rum and hot water or apple cider.

What's the best rum for hot buttered rum?

You can use your favorite dark or spiced rum for this cocktail. Black rum, which has more intense flavors, is also a good choice.

Is hot buttered rum alcoholic?

Yes, hot buttered rum does include rum, which makes it alcoholic. However, if you make the drink with apple cider and the batter, it would have enough flavor to leave out the rum.

🍰 Pairing

Try pairing this drink with any of these recipes:

  • cookies on a blue and green background
    Ginger Cookies With Fresh Ginger
  • plates of tiramisu topped with cherries
    Cherry Tiramisu
  • pear cake on a cake stand with caramel
    Caramel Pear and Cardamom Cake
  • parsnip cake with oranges and pistachios
    Orange Parsnip Cake with Cream Cheese Frosting

🍵 Related Recipes

Looking for more drink recipes like this one? Try these next:

  • irish cream being poured into a glass with ice
    Dairy Free Irish Cream
  • mug of amaretto latte with almonds and whipped cream
    Amaretto Latte
  • peppermint mocha martini with lights
    Peppermint Mocha Martini
  • glasses of mocktail with gingerbread
    Gingerbread Mocktail

Raspberry Rugelach

raspberry jam with rugelach cookies

Looking for a tasty holiday treat? This raspberry rugelach cookie recipe is filled with raspberry jam, pecans, and cinnamon and wrapped in tender cream cheese cookie dough.

large plate of rugelach cookies with jam and pecans

If you picture a hybrid between a croissant and a cookie, you might envision rugelach. These small cookies originated in the Jewish communities of Eastern Europe, especially in Poland. The Yiddish name rugelach translates to "little twists," referring to the cookie's rolled shape.

Today, they're found worldwide yet remain especially popular in Israel, especially the old-fashioned variety, filled with chocolate and made with a yeasted dough. These kosher, dairy-free, and yeasted cookies are puffier and flakier.

The quicker approach I'm sharing here, more popular in America and Eastern Europe, uses a pastry dough made with equal parts butter and cream cheese. This creates a more tender cookie with a hint of appealing tanginess.

🍪 Why You'll Love These Raspberry Rugelach Cookies

  1. These rugelach are fruity and tangy, with a comforting hint of cinnamon and sugar.
  2. This recipe is more straightforward than the old-fashioned method and does not require extra time for the dough to rise.
  3. One batch yields about four dozen small cookies, which makes them excellent for baking around the holidays and sharing with friends and family.

For festive more holiday bakes, try these:

  • No Bake Eggnog Cheesecake
  • Cranberry Gingerbread Cake
  • Red Wine Cupcakes
  • Cranberry and White Chocolate Tart
[feast_advanced_jump_to]

🧀 Ingredients

Here's everything you need to make raspberry rugelach cookies.

ingredients for making rugelach cookies

Key Ingredients

  • Raspberry jam - You can use your favorite raspberry jam or make your own by simmering raspberries and sugar until thickened and reduced. Here's more on how to make jam.
  • Pecans - For adding a nice crunch to the cookies. Other nuts may be used as well.
  • Cream cheese - An 8-ounce package is used with the butter to make the dough. This helps to keep the cookie dough tender and adds a little tang.
  • Flour - Standard all-purpose flour is all you need.
  • Butter - Two sticks of unsalted butter are needed for the dough.
  • Cinnamon - For flavoring the filling.
  • Brown sugar - To be mixed with the nuts and cinnamon for the cookie filling.

See the recipe card below for the complete list of ingredients and quantities.

🍫 Substitutions and Variations

  • Chocolate: Sprinkle the rugelach dough with chopped chocolate after spreading the jam. This is my favorite variation. I love the fruit and chocolate combo.
  • Raspberry walnut rugelach: Use an equal amount of walnuts instead of pecans.
  • Apricot rugelach: After raspberry, apricot is my next favorite filling. Use your favorite apricot jam in place of raspberry.
  • Multiflavored rugelach: Since the recipe makes four dozen cookies, why not make a few different flavors all with one batch of dough?

🥣 Instructions

How to make these rugelach cookies.

cream cheese and butter in mixing bowl
  1. Step 1: Cream the room temperature butter and cream cheese with a mixer until blended.
rugelach dough in a mixing bowl
  1. Step 2: Add the flour and salt and mix on low speed until a soft, cohesive dough has formed.
dough divided into four pieces
  1. Step 3: On parchment or a floured surface, divide the dough into four equal pieces and shape them into small discs. Wrap and refrigerate for an hour to rest and firm up the dough.
rugelach dough being rolled out
  1. Step 4: Preheat the oven to 350 degrees F. Roll one of the pieces of dough out into a 10-inch round.
brown sugar, cinnamon, and pecans being mixed in a bowl
  1. Step 5: Mix the pecans, cinnamon, and brown sugar together.
jam being spread over a piece of cookie dough
  1. Step 6: Spread some of the raspberry jam over the dough.
nut mixture being spread over jam on dough
  1. Step 7: Top with the pecan mixture.
rugelach dough sliced into twleve pieces
  1. Step 8: Cut the dough into 12 pieces. Divide it into quarters and then each quarter into thirds.
raspberry rugelach being rolled
  1. Step 9: Roll each piece up from the outside in. As you go, place them on a parchment-lined baking sheet. Repeat this process with the remaining dough, jam, and filling.
rugelach being brushed with egg wash on baking tray
  1. Step 10: Beat the egg in a bowl with a splash of water. Brush the rugelach with the egg, sprinkle with sugar, and bake for about 30 minutes or until golden brown.

💡 Top Tips

  • The dough needs a little time in the fridge to firm up-at least an hour-but you could also prep and store it in the fridge for up to a couple of days in advance.
  • Don't worry about trying to shape each cookie perfectly and evenly. They will still taste great.
  • Try not to overfill the cookies with jam (or chocolate, if using), as it may ooze out of the cookies as they bake.

🥣 Equipment

Mixer: A mixer will make the dough-making process easier, but it's possible to do it by hand if needed.
Rolling pin: To roll out the dough. In a pinch, use a wine or other large glass bottle.

🫙 Storage

At room temperature: The cookies will keep for up to a week at room temperature. If they get soft, which they tend to do, try crisping them back up by heating them at 300 degrees F for 5-10 minutes.
In the freezer: Baked or unbaked cookies may be frozen for 2-3 months when well-wrapped and stored in a freezer bag or container. Defrost unbaked cookies before baking and baked cookies before eating.

🙋🏻‍♀️ FAQ

Can you freeze unbaked rugelach?

Yes. Freeze unbaked rugelach on a tray, then transfer to a freezer bag when frozen. Defrost and bake as usual.

Should you refrigerate rugelach?

It is not necessary to refrigerate rugelach after baking. However, doing so may extend freshness for a few extra days.

Why is my rugelach dough so soft?

The cream cheese makes this cookie dough softer than your typical dough, so it's completely normal. But you want to make sure to let the dough firm up in the fridge for at least an hour before rolling out and handling. Flouring your surface before rolling will also help.

🫖 Pairing

These recipes would go well with rugelach cookies.

  • glasses of mocktail with gingerbread
    Gingerbread Mocktail
  • a glass of eggnog cocktail with a cinnamon stick
    Baileys Eggnog
  • cookies on a blue and green background
    Ginger Cookies With Fresh Ginger
  • a glass mug of citrus tea being poured from a tea pot
    Honey Citrus Mint Tea

🧁 Related Recipes

Looking for other recipes like this one? Try these:

  • cookies on a blue and green background
    Ginger Cookies With Fresh Ginger
  • biscotti on a plate with lemons and icing
    Limoncello Biscotti
  • plate of cupcakes with orange zest, cinnamon, and bottle of wine
    Spiced Red Wine Cupcakes
  • a plate of chamomile cookies with flowers on side
    Chamomile Cookies

Sweet Coconut Cornmeal Pudding

cornmeal pudding dessert served at table

This cornmeal pudding recipe combines the flavor of a molasses cookie with the custardy texture of a pumpkin pie. It's a warm, cozy, and simple dessert.

plates of cornmeal pudding with coffee and ice cream

Cornmeal pudding, also known as Indian Pudding and Cornmeal Pone - and similar to the English's hasty pudding - has existed in some form for hundreds of years. It was originally found in places where corn and molasses were easily accessible, such as colonial New England and Jamaica. The ingredients and consistency just vary a bit depending on where you go.

This recipe combines some of the best components to create a dessert worth revisiting in modern times. And here's why you'll want to give it a try:

[feast_advanced_jump_to]

It's comfort food. That may be weird to say about a dessert, but it feels homey and rustic, and it's easy to see why it was popular in simpler times. And not that we generally look to desserts to fill us up, but with a base of cornmeal, it satiates you in a way that most desserts won't.

It's neith fancy nor fussy . Yes, it takes about an hour to bake, but it simply needs the time to firm up. You don't have to worry about it looking good, rising, or anything stressful that requires skill, expertise, or a close amount of your attention.

It's a unique hybrid. There's no good way to describe it. Although called a pudding, it's not a pudding in the traditional American sense. It's not a cake or a pie, either. Maybe it's closest to a bread pudding. However, the consistency is more custardy, as you'd expect from a pumpkin pie.

If you like simple desserts, here are a few other recipes to check out:

  • Lemon Rosemary Olive Oil Cake
  • No Bake Eggnog Cheesecake
  • Cast Iron Peach Cobbler.

🌽Ingredients

Here's everything you need to make this warm, comforting dessert. Most of these ingredients are pantry staples, especially during the fall and holiday seasons.

ingredients on a wooden table for making the recipe

🥥Key ingredients

Cornmeal - Use quality stone-ground cornmeal for the best texture and flavor. I prefer yellow cornmeal to white, which is sweeter and more flavorful.
Milk - I use whatever I have on hand, either whole or 2% milk. You can try milk alternatives, but the results may vary depending on the kind.
Coconut milk - Adds a hint of coconut flavor to the pudding, which helps to balance the molasses and spices. Use full-fat for the most flavor.
Molasses - Creates a deep, rich sweetness. Use a standard molasses, not blackstrap molasses in this recipe.

See the recipe card below for the full list of ingredients.

📋Substitutions and Variations

Raisins - Stir in ½ cup raisins before putting the pudding in the oven
Dairy-free - Use two cans of coconut milk
Spicier - Increase the ginger to 2 teaspoons and add a ¼ teaspoon ground cloves
Sweeter - Increase the brown sugar up to ½ - ¾ cup
Individual portions - Bake in small greased ramekins for about 40 minutes

⏲️Instructions

cornmeal being whisked into milk

Heat both kinds of milk in a pan over low heat. When it's just barely simmering, whisk in the cornmeal a little at a time to avoid lumps.

molasses being whisked into the pudding

Then whisk in the molasses, salt, brown sugar, and spices until combined. Keep simmering for a few minutes until thickened.

cornmeal mixture being whisked into eggs

Beat the eggs in a bowl, then add a ladle of the hot cornmeal pudding mixture as you whisk. Whisk for a minute, then pour this back into the pan with the butter and vanilla.

the pudding being poured into a baking dish

Pour the cornmeal pudding into a baking dish and bake for about an hour in a preheated oven. Serve warm and top with a scoop of ice cream.

🥄Storage

Leftover pudding can be stored in the fridge for up to four days. It's best served warm, as it becomes firm and dense when cold. Individual servings can be reheated in the microwave for about a minute.

💬FAQ

How long does cornmeal last?

Stored in an airtight container in a cool and dark spot, cornmeal will last for about a year.

How do you make cornmeal pudding?

Start by making a pudding mixture with cornmeal and milk in a pot on the stove, add eggs and sweetener, then bake it in the oven until set. Check out the recipe below.

Can I use polenta in place of cornmeal?

Yes, they're essentially the same ingredient. There's just a slight difference in texture between the two, but not enough to

Pairing

Try any of these recipes with this cornmeal pudding:

  • glasses of mocktail with gingerbread
    Gingerbread Mocktail
  • a glass of eggnog cocktail with a cinnamon stick
    Baileys Eggnog
  • cocktail with pomegranate and rosemary
    Pomegranate Rosemary Cocktail
  • irish cream being poured into a glass with ice
    Dairy Free Irish Cream

🍰Related Recipes

Looking for more recipes like this cornmeal pudding? Try these:

  • glasses of plum fool with whipped cream and cookies
    Plum Fool
  • peach cobbler in a cast iron pan with two plates and sliced peaches
    Cast Iron Peach Cobbler
  • slices of cranberry tart
    Cranberry White Chocolate Tart
  • Apple Strudel

Quinoa Sweet Potatoes

baked sweet potatoes with quinoa and black beans

These quinoa sweet potatoes make a hearty, flavorful vegetarian meal. They are stuffed with quinoa, black beans, and warm spices and finished with cheese sauce and salsa for a satisfying balance of texture and taste.

stuffed sweet potatoes on a plate

I first made this recipe the year I grew quinoa in my garden. Our plants reached over six feet tall with flowering heads in shades of red, purple, and yellow. They added a stunning pop of color to the garden. That's when I learned that quinoa isn't a grain; it's a seed, and I was surprised to find that it's part of the spinach and Swiss chard family.

About twenty years ago, quinoa rose from the depths of obscure health food to something that most Americans are at least vaguely familiar with today. It's a low-fat, high-protein food that, as we know, acts and cooks similarly to common grains.

The quinoa I grew at home was a fun experiment. But it has only made me appreciate the farmers who grow it even more. Despite our massive plants, we only ended up with a couple of cups of quinoa by the end of the season. It's a plant worth experimenting with if you're looking to try growing something new, but you'll have to plant quite a bit - and spend a fair amount of time removing the outer coating - to make it worthwhile.

😍 Why You'll Love These Stuffed Sweet Potatoes

  1. They make a filling vegetarian meal. A stuffed potato may not sound like much of a meal, but this recipe will surely fill you up.
  2. They are a good source of protein, fiber, Vitamins A and C, and calcium. That sounds healthy to me.
  3. They have taco vibes. It helps that they're finished off with salsa, cheese sauce, and cilantro.

Want more stuffed vegetable inspiration? Try my Stuffed Peppers with Tomato Sauce, Polish Golumpki, and Simple Stuffed Zucchini recipes. Or for another tasty bean recipe, how about Beans and Chorizo with Spinach or One Pan Sweet Potatoes and Green Beans?

[feast_advanced_jump_to]

🍠 Ingredients

Here's everything you need to make quinoa stuffed sweet potatoes.

ingredients for making the sweet potato recipe

Key Ingredients

  • Sweet potatoes: Aim for four, around 8-10 ounces each. The size of sweet potatoes can vary so much, so if you have to use a few extra smaller ones or a couple of larger ones that you cut in half, that's fine. Aim for about two to two and a half pounds in total.
  • Quinoa: A half cup of raw quinoa will make about one and a half cups of cooked quinoa for the recipe. I prefer to rinse quinoa before cooking to help remove the outer coating, which can be bitter and cause stomach issues for some people.
  • Black beans: You'll need one can of rinsed black beans or one and a half cups of precooked dried black beans. If you don't love black beans, try chickpeas or just about any other bean instead.
  • Onion and bell pepper: Chopped and sauteed with garlic, they add flavor and substance to the quinoa filling.
  • Cheese: Grated cheddar is melted into warm milk to make a quick cheese sauce.
  • Salsa: Use your favorite salsa to top the stuffed sweet potatoes before serving. You

Check out the recipe card below for the complete list of ingredients and quantities.

🧀 Substitutions & Variations

  • Potatoes: This recipe would be equally tasty with regular potatoes instead of sweet potatoes.
  • Skip the cheese sauce: To save a few minutes, skip the cheese sauce and sprinkle shredded cheddar over the stuffed potatoes instead.
  • Other beans: Try pinto, garbanzo, or kidney beans.
  • Make them spicy: Top the potatoes with a few pickled jalapenos.

🔪 Instructions

How to make these quinoa sweet potatoes.

sweet potatoes being stabbed with a fork
  1. Step 1: Stab the sweet potatoes with a fork. Brush the skins with a bit of oil (optional). Bake in a 400-degree oven until tender, about 45 minutes.
vegetables chopped on a cutting board
  1. Step 2: Meanwhile, chop the onion, pepper, garlic, and cilantro.
vegetables being sauteed in  a pan
  1. Step 3: Saute the onion, pepper, and garlic in the olive oil until tender, about 7-8 minutes.
quinoa being added to a pan
  1. Step 4: While the vegetables cook, rinse the quinoa, then add it to a small pan with ¾ cup water. Simmer for about 10 minutes or until tender.
black beans being added to the pan of vegetables
  1. Step 5: Add the coriander, cumin, cinnamon, and salt to the pan of vegetables. Then, stir in the black beans.
quinoa being stirred into the pan of vegetables
  1. Step 6: Toss the cooked quinoa into the pan.
milk and cheese being heated in a pan
  1. Step 7: Add the milk to a saucepan and heat over low. When warm, stir in the grated cheese. Mix the cornstarch with a splash of water and add to the pan, stirring into the cheese.
cheese sauce stirring in a pot
  1. Step 8: Cook over low heat while stirring until the cheese is melted and the sauce has thickened.
roasted sweet potatoes on a baking sheet
  1. Step 9: Let the potatoes cool until you can easily handle them. Then slice them open, but don't cut all the way through.
stuffed sweet potatoes on a plate
  1. Step 10: Top the sweet potatoes with the filling, salsa, cheese sauce, and cilantro. Serve warm.

✨ Helpful Tips

  • You can save some time by partially cooking the sweet potatoes in the microwave for 10 minutes. Then finish them in the oven for another 15-20 minutes or until easily pierced with a knife.
  • You can also bake the sweet potatoes in advance up to two days in advance and just make the quinoa stuffing the day of serving.
  • The cheese sauce should be made over low heat. Too high of heat will cause it to thicken too much. If it does thicken to the point of being unable to pour, especially if you reheat leftovers, whisk in a little warm milk until it has thinned.

🥡 Leftovers

Store the sweet potatoes and quinoa stuffing in the fridge for up to four days. Reheat in the oven or microwave until heated through. I prefer to store the quinoa potatoes separately and assemble them with the toppings upon reheating and serving.

🙋🏻‍♂️ FAQ

What pairs well with quinoa?

Quinoa, with its chewy texture, nutty flavor, and slightly bitter undertones, pairs well with a soft and sweet vegetable like sweet potato. Together, they offer a good range of nutrients, and both benefit from seasoning with bold spices like cumin and cinnamon.

Can I eat quinoa and sweet potatoes together?

Of course. Quinoa and sweet potatoes together are a good source of fiber, protein, and carbohydrates. They also offer complementary flavors and textures. Try stuffing sweet potatoes with quinoa or making a quinoa salad with diced sweet potato.

Are stuffed sweet potatoes healthy?

It depends on what you're stuffing them with and what you consider healthy. This recipe with quinoa, black beans, and cheese sauce is a good source of protein, fiber, calcium and Vitamin A and C.

🍞 Pairing

Try pairing these recipes with quinoa-stuffed sweet potatoes:

  • glasses of elderberry cordial
    Elderberry Cordial Recipe
  • a glass of negroni with smoke
    Smoked Negroni
  • Roasted Salsa Verde
  • an ice cream cone with two scoops of black currant ice cream
    Blackcurrant Ice Cream

🫑 Related Recipes

Looking for other vegetarian recipes like this one? Try these next:

  • bowls and a pot of chili with vegetables
    Chili sin Carne
  • bowls of lentil and rice soup
    Lentil and Rice Soup
  • a plate of artichoke pasta
    Artichoke Pesto Pasta
  • Zucchini Curry

Chicken and Squash Curry

bowls of chicken curry with noodles and peanuts

Enjoy a flavorful chicken and delicata squash curry, infused with fresh lemongrass, savory fish sauce, and fragrant cilantro. This comforting dish combines tender chicken and sweet delicata squash, making it a satisfying meal for any night of the week.

bowls of curry with noodles and chicken

Patience and persistence are essential for gardening. For me, growing lemongrass required both. But on my second attempt at growing this bright and citrusy herb, I had enough to flavor soups and curries for months.

Lemongrass freezes well, which is great because I use it more in the colder months of the year. I followed the directions in this video, which shows you how to create lemongrass bundles by bending and wrapping the stalk's leaves around the base of the stem and then tying them up. See the ingredient photo below to see what I mean. My wife made a ton of these bundles last year, and we store them in a bag in the freezer.

[feast_advanced_jump_to]

You can make these bundles whether you're using lemongrass fresh or freezing it for later. It's easy to pop a couple of them directly into a soup. But you can also cut off the top of the stalks, bruise the base of the plant with the back of your knife, and either keep them whole or cut them into pieces to add to a recipe as it cooks. You'll just want to remove them before serving.

Lemongrass is a prominent herb in Vietnamese cooking, which focuses on balance. Vietnamese cuisine considers the balance of flavors, colors, and textures. It also emphasizes fresh ingredients, especially vegetables and herbs. The little I have explored with Vietnamese cooking particularly appeals to my cooking style.

This chicken and squash curry, known as ca ri ga in Vietnamese, is adapted from a recipe by in the Pike Place Market Recipes cookbook.

🌱 Garden Tip

You can propagate your own lemongrass if you have extra stalks or maybe a friend willing to share some of their plant. Stick the stalks in a glass of water until they root, then plant them in a pot of soil. Side shoots will grow if kept near a sunny window. Or plant them directly in your garden during the growing season.

😍 Why you'll love this curry

  1. It's a beautiful balance of flavor. The curry powder and chili paste offer some spice; the fish sauce lends sourness; the sugar provides sweetness; the lemongrass adds bitterness, and the broth has saltiness.
  2. It uses easy to prepare ingredients, like boneless chicken thighs, delicata squash, and instant rice noodles.
  3. It tastes bright and fresh, making it a welcome dish for winter when you need a change from heavier meals.

If you like the versatility of winter squash as much as I do. Check out my recipes for Grilled Spaghetti Squash with Meat Sauce, Butternut Squash Chicken Soup, Pumpkin and Sage Risotto, and Pumpkin Couscous Salad.

🍜 Ingredients

Here's everything you need to make this squash curry recipe.

ingredients for making the curry

Key Ingredients

  • Chicken: I like to use boneless and skinless chicken thighs because they require minimal preparation and stay tender, even when overcooking. However, you can use chicken breasts if you prefer.
  • Delicata squash: Quick cooking with no peeling required. See the note below for alternatives.
  • Lemongrass: Fresh lemongrass stalks infuse the curry with brightness and freshness in a herbal, lemony way.
  • Curry powder: Curry powders can vary greatly depending on the blend you buy or make. They can be sweet, spicy, or somewhere in between. I like this curry blend from Penzey's.
  • Rice noodles: I like to use instant rice noodles because they typically only need a quick soak in hot water and are ready to use.
  • Cilantro: Adds more herby citrus notes to the dish. Mint, parsley, basil or a combination of these herbs may be substituted.

Check out the recipe card below for the complete list of ingredients and quantities.

🌿 Substitutions & Variations

  • Fresh lemongrass: If you can't find it, try the lemongrass paste you may find in the produce department near the herbs. Gourmet Garden is one brand I see often. If you can't find that either, try looking for dried lemongrass. It's not nearly as fresh-tasting, but it's better than nothing. Add it in when you add the curry powder.
  • Squash: You can use any other winter squash, such as butternut squash, instead of delicata squash. Just make sure to peel and chop into bite-sized pieces. Depending on the squash, you may need to cook the curry longer. Sweet potatoes could also work.
  • Vegetarian and vegan: Skip the chicken and add 1 pound of cubed tofu to the pot when you add the squash. Use one tablespoon of each soy sauce and lime juice instead of the fish sauce.
  • Noodles: You can use any noodle you choose instead of the instant rice noodles. Cook them according to the package directions and add them to your bowls before ladling over the curry.
  • Rice: In place of noodles, serve the curry over rice.

🔪 Instructions

Here's an overview of how to make this coconut chicken and squash curry. For the full instructions, see the recipe card below.

onions being chopped on a cutting board
  1. Step 1: Roughly chop the onion, mince the garlic, and peel and grate the ginger. Wrap the lemongrass stalks around themselves and tie to secure.
squash with seeds being scooped out
  1. Step 2: Halve the squash, then scoop out and discard the seeds.
sliced delicata squash on a cutting board
  1. Step 3: Slice the squash into thin pieces. Roughly chop the cilantro and peanuts.
chicken cut into pieces on a cutting board
  1. Step 4: Cut the chicken into bite-sized pieces.
onions and spices sauteeing in pan
  1. Step 5: Heat the oil in a large pot over medium heat. Add the onion and cook, stirring occasionally, until softened. Add the garlic, lemongrass, ginger, and curry powder and cook for another minute.
chicken and onions cooking in spices in pan
  1. Step 6: Add the chicken and salt. Lower the heat and cook for about 10 minutes, stirring occasionally, until the chicken is browned. If the pan dries out, pour in a little more oil.
stirring pot of coconut squash curry
  1. Step 7: Pour in the broth. Scrape the bottom of the pot to deglaze, then add the coconut milk, fish sauce, and chili paste. Bring to a boil.
delicata squash being added to curry
  1. Step 8: Add the squash to the pan. Return to a boil. Lower the heat and simmer until tender, about 15 minutes. Remove the lemongrass stalks.
rice noodles with hot water being poured over
  1. Step 9: While the soup is cooking, prep the noodles according to the package directions.
bowls of curry with noodles and chicken
  1. Step 10: To serve, divide the noodles among your bowls, ladle over the soup, and garnish with the cilantro and peanuts.

✨ Helpful Tips

  • Keep an eye on the chicken when you add it to the pan. It may stick a little and the pan may dry out, so stir occasionally, adjust the heat, and add more oil, as needed.
  • Instant rice noodles cook quickly. Avoid overcooking them to keep the noodles intact and avoid a mushy consistency.

🥡 Storage

Fridge: Store leftover chicken and squash curry in an airtight container in the refrigerator for up to four days.
Freezer: Store cooled leftovers in an airtight container in the freezer for up to three months. Defrost in the fridge before reheating.

🙋🏻‍♂️ FAQ

What vegetables go with coconut chicken curry?

Many vegetables go well with chicken curry. You can go with sweet and creamy vegetables like winter squash and sweet potatoes as well as fresh and crunchy vegetables like green beans and bell peppers.

Can I make chicken and squash curry without coconut milk?

Sure. If you want a non-dairy alternative, try cashew cream or oat milk or for a dairy option, try yogurt or heavy cream thinned out with water. On the other hand, you can also just use additional broth in its place.

Can I make this a butternut squash chicken curry?

You can definitely use butternut squash in place of the delicata. Peel the butternut and cut it into bite sized pieces. It may take longer to cook, so check for doneness and add simmer for a few extra minutes, if needed, until tender.

🍹 Pairing

Try pairing these recipes with this chicken and squash curry:

  • pieces of squash tartlets with apple
    Squash Tartlets
  • brownies on parchment with knife and cherries
    Brownies with Cherry Pie Filling
  • roasted brussels sprouts in a dish
    Honey Sriracha Brussels Sprouts
  • glasses of elderberry cordial
    Elderberry Cordial Recipe

🐔 Related Recipes

Looking for more chicken recipes? Try these next.

  • bowl of butternut chicken soup
    Butternut Squash Chicken Soup
  • a pan of chicken and rice with cardamom and parsley
    Cardamom Chicken and Rice
  • large pan of chicken thighs with apricots and barley
    Apricot and Chicken Tagine
  • pan with pasta and parmesan, garlic, and basil
    Creamy Garlic Parmesan Chicken Pasta

Apple Strudel

Thin layers of homemade dough are rolled up around fresh crisp apples in this popular German apple strudel dessert that dates back hundreds of years.

As with everything else this year, there was no Oktoberfest. It's not the first time in its more than 200 year run that the world's largest beer and folk festival didn't occur. But it's been a while; the last time was back in 1949. With more than six million visitors over the 16 days of the festival, I'm betting social distancing wasn't going to be possible.

[feast_advanced_jump_to]

What is Oktoberfest?

What started as a festival to celebrate a king's wedding in 1810 grew into an annual event known and emulated throughout the world. The celebrations involve plenty of Oktoberfest beer, which you may know as a style offered from your favorite brewery each fall. Yet these beers vary from on to the other. Oktoberfest beer may be more symbolic of the time of year they're released than an agreed-upon style. For instance, they're often a red ale when brewed in America but are usually pale lagers at the fest in Munich. Funny, I always thought they were dark beers.

No matter the exact style, with all the beer comes the need for food. When you think of German or Oktoberfest food, bratwurst and pretzels may come to mind. But there are plenty of other lesser-known foods to try. Spaetzle, roast chicken, pork knuckle, seafood sandwiches, and buttery cheese spreads are just a few.

After a visit to Champlain Orchards and loaded with a bushel and a half of a few of their 115 apple varieties, it was time to bake. Champlain is my favorite local orchard to go apple picking. They have unique varieties that you won't find in the typical grocery store. It's fun to bring them home and taste them all. Plus, it's a beautiful spot to visit.

Desserts may not come to mind when thinking of Oktoberfest, but they do exist. And when it comes to apples and German desserts, apple strudel (called apfelstrudel, in German) is a good place to start. This is the kind of dessert you make on a fall afternoon when you have some free time and are looking for an enjoyable baking project.

What is strudel?

Strudel can be made with a number of different fillings. It can be sweet or savory. Earlier this year I made one with salmon, as odd as that may sound. Strudel dough is rolled out as thin as possible and the filling, whatever it may be, is rolled up inside. The result is several attractive layers of pastry and filling.

Although strudel is a little labor-intensive, it's not all that difficult. There are ways to simplify the process. For instance, you could use store-bought phyllo dough. It won't get you the same result, and it's not how you'd find it at an Oktoberfest. Yet I'm sure it's still delicious, and if you're short on time, I won't blame you either.

Tips for making apple strudel:

  1. Letting the strudel dough rest in the fridge makes it easier to stretch and roll out, so don't skip the step.
  2. Par-cooking the apples in the microwave may seem odd, but doing so helps them keep their shape when baking the apple strudel.
  3. Using a towel under the dough makes rolling the strudel easier and helps to prevent tearing.
  4. Don't wait until the strudel is cool to slice. Doing so will cause the pastry to crack.
  5. This makes two smaller apple strudels. If you want, freeze one before baking and save it for later.

Related

For more apple recipes, check out these:

  • a plate with stuffed apple cremes covered in caramel and powdered sugar
    Baked Apple Crepes with Ricotta
  • a serving dish on a wooden table filled with cabbage, apples, and walnuts
    Instant Pot Red Cabbage with Apples
  • small dishes of cherry crisp topped with whipped cream
    Apple Cherry Crisp
  • bowl of rhubarb chutney with apple slices
    Easy Rhubarb and Apple Chutney

Roasted Salsa Verde

Wondering what to do with green tomatoes? Make a simple roasted salsa verde that turns these bland unripe tomatoes into a flavorful condiment.

bowl of roasted salsa verde

I have to say, picking green tomatoes is a depressing way to end the summer. But there was little choice. A couple of early hard frosts killed off our tomato plants. Even worse, we were away on our honeymoon when it happened. When we returned, we scrambled in the dark, filling up baskets and buckets of rescued tomatoes, peppers, and eggplant. But hey, I'm not complaining. We got married and spent a few days out of town, neither of which are easy feats for 2020.

Between our wedding and then some time out of town, we were a little distracted from the garden for a couple of weeks. It hadn't even crossed my mind to prepare for a frost. Yet even if we were home, it likely would have been impossible to save all our plants from many nights of such cold. The most frustrating part is that as I write this, it's 80 outside, and the low is around 60.

What to do with green tomatoes

What do you do with several pounds of green tomatoes? Well, you could let them ripen until red, which shouldn't take more than a couple of weeks or so. Keep an eye on them and discard any that turn soft or moldy. This is fine if you have the space to do so and can use them as they're ready. I don't have much space in my condo to spread tomatoes everywhere, especially when my dog is known to snag tomatoes within his reach. One year I caught him pulling cherry tomatoes right off the plant!

Of course, you can always try making fried green tomatoes. They're appealing at first, but I can only eat so many. There's also green tomato chutney, which I tend to make with the inevitable few green tomatoes we get. It's a sweet, sour, and spicy condiment that pairs well with cheese and sandwiches. I love it on grilled cheese. But even after canning a few pints of chutney, my dining table was still covered in green tomatoes.

That's when I got creative. Or do I mean desperate? I already made roasted red tomato salsa, so why not try a green one? Green salsa, or salsa verde, is a popular Mexican salsa that is usually made with tomatillos. Since my tomatillo plant never produced, and I was drowning in green tomatoes, I figured it was a substitution worth trying.

What is salsa verde?

Traditional salsa verde is like other green sauces, such as Italian pesto or Argentinian chimichurri sauce. It's usually a thin salsa used as a condiment on anything from enchiladas to eggs. In this recipe, I roast the ingredients to help bring out some flavor because green tomatoes don't taste like much on their own. I also use a mix of jalapenos and poblanos for spice and earthiness. You can use all jalapenos if you like a spicier salsa or use all poblanos if you don't.

This roasted salsa verde is a thicker, more common style of salsa and not that much like the salsa verde you might know from restaurants. But if that's what you're looking for, all you have to do is keep pulsing it in the food processor and add water until it's thinned out a bit.

Easy Chile Relleno Casserole

plate of poblano casserole with salsa

Inspired by the classic Mexican dish, this Easy Poblano Chile Relleno Casserole bakes poblano peppers, cheese, and sausage into an eggy filling. It's a comforting dish for everything from brunch to dinner.

serving dish of chile relleno casserole with plate and salsa

Poblanos are one of my favorite peppers to grow in the garden. They offer more flavor than bell peppers yet are nearly as mild. Poblanos are rich and earthy with a touch of smokiness. And they're the traditional pepper used to make chile rellenos, which inspired this casserole recipe.

This is not the traditional dish. Chile rellenos (stuffed chiles) are made by roasting or charring poblanos, bringing out the peppers' flavor and making them easy to peel. After peeling, the softened peppers are stuffed with cheese, coated in a batter, and deep-fried until the outside is golden and the inside is nice and melty. Here's an interesting overview of the recipe's history, and while I haven't tried it, this recipe looks worth making if you want to experience an authentic dish.

✨Why you'll love this recipe

  1. This chile relleno casserole is baked, not fried, like the traditional dish, which means there's less hassle and mess than deep-frying. I wanted to make the dish easier and more practical for everyday home cooking.
  2. With eggs, cheese, peppers, and sausage, this casserole makes a good meal for any occasion - brunch, lunch, or dinner. It would also be a good item to take on a picnic.
  3. Have a bunch of poblano peppers to use? This recipe requires eight peppers, which is helpful for gardeners looking to cook through their harvest.

Looking for more pepper recipes? You can use them in my Ground Chicken Sloppy Joes, Roasted Salsa Verde, Oven Roasted Jalapenos, and add them to this Chili Sin Carne.

[feast_advanced_jump_to]

🫑Ingredients

Here's everything you need to make this chile relleno casserole.

poblano peppers, cheese, eggs, sausage, and other ingredients for the chile relleno casserole

Key Ingredients

  • Poblano peppers are good for stuffing and roasting because they're thick-skinned like bell peppers. They have an earthy and slightly smoky flavor and can come in shades of purple, black, green, and brown, as they grow and ripen. Poblanos originated from the state of Puebla, the fourth largest city in Mexico. There, they're used both fresh and dried and are one of the country's most popular peppers. (Note: If you're wondering why the ones in my photo look different, it's because they're frozen and have some ice coating them.)
  • Ground sausage will stuff the peppers, along with cheese. Use whatever variety of sausage you enjoy best.
  • Cheddar cheese is in the stuffed peppers and on top of the casserole. Cheddar melts nicely, though it's not the only cheese that would work well here. Opt for a block of cheddar and grate it yourself.
  • Cream cheese will keep the filling creamy and gooey.
  • Eggs, along with milk, are used to make the batter in which the peppers rest. The result is similar in texture to a frittata.
  • Cornmeal and flour will add substance and texture to the egg batter that makes up the casserole.

See the recipe card below for the full list of ingredients and quantities.

🔥Substitutions & Variations

  • Have time? Roast your poblanos. Turn the broiler to high and place whole poblano peppers on a baking sheet as closely under the broiler as you can. Allow the skins to char for 2-3 minutes per side. Rotate and repeat so that all of the skin is blackened. Place the peppers in a large bowl and cover with plastic wrap to steam. Peel as much skin off of the steamed peppers as you can. Proceed with the recipe as written.
  • Make it vegetarian. Leave out the sausage. You could include more cheese or use browned and crumbled tempeh.
  • Try other cheeses. Such as Queso Fresco, Monterey Jack, and Cojita. Or use a combination of cheeses.

🔪Instructions

Here's how to make this poblano chile casserole.

sausage, cream cheese, and cheddar cheese in bowls
  1. Step 1: Combine the sausage, cream cheese, and half of the cheddar in a bowl. Stir to mix well.
cornmeal and flour in bowl with whisk and other ingredients
  1. Step 2: In another bowl, make the batter. Combine the flour, cornmeal, salt, and baking powder.
milk being poured into the batter mixture
  1. Step 3: Whisk in the milk.
eggs being whisked into the batter
  1. Step 4: Whisk in the eggs one at a time until the batter is smooth.
poblanos in a pan
  1. Step 5: Cut the poblanos in half, and remove the stems and seeds. Line the bottom of a greased baking dish with half the pepper pieces.
meat mixture spread on top of peppers
  1. Step 6: Top the peppers with the sausage and cheese filling.
tops of poblanos added to the pan
  1. Step 7: Cover with the remaining pepper halves.
batter being poured over the poblano peppers
  1. Step 8: Pour the batter over the top of the peppers. Tap the pan lightly on the counter to settle the batter around the peppers.
cheddar being sprinkled over the chile relleno casserole
  1. Step 9: Sprinkle over the remaining cheddar.
baked chile relleno casserole
  1. Step 10: Bake on a rack in the top third of the oven at 375 F for 40-45 minutes. The batter should be firm to the touch. Pop under the broiler briefly to brown the top, if desired.

🌡️Top Tip

Avoid overbaking the casserole, which will cause it to dry out. Check for doneness starting at 40 minutes in the oven. The center should be just set. If it's not browned to your liking, put it under the broiler for a minute or two rather than continuing to bake.

🥡Storage

Leftover chile relleno casserole can be stored, tightly covered, in the fridge for up to four days. Individual portions can be reheated in the microwave for about 2 minutes or in the oven at 350 F for 10-15 minutes.

Alternatively, free leftovers in individual portions for 2-3 months. Defrost in the fridge and reheat as described above.

💭FAQ

Do you have to peel poblano peppers before cooking?

If you're roasting poblanos, peeling off the skin is a good idea. However, in this recipe, since they will be baked in a casserole with liquid, it is not necessary.

How to reheat chili relleno casserole?

Reheat the casserole in the oven at 350 degrees for 10-15 minutes or until hot. But if you're in a hurry, you can microwave individual portions for about 2 minutes.

Are poblano peppers hot?

On the Scoville scale that measures peppers' heat, poblanos range from 1,000 to 1,500, compared to jalapenos, which range from 2,500 to 8,000. To give some more context, bell peppers are a 0 on that scale, while the hottest pepper, the Carolina Reaper, is between 1,000,000 and 2,000,000. In other words, poblanos hardly register for their level of heat.

🍅Pairing

Here are a few other recipes that would go well with this casserole:

  • plate of salad with beets and sweet potatoes
    Sweet Potato and Beet Salad
  • Roasted Salsa Verde
  • a plate of colorful roasted leeks and potatoes
    Roasted Potatoes and Leeks
  • roasted brussels sprouts in a dish
    Honey Sriracha Brussels Sprouts

🍠Related Recipes

Looking for other recipes like this? Try these:

  • three stuffed zucchini halves on a cutting board
    Rice Stuffed Zucchini
  • baked sweet potatoes with quinoa and black beans
    Quinoa Sweet Potatoes
  • a plate of cabbage rolls sliced open with sauce
    Polish Golumpki Recipe (Stuffed Cabbage Rolls)
  • large serving dish of zucchini mushroom pasta
    Zucchini Mushroom Pasta

Remy’s Ratatouille with Tomato Cream Sauce

a large pan of cooked ratatouille

This recipe for Remy's Ratatouille is inspired by the film Ratatouille and puts a modern twist on the traditional French vegetable stew. In this version, thin slices of zucchini, eggplant, summer squash, and tomato are layered over a tomato cream sauce and baked until melt-in-your-mouth tender.

a large pan full of sliced roasted vegetables

When I eat this ratatouille vegetable stew, I reflect on the warm summer days I spent growing vegetables in my garden. Maybe that makes me a bit like Ego, the food critic in Ratatouille, the 2007 Pixar film that tells a story about how anyone including the rat, Remy, can cook.

When Ego takes a bite of Remy's ratatouille, he's immediately transported to the happy days of his childhood and his mother's cooking.

If you haven't seen Ratatouille, it's one of my favorite movies. The visual detail of the food is impressive, and the story is thoughtful and amusing. You should probably make a pan of my traditional ratatouille to enjoy while you watch.

Ratatouille can be as simple or as refined as you like. You can chop everything and simmer it on the stove for a rustic vegetable stew, or, like in my recipe here, thinly slice the vegetables and layer them over a tomato sauce for a more elegant baked version.

Update note/short rant: I've been told this isn't "traditional ratatouille." Frankly, I don't care. It's delicious. Words like "traditional" don't mean much, anyway. Traditional for whom? What if my family made the dish like this for years? It would be traditional to me.

😍 Why You'll Love This Ratatouille Recipe

  1. This ratatouille dish incorporates several summer vegetables, including tomatoes, eggplant, zucchini, and yellow squash. It's a great way to use up a bunch of vegetables and feel good about cooking seasonally and healthily.
  2. It tastes like summer in every bite. Summer vegetables are the star of the show.
  3. While a simple dish, it somehow feels both sophisticated and comforting. It'll make you slow down and appreciate the simple things in life, even zucchini.
[feast_advanced_jump_to]

🍅 Ingredients in ratatouille

Here's what you need to make a ratatouille dish just like Remy the rat.

ingredients for making ratatouille dish on wooden counter

Key Ingredients

  • Zucchini, summer squash, and eggplant: Look for these fresh vegetables when they're in season in your area and aim to have them be all about the same width for the best presentation. One small-medium sized vegetable of each should be enough for this recipe. If you can't find similar sized vegetables, you can always cut the slices in half.
  • Tomatoes (fresh and crushed): Fresh sliced tomatoes are part of the stew and are arranged with the other vegetables. Crushed tomatoes make up the sauce on the bottom of the pan. Canned tomatoes are fine, unless you have extra fresh tomatoes to use and want to crush them yourself.
  • Onion and garlic: Aromatic flavorings for the ratatouille sauce on the bottom of the pan.
  • Parmesan cheese: I like to sprinkle grated Parmesan over the top of the ratatouille in the final minutes of cooking in the oven for a lightly
  • Thyme: I like to use a bit of fresh thyme to add mild earthiness to the dish. You could try some chopped fresh oregano instead (or in addition to the thyme) or top it off with chopped parlsey or basil after cooking.
  • Milk: Whisked into the roux to make a simple bechamel sauce. Use whatever milk you prefer. For a richer sauce, try cream or half and half.

Check out the recipe card below for the complete list of ingredients and quantities.

🥔 Substitutions & Variations

  • Larger dish: You can make this in a larger dish to fit more vegetable slices. Arrange them in any pattern (not just in a spiral) as you like.
  • Vary the veg: You can customize this ratatouille any way you like. Don't like or don't have one of the vegetables? Leave it out.
  • Ratatouille with potatoes: Add thinly sliced, peeled potatoes to the rotation with the other vegetables. You can use less of the others or a large pan to incorporate more.
  • Ratatouille with meat: Sauté ground beef or sausage in a bit of oil in the pan. When cooked, drain off any excess fat and proceed with the recipe as written.

🔪 Instructions

Here's how to make my take on traditional ratatouille:

crushed tomatoes spread across a pan with a spoon
  1. Step 1: Spread the crushed tomatoes across the bottom of your pan. Preheat to oven to 375 degrees F.
onion and garlic being added to the pan
  1. Step 2: Chop onion, garlic, and thyme. Spread these over the tomatoes in the pan, saving about half of the thyme to go on top.
flour and butter cooking in a small pan
  1. Step 3: Melt the butter in a small saucepan. Stir in the flour and cook over low heat for a couple of minutes until golden and fragrant.
milk being whisked into flour in a pan
  1. Step 4: Whisk in the milk and continue to cook for 3-4 minutes or until thickened.
bechamel sauce being stirred into tomatoes
  1. Step 5: Stir the bechamel sauce into the tomatoes and onions in the pan. Add salt.
thinly sliced vegetables on a cutting board
  1. Step 6: Thinly slice the eggplant, tomato, yellow squash, and zucchini to about ⅛ of an inch.
slices of vegetables being held over a pan
  1. Step 7: Grab a slice of each vegetable in your hand, then place them on the outer edge of the pan.
a ring of sliced vegetables in ratatouille sauce
  1. Step 8: Continue to add repeating slices of vegetables around the pan, adjusting and adding in more vegetables as needed.
olive oil bring poured over a pan of ratatouille
  1. Step 9: After filling the pan with vegetables, drizzle with olive oil and sprinkle with more salt and remaning thyme.
pan covered with parchment
  1. Step 10: Place a piece of parchment paper over the pan of ratatouille, tucking in the edges as much as possible. Bake for 50 or so minutes, then remove the parchment, top with the grated Parmesan, and cook for 5-10 more minutes until golden and bubbly.

✨ Top Tips

  • When layering the vegetable slices in the pan, I like to layer several pieces together in my hand and then place them into the dish together. (See step 7 above.) Then repeat with the next sequence of vegetable slices, creating a circular pattern (if using a round pan or rows if using a square or rectangle) and adjusting as I go to keep things neat.
  • Don't skip the parchment. It helps to trap some of the steam and cook the vegetables without drying them out.
  • Leftover vegetables? Toss them together in a small baking dish and bake along with the arranged ratatouille. Serve them as needed or save for another meal.

🍆 confit byaldi Method

Thomas Keller of The French Laundry popularized this method for ratatouille in one of his cookbooks in the 1990s. It turns out that Keller served as a food consultant for the Ratatouille film and that is how the dish is prepared by Remy. Although it's an animated movie, you can tell that they still wanted to pay close attention to detail for the food. That's one of the many reasons why I love it.

🍳 Equipment

Mandolin: An optional tool that will help achieve perfectly thin and consistent slices of vegetables. However, a sharp knife and careful slicing will do the job just fine.

🥡 Storage

Leftover ratatouille may be stored in an airtight container in the fridge for up to four days. I don't reccomend freezing leftovers, as the vegetables will lose their texture and turn mushy upon reheating.

🥡 What to serve with ratatouille

Pasta: A fitting and easy choice, as the tomato sauce and vegetables will coat the noodles and create a filling vegetable and pasta meal.
Rice or couscous: For a lighter choice, go for a grain like rice or small pasta like couscous.
Polenta: My favorite way to serve ratatouille is over a small mound of creamy polenta with cheese and butter. The tomatoes and vegetables cut the richness of the polenta and offer a balanced, yet still filling, dish. Here's a basic polenta recipe. (I'd reduce the salt in half and use Parmesan instead of cheddar.)
On toasted bread: For a lighter meal or even as an appetizer format, serve the ratatouille over slices of Italian or sourdough bread.

🙋🏻‍♀️ FAQ

What is ratatouille?

Ratatouille is a French vegetable stew that typically includes zucchini, eggplant, tomatoes, and sometimes bell pepper. Vegetables may vary from recipe to recipe. It may be served as a side dish, appetizer, or as part of a main dish.

Do you need to peel the vegetables for ratatouille?

Because they're sliced so thinly, it's not necessary to peel the vegetables for this ratatouille recipe.

Is ratatouille eaten hot or cold?

That's up to personal preference. I prefer to serve ratatouille hot, but I can see it being good at room temperature as well. I've never tried it cold.

Can I add meat to ratatouille?

Sure! While this version is vegetarian, you can crumble ground sausage or beef into the sauce before topping with the vegetables before baking.

🥖 Pairing

Try pairing any of these recipes with Remy's ratatouille:

  • glasses of lavender lemonade with blueberries and lemon slices
    Blueberry Lavender Lemonade
  • rosemary parmesan bread sliced on a cutting board
    Rosemary Parmesan Bread
  • watermelon basil vodka cocktail in a martini glass with basil and watermelon garnish
    Watermelon Basil Cocktail
  • glasses of elderberry cordial
    Elderberry Cordial Recipe

🍅 Related Recipes

  • three stuffed peppers with cheese
    Stuffed Peppers with Tomato Sauce
  • a plate of spaghetti squash topped with a meat sauce, cheese, and basil
    Grilled Spaghetti Squash with Meat Sauce
  • Zucchini Curry
  • plate of poblano casserole with salsa
    Easy Chile Relleno Casserole

Cast Iron Peach Cobbler

peach cobbler in a cast iron pan with two plates and sliced peaches

A quick cast iron peach cobbler that bakes directly in a skillet. With just one bowl and one pan, it's an easy dessert full of fresh, ripe summer fruit and hints of spice and notes of caramel.

pan and plates with peach cobbler with peaches on side

When it comes to baked fruit dishes, you have options. There are crisps, crumbles, bettys, buckles, and cobblers, to name just a few. Who knew there were so many?

What they all have in common is that they're unfussy desserts that are easy to throw together. And in my case, it's usually at the last minute, too. They're quick enough to prep and they can bake up in less time than it takes to eat dinner.

They're excellent desserts to bake after picking fresh fruits at a farm or orchard and you want to immediately use up the ripest of the bunch. And yet, they also work great with frozen fruit as well.

[feast_advanced_jump_to]

🥧What is a cobbler?

I've simplified my previous peach cobbler recipe to be more in line with the true meaning of a cobbler - something that is cobbled together.

Cobblers emerged from resourceful early American colonists who, lacking traditional pie ingredients, resourcefully assembled fruit and dough in baking dishes - or perhaps cast iron skillets - as a kind of makeshift dessert. The biscuit dough quickly bakes over the fruit until golden brown while the fruit softens and releases its juices.

I already had a reliable biscuit recipe, adapted from Alton Brown, and that's the most important part of a good cobbler. In this version, I use a little more liquid for a softer dough and don't bother to shape it into biscuits. Instead, the dough is simply scooped the dough over the fruit.

It's not meant to be pretty or perfect. But it's easy and tasty, and that's all that matters. You can't mess it up, because the beauty is in its imperfection.

For more imperfectly delicious recipes, after you make this one, try my Apple and Cherry Crumble, Plum Fool, or New England Cornmeal Pudding.

🍑Ingredients

Here's what you'll need for this peach cobbler skillet recipe:

ingredients laid out on a table for the peach cobbler

Ingredient Notes:

  • Peaches - Look for ripe, but not too soft peaches. There's no need to peel them. Frozen sliced peaches will also work in this cobbler.
  • Milk - Any variety will work fine for the dough.
  • Sour cream - Or Greek yogurt, helps make the dough more flavorful and tender.
  • Brown sugar - Either dark or light brown sugar is fine.
  • Brandy - An optional addition. The oaky sweetness pairs well with the peaches, vanilla, and spices.

See the recipe card below for a full list of ingredients and measurements.

🍳Substitutions and Variations

  • Biscuit version - A bit more work, but if you like traditional biscuits, it's worth it. Reduce the milk by 2 tablespoons and shape the dough into a solid mass on a lightly floured counter. Handle the dough as little as possible to keep tender. Cut out circular biscuits and arrange on top of the cast iron pan before baking.
  • Other fruits - Try this recipe with apples, plums, nectarines, or a combo of fruits.
  • Without a cast iron skillet - Feel free to use another oven-safe pan or transfer the peaches after cooking on the stovetop to a baking dish.

🔪Instructions

ingredients for bowls for making biscuit dough topping

Preheat the oven to 375 F. Whisk together the dry ingredients for the biscuit topping.

mixing the biscuit topping in a bowl

Add the sour cream, milk, and butter and stir to combine into a loose dough.

peaches being sliced on a cutting board with a knife

Slice the peaches. Remove the pits, but don't bother to peel the fruit.

peaches and brown sugar in a bowl with a spoon

Toss the peaches with brown sugar, spices, vanilla, brandy, and lemon juice.

peaches with sugar cooking in a cast iron skillet

Cook on top of the stove over medium-low heat for about 5 minutes.

biscuit topping being spooned over the peach cobbler in cast iron skillet

Spoon the biscuit topping over the peaches in the skillet.

biscuit topping over the top of peach cobbler

Place the cast iron skillet on a baking sheet and bake for 25-30 minutes.

peach cobbler baked in pan

Remove from the oven when golden and the topping is cooked through. Serve warm with ice cream or whipped cream.

💡Top Tips

  • Make sure your butter, sour cream, and milk are as cold as possible, as this will help keep the butter solid and create a better textured biscuit topping.
  • If your fruit is already ripe and juicy or you're short on time, you can skip the step of pre-cooking the fruit on the stove. Instead, mix everything together in the cast iron skillet before topping it with the biscuit dough.

🙋FAQ

Is it better to peel peaches for cobbler?

There's no need to peel your peaches for a cobbler, so save yourself the trouble.

Is it OK to leave peach cobbler out overnight?

Personally, I would store the cobbler in the fridge. In my house, summer temps are usually too warm to keep food sitting out overnight. Also, I don't want to attract flies or ants. You can pop the whole pan in the fridge and when ready to eat, throw in the oven for a few minutes first.

How ripe should peaches be for cobbler?

Aim to use peaches that are ripe, but not overly soft. Peaches that are too ripe may easily overcook and become mushy. You want them to retain their structure while baking.

Do you need to grease cast iron before baking?

In this recipe, the fruit portion of the cobbler is what is touching the bottom of the cast iron pan and so it's not necessary to grease before cooking. But if you were making a cake and wanted the slices to come out nicely from the pan, then yes, I would be sure to grease your cast iron first.

Swiss Chard Gnudi

If you like gnocchi, you'll love these Swiss chard gnudi. Made with ricotta cheese and Swiss chard, this fresh, indulgent pasta melts in your mouth.

swiss chard gnudi on plate

You probably know gnocchi, the Italian dumpling made with potatoes, but what about gnudi? Translated to English, the word "gnudi" means exactly what it sounds like: "nude." It gets its name because this Tuscan take on gnocchi is similar to the filling of a ravioli. If you strip off the pasta, take the filling, add some flour, greens, and seasonings, you essentially have gnudi.

The difference between gnudi and gnocchi

Much like gnocchi, gnudi is a soft pasta-like dumpling that practically melts in your mouth. The big difference is that the main ingredient of gnocchi is potato, while with gnudi, it's ricotta cheese. Naturally, the lack of potato makes gnudi softer and more delicate.

Currently, I have an abundance of Swiss chard in my garden, so I added some to the gnudi dough. You can also try other greens, such as spinach or arugula. While I was at it, I added some mint and lemon zest to add a touch of freshness.

The dish is light (at least in terms of texture and density, if not calories) because it is served in a simple brown butter sauce. It's then mixed with fresh oregano leaves and lemon juice. It is quite filling, especially when paired with a side of bread and salad, or perhaps some quickly sautéed vegetables, such as peas or zucchini.

For another tasty Swiss chard recipe, try my Kale and Swiss Chard Galette.

hiding greens in gnudi

My nephew and sister joined us to try these gnudi recently. Thanks to the chard, the gnudi were filled with flecks of green, my nephew's favorite color. That was the pitch my sister attempted to use to get him to try it.

But it wasn't until I brought a piece of gnudi to where he was hiding in the living room and told him it was a treat that he gave it a try. He then came back to the table and ate several more bites. No, I don't know anything about parenting; it's just the same tactic that works with my dog when I want his attention.

When it came time to share a bowl of strawberry rhubarb crisp for dessert, though, my nephew nearly spit it back into the bowl. I guess you can't win them all. But I can't blame him. I was not too fond of rhubarb as a kid, either.

Whether you call it Swiss chard gnudi or a treat, these little dumplings are a fun alternative to traditional pasta and are perfect for a summer dinner with family.

Rice Stuffed Zucchini

three stuffed zucchini halves on a cutting board

This rice stuffed zucchini recipe is a fresh, Mediterranean-inspired dinner made with herbed rice, tomato sauce, and a blend of Parmesan and feta cheese. It's easy, vegetarian, and perfect for a summer meal.

stuffed zucchini halves with herbs and rice

There are so many ways to cook zucchini, and many cultures see it as a must-have ingredient. You can find zucchini in all kinds of dishes, like the French summer veggie classic ratatouille, Mexican zucchini quesadillas, and even fried zucchini flowers that Italian grandmothers have cooked for generations.

Because zucchini grows so easily, it sparks creative ideas in kitchens around the world. With that in mind, you can't get too annoyed if neighbors try unload a few on you every summer.

I like to look for ways to make vegetables, especially those we grow ourselves, the star of our meals and not just a side dish or hidden component. One of the best ways to make zucchini the highlight of a meal is to stuff it.

Stuffing vegetables is common practice in Middle Eastern and Mediterranean cooking. Eggplant, zucchini, tomatoes, peppers, onions, and potatoes are all fair game. Even leafy vegetables, such as cabbage, chard, and grape leaves, are prone to stuffing.

This is a straightforward vegetarian version of stuffed zucchini with rice, tomato sauce, herbs, and cheese.

😍 Why You'll Love This Stuffed Zucchini

  1. It makes a filling vegetarian meal.
  2. It proves zucchini doesn't have to be bland and boring.
  3. It's a perfect meal for summer.

Despite its versatility, I think zucchini can still have an unpopular reputation. But it's all in how you cook it, of course. Try this stuffed version, then check out my recipes for Zucchini Mushroom Pasta and Zucchini Curry.

[feast_advanced_jump_to]

🌾 Ingredients

Here's everything you need to make rice stuffed zucchini boats.

ingredients for making zucchini stuffed with rice

Key Ingredients

  • Zucchini: Two medium zucchini (about 10-12 inches long) yield four stuffed halves - enough for four main dish servings.. If you have larger or smaller zucchini, you can certainly use them; you'll want to divide up the filling evenly or save any extra filling for another use.
  • Rice: This recipe is a good use for leftover, precooked rice. You could even use leftover takeout rice, if you have it, or a packet of store-bought precooked rice to save time. Long‑grain white or basmati rice gives a fluffier texture; brown rice adds nuttiness.
  • Parsley and basil: Fresh herbs are chopped and used as part of the topping and mixed into the filling.
  • Tomato sauce: Ties the filling together and makes it saucy. Jarred tomato sauce is fine, as is canned crushed tomatoes. You could even puree a couple of fresh tomatoes.
  • Feta and Parmesan cheese: I like to include both cheeses in the recipe, but you could use one or the other if you prefer.
  • Pepitas: Add crunch to the filling and topping. Sunflower seeds are a good alternative.
  • Onion, garlic, and bell pepper: Help to bulk up the filling with more vegetables and add aromatic flavors. The bell pepper is optional here and won't make or break the dish.
  • Lemon: The juice and zest are used in the topping, and they add a fresh zing along with the herbs to finish the dish.

Check out the recipe card below for the complete list of ingredients and quantities.

🌿 Substitutions & Variations

  • Make it vegan. Omit eggs and cheese, add ½ cup cooked lentils or chickpeas to the filling for extra substance.
  • Change the herbs. Add some chopped fresh oregano (or even a little dried) for more Italian flavors or include mint and cilantro for a more Mediterranean take.
  • With yellow squash. Swap zucchini for yellow squash for an equally delicious dish.
  • With ground beef. If you'd like to add meat, cook ½ pound of ground beef and stir it into the rice mixture before stuffing

🔪 Instructions

How to make stuffed courgettes with rice.

zucchini sliced in half on cutting board
  1. Step 1: Halve the zucchini.
zucchini being scooped out
  1. Step 2: Scoop out most of the zucchini flesh, leaving enough to maintain a firm shell for stuffing.
zucchini flesh being squeezed over a bowl of liquid
  1. Step 3: Put the scooped out zucchini into a clean kitchen towel and squeeze out most of the liquid.
ingredients being chopped on a cutting board
  1. Step 4: Chop the onion, bell pepper, garlic, and herbs. Zest and juice the lemon.
onions and peppers sauteeing in pan
  1. Step 5: Saute the onion, pepper, and garlic in a pan with the oil until softened, about 5-8 minutes.
rice, zucchini, and other ingredients being combined in a bowl
  1. Step 6: In a large bowl, combine the zucchini flesh with the rice, sautéed vegetables, tomato sauce, eggs, salt, pepper, and feta.
herbs and pepitas being mixed in a bowl
  1. Step 7: In a second bowl, toss the pepitas with the chopped herbs, lemon juice and zest, and remaining oil. Mix half of this into the zucchini filling.
rice filling being scooped into zucchini
  1. Step 8: Fill the scooped out zucchini with the filling. Save any extra filling for another use. Bake for about 25 minutes or until zucchini is easily sliced with a knife.
stuffed zucchini being sprinkled with parmesan cheese
  1. Step 9: Top the zucchini with the Parmesan and place under the broiler for about 2-3 minutes until browned.
herbs and seeds being spread over zucchini
  1. Step 10: Spoon over the remaining pepita and herb mixture over the rice stuffed zucchini and serve.

✨ Top Tips

  • Try to use medium zucchini (about 10-12 inches long) for this recipe and avoid the super large ones, which will take longer to cook and don't always taste as good.
  • You can make the filling up to a day ahead and store it in the fridge until ready.
  • If there is leftover filling, reheat and serve on the side or save for another use.

🥡 Storage

Fridge: Store cooked zucchini in an airtight container or tightly wrapped in the refrigerator for up to four days. Reheat in the microwave or oven.
Freezer: Cooked stuffed zucchini freezes well. Cool completely, wrap tightly, pop into a freezer bag, and freeze up to 2 months. Reheat in the oven until warmed through.

🙋🏻‍♂️ FAQ

Do you cook zucchini before stuffing?

No, you don't need to cook zucchini before stuffing. The zucchini should become tender in the amount of time it takes for the filling to cook in the oven.

How to get moisture out of zucchini before cooking?

You can get some of the moisture out of zucchini before cooking by squeezing the zucchini flesh in a kitchen towel and wringing it so that the liquid is removed.

How to drain zucchini without cheesecloth?

You can drain water from zucchini by placing it in a clean kitchen towel and squeezing instead of using cheesecloth.

What's the best way to avoid soggy zucchini?

Drain the scooped flesh in a towel, try not to overbake the zucchini, and crisp it under the broiler before serving.

🍸 Pairing

Try serving these recipes with these rice stuffed zucchini:

  • watermelon basil vodka cocktail in a martini glass with basil and watermelon garnish
    Watermelon Basil Cocktail
  • two napa cabbage halves with sesame seeds
    Roasted Napa Cabbage
  • a glass with a foamy pink cocktail topped with cherries and limes
    Cherry Whiskey Sour
  • cheese scones on plate with chives
    Easy Cheese and Chive Scones

🫑 Related Recipes

Looking for more recipes like this one? Try these next:

  • three stuffed peppers with cheese
    Stuffed Peppers with Tomato Sauce
  • plate of poblano casserole with salsa
    Easy Chile Relleno Casserole
  • chicken sloppy joes with pickles
    Ground Chicken Sloppy Joes
  • a plate of cabbage rolls sliced open with sauce
    Polish Golumpki Recipe (Stuffed Cabbage Rolls)

Sour Cherry Blackcurrant Granita

fruit granita in bowls

Granita is the Sicilian variation of Italian ice and this recipe makes for a pucker-inducing blackcurrant and cherry dessert that's easy to customize with other fruits.

two bowls of granita with sherries and blackcurrants

Sicily was one of the stops on the Mediterranean cruise planned for our upcoming honeymoon. At this point, there is no chance we're going to make it there this fall, and honestly, who knows when we will. Yet Sicily is a destination I am eager to visit.

As the largest island in the Mediterranean, Sicily is home to castles, cathedrals, ancient walls and mosaics, not to mention mountains and one of the world's most active volcanoes: Mount Etna. There's so much to explore and experience that a cruise stop would only serve a small taste of what the island has to offer.

The food of Sicily

Sicily is located halfway between Greece and North Africa. Because of this, its food culture is a reflection of the varied trade routes on which the island lies as well as its many past occupants. Although today Sicily makes up one of Italy's twenty regions, the cuisine is not just Italian. It's also influenced by Greek, Arab, Norman, Spanish and French cultures.

The island is well-suited to sustain such a diverse range of foods. The activity of its volcanoes creates fertile soil that's ideal for growing some of their most popular crops. You'll find citrus fruits, tomatoes, olives, almonds, pistachios, and grapes, among several others. Sicily is also one of the largest wine-producing regions in all of Italy. Of course, the mild climate and Mediterranean sea rich with tuna, sardines, and anchovies, helps ensure there is no shortage of fresh seafood.

With so much food diversity, it's impossible to pick a recipe that reflects all that Sicily has to offer. But I looked to the blackcurrants about to burst on the bush in my yard and the juicy sour cherries I picked from Champlain Orchards. I knew I had to incorporate fruit in this week's recipe. Considering the heat, something cold sounded good too.

What's granita?

The closest thing to granita in America is Italian ice. Essentially, granita is a type of fresh Italian ice that originated in Sicily. The difference is that granita has a bit more crunch and flakiness to its texture. Italian ice and sorbet are smoother, creamier, and more compact. These are small differences, really. At the end of the day, granita is made up of similar ingredients: fruit, water, sugar, and flavoring. The texture may vary throughout Sicily depending on how it's made. But at home, you can achieve the flakiness of granita by scraping the liquid mixture with a fork as it freezes.

Make granita with any fruit

I love all things sour, hence my supply of blackcurrants and sour cherries. Combined, along with some lime juice, it's quite the pucker inducer. I like to balance this out by topping a dish of this granita with plenty of sweetened whipped cream and then lightly stirring the two together.

Though if sour is not your thing, it's easy to customize the flavor of granita and use other fruits. Blackberry, strawberry, sweet cherry, raspberry, blueberry, and watermelon granita all sound good to me, especially if they're fruits you've picked or grown yourself. You can certainly combine flavors too, just stick to about a pound and a half of fruit total. Instead of the lime juice, you can use any other citrus juices or even some wine. As for the amount of maple syrup you use, that depends on how sweet you like things. I always start with less and add more as needed.

Once the granita is completely frozen, it stores well for up to a couple of weeks, or longer, in the freezer. Just scrape it again before serving to achieve that perfect texture.

Looking for more cherry recipes? Check out my cherry rhubarb pie, cherry limoncello biscotti, and cherry apple crumble.

If you'd rather make ice cream, try my Blackcurrant Ice Cream recipe.

Homemade Fig Bars Recipe

three fig bars with crumbs and figs

Recreate your childhood snacking memories with these homemade fig bars. With their fruity, seedy filling, these tender fig bars are flavored with cinnamon, orange zest, and honey and conveniently made with dried figs.

a small stack of fig bars with figs and jam

I hadn't had a Fig Newton for years, and when I finally bought a pack a few years ago as an adult, I was shocked at how bad it tasted. It certainly wasn't the Fig Newton I remembered from my school lunch bag.

[feast_advanced_jump_to]

I'm sure the recipe has changed since I was a kid. I mean, they don't even call them Fig Newtons anymore. Now they're just Newtons.

Yet the original fig bar recipe originated in the late 1800s from a cookie maker in Ohio. He sold the recipe to the Kennedy Biscuit Company in Cambridge, Massachusetts, which took advantage of the modern technology of 1891 to mass-produce the cookies.

The Kennedy Biscuit Company was known for naming its products after nearby towns, including Newton, Massachusetts, which is located about seven miles from Boston. Today, the company is known as Nabisco.

Unfortunately, you can't get fresh Newtons in Cambridge today, as the company's factories are now in New Jersey. But the original home of the Kennedy Biscuit Company is on the National Register of Historic Places.

Sadly, I would have to advise against buying Fig Newtons today. The cookie lacks the taste of fruit, the sweetness is overwhelming, and it tastes highly artificial. A glance at the ingredient list explains why. It's packed with sugars, preservatives, and oils. It appears that by removing most of the fruit from the recipe and omitting the name of the fruit from the package, the expectation of finding any fruit in the cookie has vanished altogether.

Luckily, we can recreate the magic of good old Fig Newtons right at home.

If you enjoy classic treats you can make yourself, you'll also want to check out my recipes for Triple Ginger Gingersnaps, Brownies with Cherry Pie Filling, Crunchy Honeycomb Candy, and Honey Coconut Chocolates.

🍯Ingredients

Here's everything you need to make your own homemade fig bars.

all of the ingredients needed for making the fig bars recipe

Key Ingredients

Dried figs - You may have expected these bars to be made with fresh figs. Yet fresh figs are not always easy to find throughout the year. Surprisingly, dried figs quickly soften and plump up when cooked in liquid, making them a great alternative. Better yet, they're cheap and easy to find in grocery stores no matter the season. Any variety will work for the bars.
Wheat flour - The combination of white and wheat flour contributes a hint of whole-grain flavor just like the original cookies.
Cinnamon - Although not a flavor in traditional fig bars, I like a hint of cinnamon in the cookie dough to add some sweet spice.
Honey - I like using some honey to make the fig jam filling. I think honey and figs are a delicious combination.
Orange zest - Helps to brighten up the fig filling.

See the recipe card below for the full list of ingredients and specific quantities.

🍒Substitutions and Variations

Adding other fruits - Try substituting up to ⅓ of the dried figs with another dried fruit, such as dried cranberries, raisins, blueberries, or cherries. This is a good way to add other fruit flavors to the fig bars.
Using fresh figs - While I have yet to try this myself, I don't see why it wouldn't work. Start by removing the stems from fresh, clean figs and giving them a rough chop, just as you would with the dried figs. Put them in the pan with the sugar and zest, as described, but reduce the water to just a splash to cover the bottom of the pan. Cook the figs until soft and blend. If the fig filling is watery and not thick, return the pan to the stove and continue to cook until you have a very thick and almost paste-like consistency. If it is at all watery, it will create a soggy, disappointing fig bar.
Wheat flour - If you'd rather use white flour and leave out the wheat flour, simply replace it with regular all-purpose flour. There won't be too much of a difference in taste.

🥄Instructions

dry ingredients being whisked together in a bowl

Whisk together the dry ingredients.

wet ingredients beaten in a mixing bowl

Using a mixer, beat the butter and brown sugar. Then, add the egg and milk.

flour being added to wet ingredients

Fold the dry ingredients into the wet.

two pieces of dough on a piece of parchment

Shape the dough into two rough rectangles and pop them in the fridge to firm up for 30 minutes.

figs on a cutting board being chopped

Meanwhile, remove the stems from the dried figs and give them a rough chop.

chopped figs in a pan with sugar and zest

Add the figs, sugar, and orange zest to a small pot with 1 cup of water. Simmer for 5-10 minutes until the figs are soft and the liquid has reduced.

spoonful of thick fig jam

Blend the figs until smooth in a blender or food processor. The result should be a very thick jam that is almost paste-like in consistency.

fig jam spread over dough

Spread the fig jam filling over the dough, leaving about a ½-inch border around the edges.

folding the fig bar dough over the jam

Fold each half of the dough inward and press the two edges together. Don't worry if there's a bit of tearing in the dough.

fig bars unbaked on a baking sheet

Use the parchment paper you rolled the dough out on to help you flip the bars onto a baking sheet lined with more parchment. Bake at 375 degrees for 15-20 minutes until golden brown and firm. Cool slightly before slicing.

📋Top Tip

The fig bar dough is soft and can tear easily, so putting it in the fridge before rolling it out is important. Handle it delicately, but if it cracks a little as you shape the bars, don't worry. You can press it back together if needed.

🍪Storage

Store these homemade fig bars in an airtight container at room temperature for up to four days. They would likely last beyond that, but as a soft cookie, they tend to lose their texture over time.

💬FAQs

Are dried figs good for baking?

Dried figs are an excellent baking ingredient. They quickly plump up and rehydrate when cooked or soaked in liquid, and they're incredibly versatile. They're also easier to find and more affordable than fresh figs.

How do you make homemade Fig Newtons with fresh figs?

If you want to try my fig bar recipe using fresh figs, start by removing the stems and giving them a rough chop, just as you would with the dried figs. Put them in the pan with the sugar and zest, as described, but reduce the water to just a splash to cover the bottom of the pan. Cook the figs until soft and blend. If the filling is watery and not thick, return the pan to the stove and continue to cook until you have a very thick and almost paste-like consistency.

Why are fig bars crunchy?

If you notice that slight crunch when biting into a fig bar, that's because of the many seeds found in figs. The seeds are still present in dried figs, and you'll get that same crunch with this recipe.

🥣Related

You may also like these recipes:

  • jars of date overnight oats
    Cinnamon Overnight Oats with Dates
  • Beetroot and Feta Tartlets
  • parsnip cake with oranges and pistachios
    Orange Parsnip Cake with Cream Cheese Frosting
  • cookies on a blue and green background
    Ginger Cookies With Fresh Ginger
  • « Previous Page
  • 1
  • 2
  • 3
  • 4
  • Next Page »
man eating pizza in italy

Hey, I'm Steve

Here you'll discover delicious recipes featuring fresh, whole foods inspired by my garden and local New England farms and producers.

About Me

Spring Eats

  • slices of rhubarb quick bread with butter
    Rhubarb Banana Bread
  • a stack of grilled cheese sandwiches with goat cheese
    Goat Cheese Grilled Cheese
  • strawberry homemade pop tarts on tray
    Strawberry Puff Pastry Pop Tarts
  • a plate of artichoke pasta
    Artichoke Pesto Pasta
  • jars of date overnight oats
    Cinnamon Overnight Oats with Dates
  • cheese scones on plate with chives
    Easy Cheese and Chive Scones
  • a large plate of bok choy, tofu, and radishes with dressing
    Bok Choy with Tofu Salad
  • a plate of chamomile cookies with flowers on side
    Chamomile Cookies
  • a glass of frozen matcha latte on a countertop with straw
    Frozen Matcha Latte
  • a bowl of soup with celery and leeks, and potatoes
    Creamy Celery Leek Soup with Croutons
  • salmon over peas and potatoes
    Salmon with Pea Purée
  • two plates of pasta with peas and mint pesto with a side of peas and drink glasses
    Pasta and Peas with Mint Pistachio Pesto

Footer

  • About
  • Recipe Index
  • Privacy Policy
  • ↑ back to top

Copyright © 2026 What Steve Eats